background image

4 ENGLISH

Power tool use and care

1. 

Do not force the power tool. Use the correct 

power tool for your application.

 The correct 

power tool will do the job better and safer at the 

rate for which it was designed.

2. 

Do not use the power tool if the switch does 

not turn it on and off.

 Any power tool that cannot 

be controlled with the switch is dangerous and 

must be repaired.

3. 

Disconnect the plug from the power source 

and/or remove the battery pack, if detachable, 

from the power tool before making any adjust-

ments, changing accessories, or storing power 

tools.

 Such preventive safety measures reduce 

the risk of starting the power tool accidentally.

4. 

Store idle power tools out of the reach of chil-

dren and do not allow persons unfamiliar with 

the power tool or these instructions to operate 

the power tool.

 Power tools are dangerous in the 

hands of untrained users.

5. 

Maintain power tools and accessories. Check 

for misalignment or binding of moving parts, 

breakage of parts and any other condition that 

may affect the power tool’s operation. If dam

-

aged, have the power tool repaired before use.


Many accidents are caused by poorly maintained 

power tools.

6. 

Keep cutting tools sharp and clean.

 Properly 

maintained cutting tools with sharp cutting edges 

are less likely to bind and are easier to control.

7. 

Use the power tool, accessories and tool bits 

etc. in accordance with these instructions, tak-

ing into account the working conditions and 

the work to be performed.

 Use of the power tool 

for operations different from those intended could 

result in a hazardous situation.

8. 

Keep handles and grasping surfaces dry, 

clean and free from oil and grease.

 Slippery 

handles and grasping surfaces do not allow for 

safe handling and control of the tool in unexpected 

situations.

9. 

When using the tool, do not wear cloth work 

gloves which may be entangled.

 The entangle-

ment of cloth work gloves in the moving parts may 

result in personal injury.

Battery tool use and care

1. 

Recharge only with the charger specified by 

the manufacturer.

 A charger that is suitable for 

one type of battery pack may create a risk of fire 

when used with another battery pack.

2. 

Use power tools only with specifically desig

-

nated battery packs.

 Use of any other battery 

packs may create a risk of injury and fire.

3. 

When battery pack is not in use, keep it away 

from other metal objects, like paper clips, 

coins, keys, nails, screws or other small metal 

objects, that can make a connection from one 

terminal to another.

 Shorting the battery termi-

nals together may cause burns or a fire.

4. 

Under abusive conditions, liquid may be 

ejected from the battery; avoid contact. If con-

tact accidentally occurs, flush with water. If 

liquid contacts eyes, additionally seek medical 

help.

 Liquid ejected from the battery may cause 

irritation or burns.

5. 

Do not use a battery pack or tool that is dam-

aged or modified.

 Damaged or modified batteries 

may exhibit unpredictable behaviour resulting in 

fire, explosion or risk of injury.

6. 

Do not expose a battery pack or tool to fire or 

excessive temperature.

 Exposure to fire or tem

-

perature above 130 °C may cause explosion.

7. 

Follow all charging instructions and do not 

charge the battery pack or tool outside the 

temperature range specified in the instruc

-

tions.

 Charging improperly or at temperatures 

outside the specified range may damage the 

battery and increase the risk of fire.

Service

1. 

Have your power tool serviced by a qualified 

repair person using only identical replacement 

parts.

 This will ensure that the safety of the power 

tool is maintained.

2. 

Never service damaged battery packs.

 Service 

of battery packs should only be performed by the 

manufacturer or authorized service providers.

3. 

Follow instruction for lubricating and chang-

ing accessories.

Important safety instructions for the tool

WARNING:


Read all safety warnings and 

all instructions.

 Failure to follow the warnings and 

instructions may result in electric shock, fire and/or 

serious injury.

Save all warnings and instruc-

tions for future reference.

Intended use

1. 

This tool is only intended for cutting grass, 

weeds, bushes and undergrowth. It should not 

be used for any other purpose such as edging 

or hedge cutting as this may cause injury.

General instructions

1. 

Never allow people unfamiliar with these 

instructions, people (including children) with 

reduced physical, sensory or mental capabil-

ities, or lack of experience and knowledge to 

use the tool. Children should be supervised to 

ensure that they do not play with the tool.

2. 

Before starting the tool, read this instruction 

manual to become familiar with the handling of 

the tool.

3. 

Do not lend the tool to a person with insuffi

-

cient experience or knowledge regarding han-

dling of brushcutters and string trimmers.

4. 

When lending the tool, always attach this 

instruction manual.

5. 

Handle the tool with the utmost care and 

attention.

6. 

Never use the tool after consuming alcohol or 

drugs, or if feeling tired or ill.

7. 

Never attempt to modify the tool.

8. 

Follow the regulations about handling of 

brushcutters and string trimmers in your 

country.

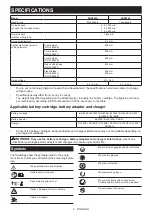
Summary of Contents for DUR369LPT2

Page 1: ...INSTRUCTION MANUAL Cordless Grass Trimmer DUR369A DUR369L ENGLISH Original instructions Read before use ...

Page 2: ...A Procedure 01 2014 are shown in the table Applicable battery cartridge battery adapter and charger Battery cartridge BL1820B BL1830 BL1830B BL1840 BL1840B BL1850 BL1850B BL1860B Battery adapter BAP182 BL36120A PDC01 Charger DC18RC DC18RD DC18RE DC18SD DC18SE DC18SF DC18SH Some of the battery cartridges battery adapters and chargers listed above may not be available depending on your region of res...

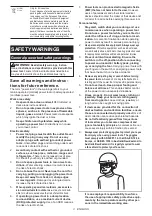
Page 3: ...n a damp location is unavoidable use a residual current device RCD protected supply Use of an RCD reduces the risk of electric shock 7 Power tools can produce electromagnetic fields EMF that are not harmful to the user However users of pacemakers and other similar medical devices should contact the maker of their device and or doctor for advice before operating this power tool Personal safety 1 St...

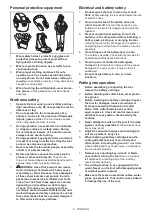
Page 4: ...n make a connection from one terminal to another Shorting the battery termi nals together may cause burns or a fire 4 Under abusive conditions liquid may be ejected from the battery avoid contact If con tact accidentally occurs flush with water If liquid contacts eyes additionally seek medical help Liquid ejected from the battery may cause irritation or burns 5 Do not use a battery pack or tool th...

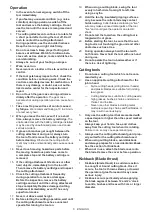
Page 5: ...battery safety 1 Do not expose the tool to rain or wet condi tions Water entering the tool will increase the risk of electric shock 2 Do not use the tool if the switch does not turn it on and off Any tool that cannot be con trolled with the switch is dangerous and must be repaired 3 Prevent unintentional starting Ensure the switch is in the off position before installing a battery pack picking up ...

Page 6: ... the cutting attachment stops completely Replace damaged cutting attachment immediately even if it has only superficial cracks 17 Never cut above waist height 18 Before starting the cutting operation wait until the cutting attachment reaches a constant speed after turning the tool on 19 When using a cutting blade swing the tool evenly in half circle from right to left like using a scythe 20 Hold t...

Page 7: ...rten the life of the tool and increase the risk of accidents 2 Before doing any maintenance or repair work or cleaning the tool always turn it off and remove the battery cartridge 3 Always wear protective gloves when handling the cutting blade 4 Always clean dust and dirt off the tool Never use gasoline benzine thinner alcohol or the like for the purpose Discoloration deformation or cracks of the ...

Page 8: ...ial requirement on pack aging and labeling must be observed For preparation of the item being shipped consult ing an expert for hazardous material is required Please also observe possibly more detailed national regulations Tape or mask off open contacts and pack up the battery in such a manner that it cannot move around in the packaging 11 When disposing the battery cartridge remove it from the to...

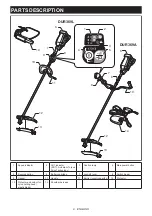
Page 9: ...ndicator 2 ADT indicator ADT Automatic Torque Drive Technology 3 Caution lamp 4 Main power button 5 Reverse button 6 Battery cartridge 7 Lock off lever 8 Switch trigger 9 Hanger 10 Handle 11 Barrier country specific 12 Protector 13 Protector extension for nylon cutting head plastic blade 14 Shoulder harness ...

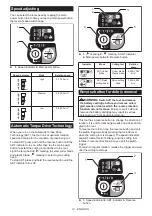
Page 10: ...ion system The tool is equipped with a tool battery protection system This system automatically cuts off power to the motor to extend tool and battery life The tool will automatically stop during operation if the tool is placed under one of the following conditions Caution lamp Status Color On Blinking Green Overload Red tool battery Overheat Red Over discharge Overload protection If the tool gets...

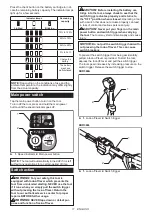
Page 11: ...itch trigger without pressing the lock off lever Return the tool to our authorized service center for proper repairs BEFORE further usage WARNING NEVER tape down or defeat pur pose and function of lock off lever CAUTION Before installing the battery car tridge into the tool always check to see that the switch trigger actuates properly and returns to the OFF position when released Operating a tool ...

Page 12: ...cator 4 Main power button 5 Reverse button Indicator Mode Cutting tool Rotation speed ADT Cutter blade Cutter blade Plastic blade 3 500 7 000 min 1 ADT Nylon cutting head Nylon cutting head 3 500 5 500 min 1 Reverse button for debris removal WARNING Switch off the tool and remove the battery cartridge before you remove entan gled weeds or debris which the reverse rotation function can not remove F...

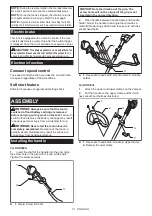
Page 13: ...is switched off and battery cartridge is removed before carrying out any work on the tool Failure to switch off and remove the battery cartridge may result in serious personal injury from accidental start up WARNING Never start the tool unless it is completely assembled Operation of the tool in a partially assembled state may result in serious per sonal injury from accidental start up Installing t...

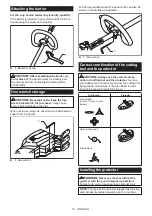
Page 14: ... 1 Hex wrench For the loop handle model the hex wrench can also be stored on the handle as illustrated 1 1 Hex wrench Correct combination of the cutting tool and the protector CAUTION Always use the correct combi nation of cutting tool and the protector A wrong combination may not protect you from the cutting tool flying debris and stones It can also affect the bal ance of the tool and result in a...

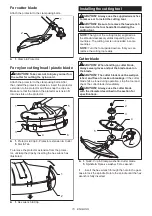
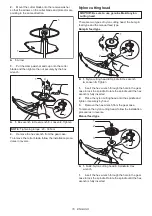
Page 15: ...l the cutting tool CAUTION Be sure to remove the hex wrench inserted into the tool head after installing the cutting tool NOTE The type of the cutting tool s supplied as the standard accessory varies depending on the countries The cutting tool is not included in some countries NOTE Turn the tool upside down so that you can replace the cutting tool easily Cutter blade CAUTION When handling a cutter...

Page 16: ...tting head There are two types of nylon cutting head the bump feed type and the manual feed type Bump feed type 4 5 3 1 2 1 Nylon cutting head 2 Spindle 3 Hex wrench 4 Loosen 5 Tighten 1 Insert the hex wrench through the hole in the gear case to lock the spindle Rotate the spindle until the hex wrench is fully inserted 2 Place the nylon cutting head onto the spindle and tighten it securely by hand...

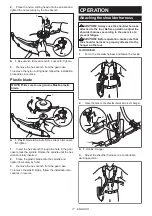
Page 17: ... wrench is fully inserted 2 Place the plastic blade onto the spindle and tighten it securely by hand 3 Remove the hex wrench from the gear case To remove the plastic blade follow the installation pro cedures in reverse OPERATION Attaching the shoulder harness CAUTION Always use the shoulder harness attached to the tool Before operation adjust the shoulder harness according to the user size to prev...

Page 18: ... Hook 2 Hanger 3 Adjust the shoulder harness to a comfortable working position The shoulder harness features a means of quick release Pull the strip as illustrated to release the tool from the shoulder harness 1 1 Strip Adjusting the hanger position For DUR369A only For more comfortable handling of the tool you can change the hanger position 1 Loosen the hex socket head bolt on the hanger and slid...

Page 19: ...ne area Also arrange a person to observe the distance between operators If someone or an animal enters the working area immediately stop the operation CAUTION If the cutting tool accidentally impacts a rock or hard object during operation stop the tool and inspect for any damage If the cutting tool is damaged replace it immediately Use of a damaged cutting tool may result in serious personal injur...

Page 20: ...oth or one dipped in soapy water and wrung out To avoid overheating of the tool be sure to remove the cut off grass or debris adhered to the vent of the tool Replacing the nylon cord WARNING Use only the nylon cord with diameter specified in this instruction manual Never use heavier line metal wire rope or the like Failure to do so may cause damage to the tool and result in serious personal injury...

Page 21: ...21 ENGLISH 95 M10L 3 m 80 mm 100 mm ...

Page 22: ...22 ENGLISH B F ECO 4L 3 m 80 mm 100 mm ...

Page 23: ...23 ENGLISH UN 74L UN 72L 4 5 m 100 mm ...

Page 24: ...feed it from the another eyelet 150 mm 1 mm 0 75 m x 2 Replacing the plastic blade Replace the plastic blade if it is worn out or broken When installing the plastic blade align the direction of the arrow on the blade with that of the protector 1 2 1 Arrow on the protector 2 Arrow on the blade ...

Page 25: ...n the guard and the cutting tool Remove the foreign object Cutting tool is loosely attached Tighten the cutting tool securely The drive system does not work correctly Ask your local authorized service center for repair Abnormal vibration stop the machine immediately Broken bent or worn cutting tool Replace the cutting tool Cutting tool is loosely attached Tighten the cutting tool securely The driv...

Page 26: ...26 ...

Page 27: ...27 ...

Page 28: ...Makita Corporation 3 11 8 Sumiyoshi cho Anjo Aichi 446 8502 Japan www makita com 885742A928 EN 20191004 ...

Reviews: