


13 ENGLISH
If the cleaner and the tool are linked successfully, the
wireless activation lamps will light up in green for 2
seconds and start blinking in blue.
NOTE:
The wireless activation lamps finish blinking
in green after 20 seconds elapsed. Press the wireless
activation button on the tool while the wireless acti-
vation lamp on the cleaner is blinking. If the wireless
activation lamp does not blink in green, push the wire-
less activation button briefly and hold it down again.
NOTE:
When performing two or more tool registration
for the cleaner, finish the tool registration one by one.
Starting the wireless activation
function
NOTE:
Finish the tool registration for the cleaner for
wireless activation.
NOTE:
Always place the cleaner so that you can see
the status of the wireless activation lamp.
NOTE:
Refer to the instruction manual of the tool, too.
After registering a tool to the cleaner, the cleaner will
automatically runs along with the switch operation of
the tool.
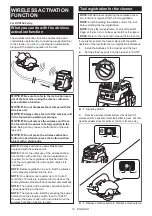
1.
Install the wireless unit to the tool.
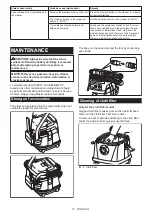
2.
Connect the hose of the cleaner with the tool.
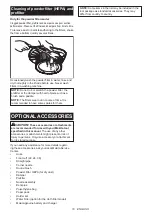
3.
Set the stand-by switch on the cleaner to "AUTO".
1
►
1.
Stand-by switch
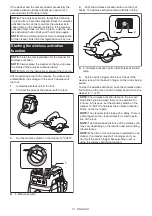
4.
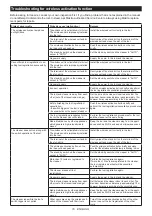
Push the wireless activation button on the tool
briefly. The wireless activation lamp will blink in blue.
2
1
►
1.
Wireless activation button
2.
Wireless activation
lamp
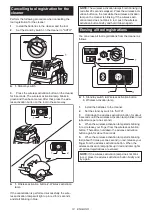
5.
Pull the switch trigger of the tool. Check if the
cleaner runs while the switch trigger on the tool is being
pulled.
To stop the wireless activation, push the wireless activa-
tion button on the tool, or set the stand-by switch on the
cleaner to "I" or "O".
NOTE:
The wireless activation lamp on the tool will
stop blinking in blue when there is no operation for
2 hours. In this case, set the stand-by switch on the
cleaner to "AUTO" and press the wireless activation
button on the tool again.
NOTE:
The cleaner starts/stops with a delay. There is
a time lag when the cleaner detects a switch opera-
tion of the tool.
NOTE:
The transmission distance of the wireless unit
may vary depending on the location and surrounding
circumstances.
NOTE:
When two or more tools are registered to one
cleaner, the cleaner may start running even if you
don't pull the switch trigger because other user is
using the wireless activation function.
Summary of Contents for DVC153L
Page 19: ...19 ...


