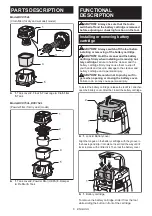
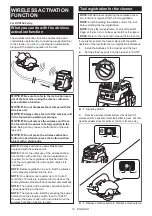
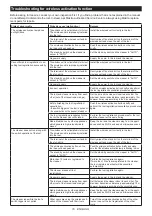
background image

9 ENGLISH

Carriage handle

When carrying the cleaner, carry it by holding the han-

dle on the head. The handle is retractable at the head 

when not in use.

ASSEMBLY

CAUTION:


Always be sure that the tool is 

switched off and the battery cartridge is removed 

before carrying out any work on the tool.

CAUTION:


Always wear dust mask during 

assembly or maintenance.

Installing the powder filter (HEPA) 

and prefilter (for dry dust)

Optional accessory for cloth filter model

CAUTION:


Never pick up water or other liq-

uids or wet dusts when using the powder filter.


Picking up such things may cause the powder filter 

breakage.

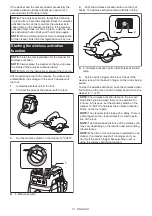
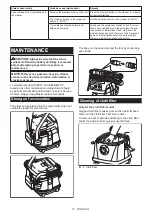
To use powder filter:
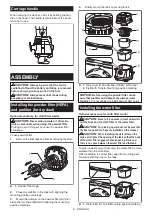
1.


Remove the float cage and float by removing the bolts.

2

1

►    

1.

 Float 

2.

 Float cage

2.

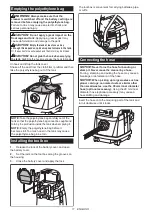
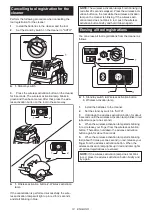
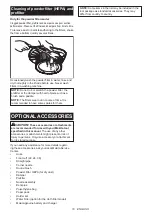
  Place the prefilter in the tank with aligning the 

mounting position markings.

3.

  Mount the damper on the powder filter and then 

place them in the prefilter with aligning the mounting 

position markings.

4.


Finally, mount the tank cover and lock it.

1

2

3

4

5

6

6

6

►    

1.

 Tank cover 

2.

 Powder filter (HEPA) 

3.

 Damper 

4.

 Prefilter 

5.

 Tank 

6.

 Mounting position marking

NOTICE:


Before using the powder filter, make 

sure that prefilter and damper are always used 

together.

 It is not allowed to install powder filter solely.

Installing the water filter

Optional accessory for cloth filter model

CAUTION:


Never pick up water or wet dust with-

out the float and the cloth filter or the water filter.

CAUTION:


For picking up wet dust, make sure that 

the float cage and the float are installed on the cleaner.

CAUTION:


When installing the water filter on the 

tank, set it tight at the opening of the tank so that the hook 

of the water filter engages the tank opening firmly and 

there is no space between the water filter and the tank.

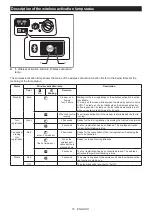
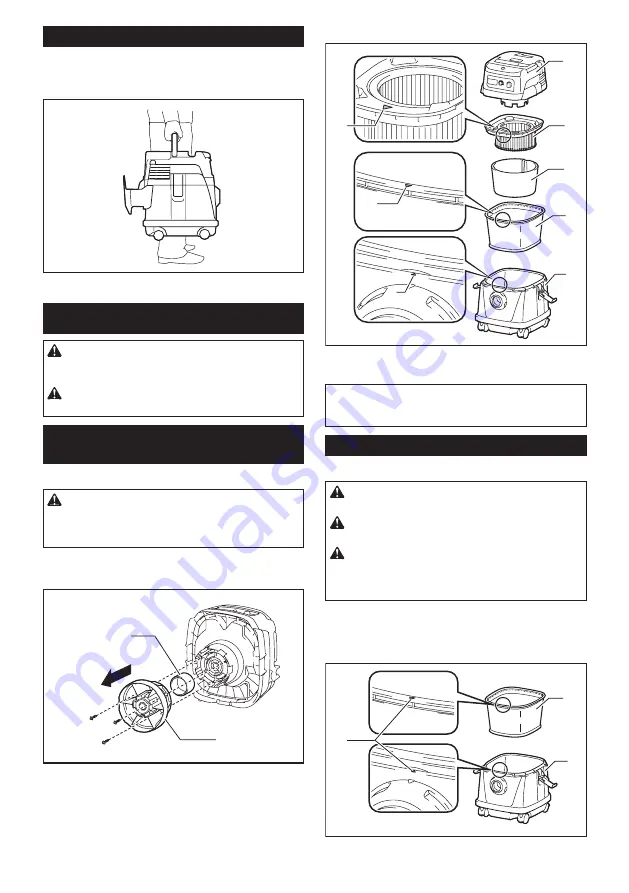
To pick up water or wet dust only, the water filter is more 

suitable than the cloth filter.

When installing the water filter, align its mounting posi

-

tion mark with the one on the tank.

3

1

2

►    

1.

 Water filter 

2.

 Tank 

3.

 Mounting position marking

Summary of Contents for DVC153L

Page 1: ...INSTRUCTION MANUAL Cordless Vacuum Cleaner DVC152L DVC153L DVC154L ENGLISH Original instructions Read before use ...

Page 2: ...opment the specifications herein are subject to change without notice Specifications and battery cartridge may differ from country to country The weight does not include accessories but battery cartridge s The lightest and heaviest combination weight of the appliance and battery cartridge s are shown in the table For wet dust the float and the water filter or cloth filter are required The Bluetoot...

Page 3: ... of exposure WARNING Wear ear protection WARNING The noise emission during actual use of the power tool can differ from the declared value s depending on the ways in which the tool is used especially what kind of workpiece is processed WARNING Be sure to identify safety mea sures to protect the operator that are based on an estimation of exposure in the actual conditions of use taking account of a...

Page 4: ...ll be dried before storage 22 Be kind to your cleaner Rough handling can cause breakage of even the most sturdily built cleaner 23 Do not attempt to clean the exterior or interior with benzine thinner or cleaning chemicals Cracks and discoloration may be caused 24 Do not use cleaner in an enclosed space where flammable explosive or toxic vapors are given off by oil base paint paint thinner gasolin...

Page 5: ...to drop or strike battery 9 Do not use a damaged battery 10 The contained lithium ion batteries are subject to the Dangerous Goods Legislation require ments For commercial transports e g by third parties forwarding agents special requirement on pack aging and labeling must be observed For preparation of the item being shipped consult ing an expert for hazardous material is required Please also obs...

Page 6: ...when installing or removing bat tery cartridge Failure to hold the cleaner and the battery cartridge firmly may cause them to slip off your hands and result in damage to the cleaner and battery cartridge and a personal injury CAUTION Be careful not to pinch your fin gers when opening or closing the battery cover Failure to do so may cause personal injury To install the battery cartridge release th...

Page 7: ...te the remaining battery capacity The indicator lamps light up for a few seconds Indicator lamps Remaining capacity Lighted Off Blinking 75 to 100 50 to 75 25 to 50 0 to 25 Charge the battery The battery may have malfunctioned NOTE Depending on the conditions of use and the ambient temperature the indication may differ slightly from the actual capacity Indicating the remaining battery capacity 1 2...

Page 8: ...r work need Suction power can be increased by turning the suc tion force adjusting knob from the symbol to the symbol NOTICE Always set the stand by switch to the O side when not using the cleaner for long time The cleaner consumes power during stand by state Auto suction stop during wet suction operation Only for the cloth filter model WARNING Do not use for a long time while the float is at work...

Page 9: ...gning the mounting position markings 4 Finally mount the tank cover and lock it 1 2 3 4 5 6 6 6 1 Tank cover 2 Powder filter HEPA 3 Damper 4 Prefilter 5 Tank 6 Mounting position marking NOTICE Before using the powder filter make sure that prefilter and damper are always used together It is not allowed to install powder filter solely Installing the water filter Optional accessory for cloth filter m...

Page 10: ...r filter damper and prefilter are always used together 1 Remove the rubber holder 1 1 Rubber holder 2 Extend the paper pack 3 Align the paper pack opening with the dust suction opening of the cleaner 4 Insert the cardboard of the paper pack onto the holder so that it is positioned at the end beyond the detent protrusion 1 2 1 Paper pack 2 Holder Installing the polyethylene bag Cleaner can also be ...

Page 11: ...ank so that the polyethylene bag cannot be caught and torn by the protrusion inside the tank when emptying it NOTE Empty the polyethylene bag before it becomes full Too much dust in the tank may cause the polyethylene bag to be torn Installing the tool box 1 Release the lock of the battery cover and open the battery cover 2 Set the rails on the tool box along the grooves on the housing 3 Close the...

Page 12: ...e that the wireless unit is properly inserted into the tool NOTE One cleaner can register up to 10 tools If more than 10 tools are registered to the cleaner the tool registered earliest will be cancelled automatically NOTE The position of the wireless activation button varies depending on the tool NOTE The cleaner also starts by pressing the power button when the stand by switch is set to AUTO How...

Page 13: ...the tool 2 Connect the hose of the cleaner with the tool 3 Set the stand by switch on the cleaner to AUTO 1 1 Stand by switch 4 Push the wireless activation button on the tool briefly The wireless activation lamp will blink in blue 2 1 1 Wireless activation button 2 Wireless activation lamp 5 Pull the switch trigger of the tool Check if the cleaner runs while the switch trigger on the tool is bein...

Page 14: ...f the wireless acti vation lamp does not blink in red push the wireless activation button briefly and hold it down again Erasing all tool registrations You can erase all tool registrations from the cleaner as follows 3 2 1 1 Stand by switch 2 Wireless activation button 3 Wireless activation lamp 1 Install the batteries to the cleaner 2 Set the stand by switch to AUTO 3 Hold down the wireless activ...

Page 15: ...n is performed for 2 hours When the tool is running The wireless activation of the cleaner is available and the tool is running Tool registration Green 20 seconds Ready for the tool registration Searching the tool to be registered 2 seconds The tool registration has been finished The wireless activation lamp will start blinking in blue Cancelling erasing tool registration Red slow 2 times sec 20 s...

Page 16: ...igger on the tool is pulled or the power button on the cleaner is turned on Push the wireless activation button briefly and perform the tool registration cancellation procedures again The tool registration procedures for the tool or the cleaner has not finished Perform the tool registration procedures for the tool and the cleaner at the same timing Radio disturbance by other appliances which gener...

Page 17: ...E CAUTION Always be sure that the tool is switched off and the battery cartridge is removed before attempting to perform inspection or maintenance NOTICE Never use gasoline benzine thinner alcohol or the like Discoloration deformation or cracks may result To maintain product SAFETY and RELIABILITY repairs any other maintenance or adjustment should be performed by Makita Authorized or Factory Servi...

Page 18: ...recommended to have some spares for them OPTIONAL ACCESSORIES CAUTION These accessories or attachments are recommended for use with your Makita tool specified in this manual The use of any other accessories or attachments might present a risk of injury to persons Only use accessory or attachment for its stated purpose If you need any assistance for more details regard ing these accessories ask you...

Page 19: ...19 ...

Page 20: ...www makita com Makita Europe N V Makita Corporation 3 11 8 Sumiyoshi cho Anjo Aichi 446 8502 Japan Jan Baptist Vinkstraat 2 3070 Kortenberg Belgium 885718 228 EN 20190204 ...

Reviews: