17
8
10
12
11
4
3
2
15
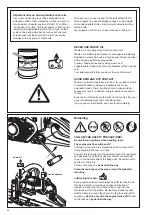
Pull the chain (
8
) around the sprocket nose (
10
) of the guide
bar in the direction of the arrow.
Line up the holes in the sprocket guard (
4
) with the pins (
11
).
Turn the chain tensioning screw (
B
/
3
) to get the chain
tensioning pin (
12
) aligned with the hole in the guide bar.
Push the sprocket guard (
4
) onto the pin (
11
).
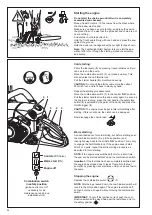
Tightening the saw chain
Simultaneously push in hard on the sprocket guard quick
tensioner (
2
) and turn it clockwise to screw the sprocket
guard on, but do not yet tighten it.
Raise the tip of the guide bar slightly and turn the chain
tensioner (
3
) clockwise until the saw chain is flush against the
bottom of the guide bar (see circle).
Push the sprocket guard quick tensioner (
2
) in again and
tighten by turning clockwise.
Release the sprocket guard chain tensioner until it turns
freely, then fold it in between protective ribs (
15
) as shown in
the illustration.
Summary of Contents for EA3501F
Page 39: ...39 ...


