15
EN
FR
DE
NL
ES
IT
PT
GR
NO
SE
FI
DK
RU
9. PERIODIC OPERATION
AND INSPECTION
10. TRANSPORTING
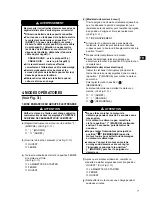
Brush Maintenance Essentials
(Disassembly and Assembly) (See Fig.
-
⑧
)
❶
BRUSH
❷
SLIP RING
❸
BRUSH HOLDER
❹
FLANGE BOLTS
❺
BRACKET COVER
❻
FLANGE BOLTS
Disassembly
1. Remove the two ange bolts (M5 x 20), then
remove the bracket cover.
2. Remove the two ange bolts (M5 x 16), then
remove the brush.
Assembly
1. While pressing the brush against the slip ring,
secure it (1.5~2N•m) by tightening it with the two
ange bolts (M5 × 16).
When doing so, con rm that the brush is in the
proper position relative to the slip ring.
2. Secure the bracket cover (3~4N•m) by tightening it
with the two ange bolts (M5 × 20).
When furnishing the generator as emergency electric
power source, periodic operation and inspection are
needed.
Fuel (gasoline) and engine oil will be deteriorated with
time, and this causes that the engine is dif cult to start
and as the results improper engine operation and fault.
CAUTION
Since the fuel (gasoline) will be deteriorated
with time, replace fuel (gasoline) with fresh one
periodically; once every three (3) months is
recommended.
When transporting the generator, make sure that the
fuel (gasoline) should be drained from the tank.
WARNING
To prevent fuel spillage due to the vibration
and impact, never transport the generator
with the fuel (gasoline) lled in the tank.
Secure the tank cap thoroughly.
To avoid the risk of the gasoline ammability,
never leave the generator in an area exposed
to direct sunlight or high temperatures for a
long time.
Keep the fuel (gasoline) in the exclusive
gasoline storage tank made by steel when
transporting.
(a) Turn the engine switch to the “STOP” position.
(b) Drain the fuel from the tank.
(c) Secure the tank cap.
CAUTION
Do not place any heavy objects on the
generator.
Select and place the generator in the proper
position of the transport vehicle so that the
generator not be moved or fallen down.
Fix the generator with rope as necessary.
This is done because if the length of the brush gets
any shorter, its contact pressure with the slip ring will
decrease, resulting in a drop in generator ef ciency
and the output voltage.
Check the brush every 500 hours to con rm its length.
In addition, check the brush length if the generator
malfunctions, such as when it is not generating power
or its voltage is low.
(a) Check the fuel (gasoline), engine oil and air
cleaner.
(b) Start engine.
(c) With appliance such as lightings activated, run the
engine for over ten minutes.
(d) Check for the following items;
Proper engine running.
Adequate output and the indicator lamp turned on
properly.
The engine switch normally operated.
No leakage of engine oil and fuel (gasoline).
Summary of Contents for EG241A
Page 4: ... V ...
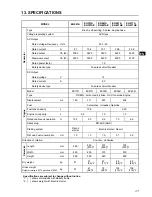
Page 5: ... EG241A EG321A EG321AE EG441A EG441AE EG601A EG601AE EG671A EG671AE 5 mm 10 11mm 0 6 0 7 mm ...
Page 6: ...EG241A EG321A EG321AE EG441A EG441AE EG601A EG601AE EG671A EG671AE LW A ...
Page 9: ......
Page 13: ...4 EN FR DE NL ES IT PT GR NO SE FI DK RU ...
Page 33: ...4 EN FR DE NL ES IT PT GR NO SE FI DK RU ...
Page 53: ...4 EN FR DE NL ES IT PT GR NO SE FI DK RU ...
Page 73: ...4 EN FR DE NL ES IT PT GR NO SE FI DK RU ...
Page 93: ...4 EN FR DE NL ES IT PT GR NO SE FI DK RU ...
Page 113: ...4 EN FR DE NL ES IT PT GR NO SE FI DK RU ...
Page 133: ...4 EN FR DE NL ES IT PT GR NO SE FI DK RU ...
Page 151: ...2 EN FR DE NL ES IT PT GR NO SE FI DK RU 1 _ _ _ _ _ _ 1 3 1m 1m ...
Page 152: ...3 EN FR DE NL ES IT PT GR NO SE FI DK RU _ _ _ _ ...
Page 153: ...4 EN FR DE NL ES IT PT GR NO SE FI DK RU ...
Page 162: ...13 EN FR DE NL ES IT PT GR NO SE FI DK RU 7 20 100 _ _ _ 50 _ 100 _ 200 _ 500 _ 1000 24 ...
Page 165: ...16 EN FR DE NL ES IT PT GR NO SE FI DK RU 11 12 6 _ _ Makita _ _ _ ...
Page 173: ...4 EN FR DE NL ES IT PT GR NO SE FI DK RU ...
Page 193: ...4 EN FR DE NL ES IT PT GR NO SE FI DK RU ...
Page 213: ...4 EN FR DE NL ES IT PT GR NO SE FI DK RU ...
Page 233: ...4 EN FR DE NL ES IT PT GR NO SE FI DK RU ...


