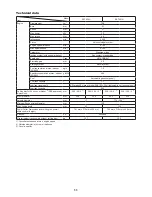
background image

7

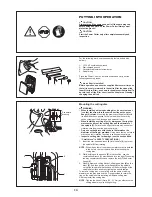
Kickback and lock-in

When working with the Power Cutter there is a danger of kickback and lock-in.

 -

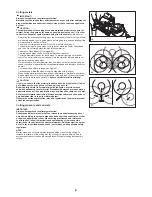
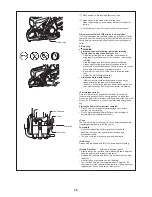
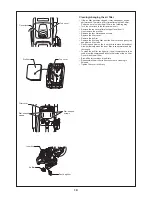
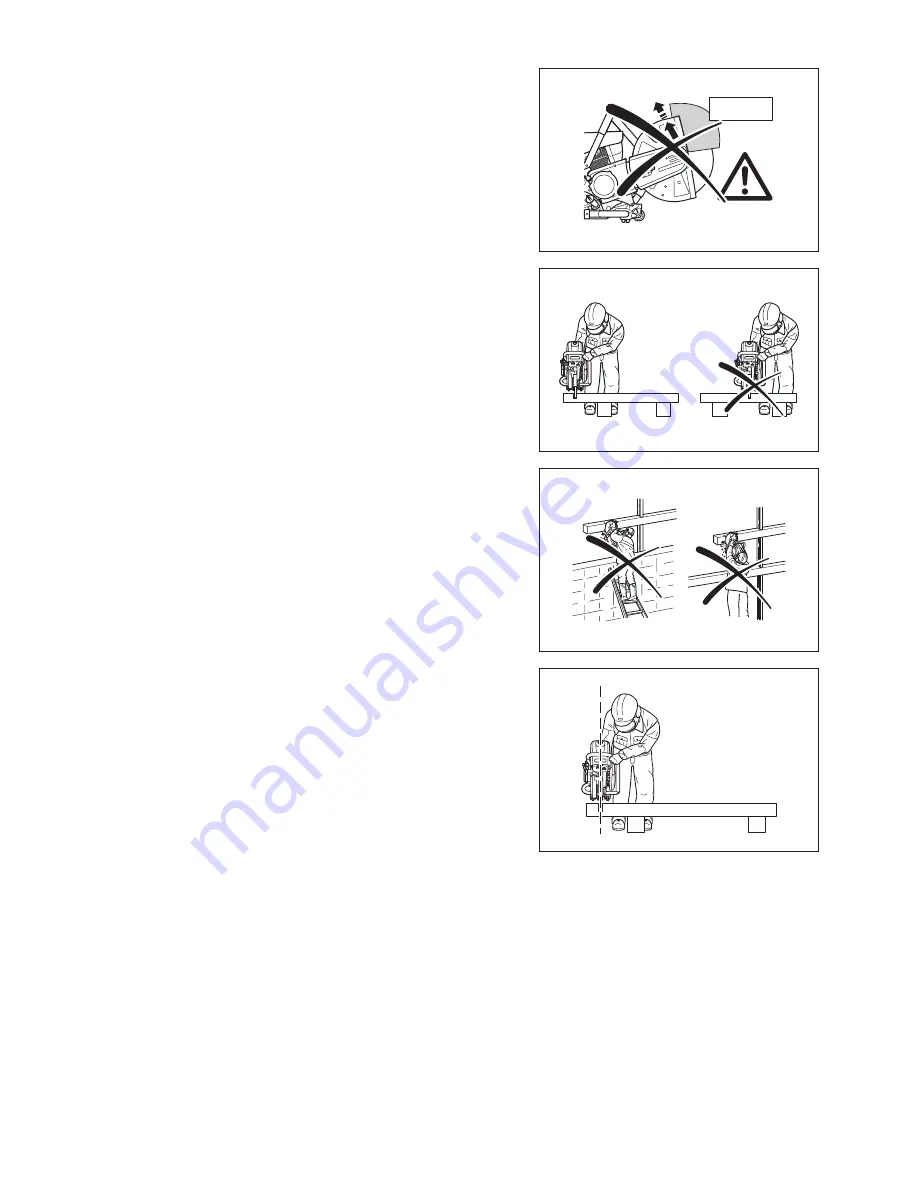
Kickback occurs when the top of the cutting disc is used for cutting (15).

 -

This causes the Power Cutter to be thrown back toward the user with great force 

 -

and out of control. 

Risk of injury!


To prevent kickback, observe the following:

Never cut with the section of the cutting disc shown in figure 15. 


 -

Be especially careful when reinserting the disc into cuts that have already 

been started!

Lock-in occurs when the cut narrows (crack, or workpiece under stress).

 -

This causes the Power Cutter to suddenly jump forward, out of control and with 

 -

great force. 

Risk of injury!


To prevent lock-in, observe the following:

When reinserting the disc into previous cuts, have the Power Cutter running at 

 -

top speed. Always cut at top speed.

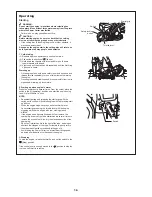
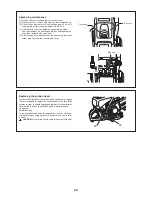
Always support the workpiece so that the cut is under tension (16), so that the 

 -

cut does not press together and jam the cutting disc as it proceeds through the 

material.

When starting a cut, apply the disc to the workpiece with care. 

 -

Do not just shove it into the material.

Never cut more than one piece at a time! When cutting, make sure that no other 

 -

workpiece comes into contact.

Working behavior / Method of working

Before starting work, check the work area for any hazards (electrical wires, 

 -

inflammable substances). Clearly mark the work area (for example with warning 

signs or by cordoning off the area).

When working with the Power Cutter hold it firmly by the front and rear handles. 

 -

Never leave the Power Cutter unattended!

Whenever possible run the Power Cutter at the rated arbour speed (see 

 -

“Technical data”).

Only use the Power Cutter during good light and visibility periods. 

 -

Be aware of slippery or wet areas, and of ice and snow (risk of slipping).

Never work on unstable surfaces. Make sure that there are no obstacles in the 

 -

working area, risk of stumbling. Always ensure that you have a safe footing.

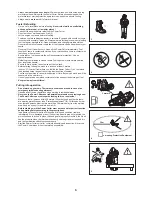
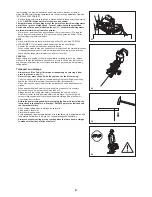
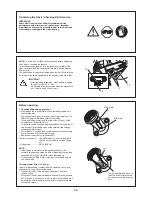
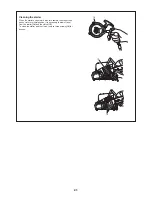
Never cut above your shoulder height (17).

 -

Never stand on a ladder to cut (17).

 -

Never use the Power Cutter while standing on scaffolding.

 -

Do not lean over too far when working. When putting down and picking up the 

 -

Power Cutter, do not bend over from the waist, but instead bend in the knees. 

Save your back!

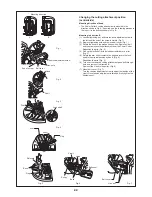
Guide the Power Cutter in such a way that no part of your body is within the 

 -

extended swing range of the disc (18).

Use cutting discs only for the materials for which they are designed!

 -

Do not use the Power Cutter to lift up and shovel away pieces of material and 

 -

other objects.

Important!

 Before cutting, remove all foreign objects, such as rocks, gravel, nails 

etc. from the cutting area. Otherwise, such objects can be flung away by the disc 

with great speed. 

Injury hazard!

When cutting workpieces down to length use a firm support. If necessary, secure 

 -

the workpiece from slipping, but do not steady it with your foot or allow another 

person to hold it.

When cutting round items, always secure them against rotation.

 -

When guiding the Power Cutter by hand, use the side mounting position of the 

 -

cutter attachment only when actually necessary. 

Otherwise, always use the central position. This gives the unit a better balance, 

for reduced operator fatigue.

15

16

17

18

Summary of Contents for EK7650H

Page 1: ...struction Manual EK7650H EK7651H Important Read this instruction manual carefully before putting the Power Cutter into operation and strictly observe the safety regulations Keep this instruction manua...

Page 2: ...ions 4 Protective equipment 4 Fuels Refuelling 5 Putting into operation 5 Cutoff discs 6 Kickback and lock in 7 Working behavior Method of working 7 Cutting metals 8 Cutting masonry and concrete 8 Tra...

Page 3: ...eye and ear protection and respiratory protection Stop engine Wear protective gloves Warning Kickback No smoking Fuel Gasoline No open fire First Aid Direction of cutting wheel rotation Delivery inven...

Page 4: ...can release toxins may be cut only with the necessary safety precautions and after notification of the proper authorities and under their supervision or that of a person appointed by them Protective...

Page 5: ...re you fuelled the Power Cutter 7 but not within the extended swing range of the cutting disc direction of sparks Fuel cannot be stored for an unlimited period of time Buy only as much as will be cons...

Page 6: ...ed When starting the Power Cutter it must be well supported and securely held The cutting disc must not be touching anything If the cutting disc is new test it by running it at least 60 seconds at top...

Page 7: ...rear handles Never leave the Power Cutter unattended Whenever possible run the Power Cutter at the rated arbour speed see Technical data Only use the Power Cutter during good light and visibility per...

Page 8: ...long cut When cutting material under stress supported material or material in structures always make a notch in the thrust pressure side and then cut from the tension side so that the disc does not lo...

Page 9: ...an the direction and sequence of cuts in such a way that the disc does not get jammed by the cut off piece and that no persons can be injured by falling pieces Transport and storage Always turn off th...

Page 10: ...n manual All other work must be carried out by MAKITA Service 28 Use only original MAKITA spares and accessories The use of non MAKITA spares accessories or cutting discs increases the risk of acciden...

Page 11: ...utomobile gasoline petrol Fuel tank capacity l 1 1 Lubricant engine oil API grade SF class or higher SAE 10W 30 oil automobile 4 stroke engine oil Lubricant quantity l 0 22 Cutting disc for 80 m sec o...

Page 12: ...lug cap 5 Top cover 6 Front handle 7 Protection hood 8 Tensioning screw 9 Hex nut 10 Muffler 11 Starter grip 12 Oil tank cap 13 Fuel tank cap 14 Fuel pump Primmer 15 Cutting disc 16 Outer flange 17 He...

Page 13: ...the hole in the tool remove it before mounting the cutting disc 2 While holding on the wrench 2 in that position use the combination wrench 1 provided and turn the bolt 7 securing the disc counterclo...

Page 14: ...ear the MIN mark of the oil tank fill the oil tank with oil to the MAX mark Oil quantity can be checked externally without removing the oil cap as the oil level can be seen at the external see through...

Page 15: ...r inflammation etc seek medical advice from a specialist doctor immediately Fuel storage period As a rule fuel held in a proper fuel container in a shaded location with good ventilation should be used...

Page 16: ...ete 2 Starting up when engine is warm Press the primer pump several times From the outset place the switch in the I operating position and start the engine using task 3 of procedure 1 above NOTE Repea...

Page 17: ...t and run out of lubricant This can damage the engine Only adjusting screw T can be manipulated by the user If the cutting disc moves in idle i e without the throttle being pressed it is imperative to...

Page 18: ...as shown in the Adjusting V belt tension section Cleaning the protection hood Over time the inside of the protection hood can become caked with material residue especially from wet cutting which if al...

Page 19: ...lter from the filter cover and gently tap and blow on it to clean Gently tap and blow on the inner filter to remove dirt and dust Also periodically wash the inner filter in soapy water and dry thoroug...

Page 20: ...ce on the spark plug remount it attach plug cap and then secure plug cover Top cover Cover lock 0 5 mm Replacing the suction head The fuel tank filter 13 of the suction head can become clogged It is r...

Page 21: ...rter doesn t work well for example the starter rope doesn t return to initial position it is necessary to blow off dust from the starter 14 and the clutch 15 To clean the starter and the clutch remove...

Page 22: ...screw to the left until the end of the screw is visible Fig 1 2 Remove tightening nuts and remove belt cover Fig 1 3 Rotate the hood to the broken line position Remove V belt and then remove cutting...

Page 23: ...A depth limiter can be added for still easier and more accurate cutting It makes it possible to maintain a precise predetermined cut depth To keep down dust and for better cutting disc cooling MAKITA...

Page 24: ...to clutch Engine does not start or with difficulty Ignition system Ignition spark O K Fault in fuel supply or compression system mechanical defect No ignition spark STOP switch operated wiring fault o...

Page 25: ...ed Make request for inspection and maintenance Abnormal drive system Make request for inspection and maintenance Contaminated clutch and around parts Clean Engine stops soon Engine speed does not incr...

Page 26: ...there is foreign matter inside the fuel tank If there is remove 2 Use a piece of wire etc to pull out fuel filter from neck of tank 3 Press the primer pump until all of the fuel is forced back into t...

Page 27: ...27...

Page 28: ...Makita Corporation 885023C7 www makita com ALA...

Reviews: