15
ENGLISH
Additional safety instructions
1.
To avoid accident, leave more than 15m (50
ft) distance between operators when two or
more operators work in one area. Also, arrange
a person to observe the distance between
operators. If someone or an animal enter the
working area, immediately stop the operation.
2.
Only use the cutting tools that are marked with a speed
equal or higher than the speed marked on the tool.
3.
Be sure to remove the cover on the cutting
blade before operation.
PARTS DESCRIPTION
EM403MP, EM404MP
►
Fig.3:
1.
Cap
2.
Pipe
3.
Protector (universal type)
4.
Protector extension
5.
Cutter
EM405MP, EM406MP
►
Fig.4:
1.
Cap
2.
Pipe
3.
Protector (narrow type)
4.
Cutter
ASSEMBLY
WARNING:
Before assembling or adjusting
the equipment, switch off the motor and remove
the spark plug cap or battery cartridge.
Otherwise
the cutting tool or other parts may move and result in
serious injury.
WARNING:
Before handling cutting blade,
wear protective gloves.
During the assembly or
adjustment, your fingers may contact with the cutting
blade and it may cause serious injury.
WARNING:
When assembling or adjusting
the equipment, always put it down.
Assembling or
adjusting the equipment in an upright position may
result in serious injury.
WARNING:
Follow the warnings and precau-
tions in the chapter “SAFETY WARNINGS” and
the instruction manual of the power unit.
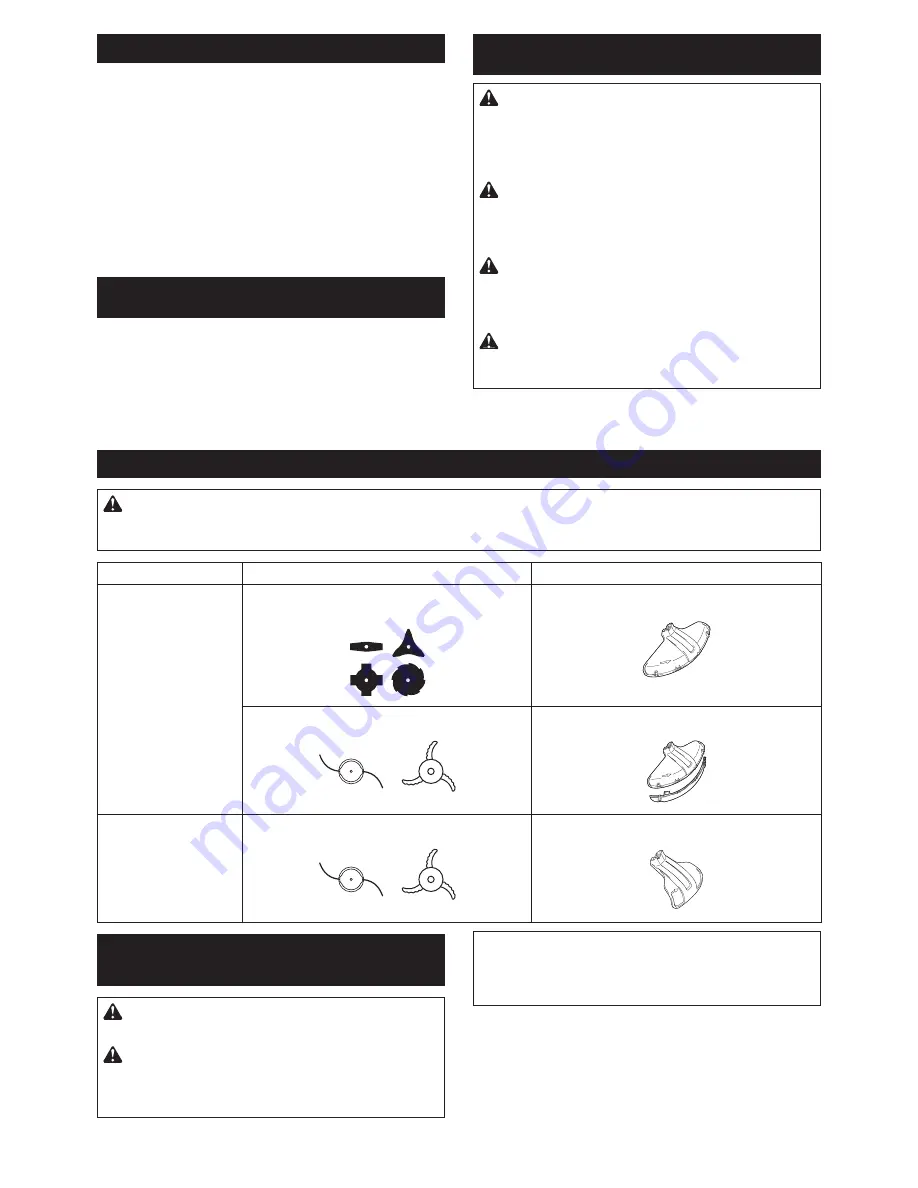
Correct combination of the cutting tool and the protector
CAUTION:
Always use the correct combination of cutting tool and protector.
The wrong protector may
not protect you from flying debris and stones. It can also affect the balance of the tool and result in serious per
-
sonal injury.
Model
Cutting tool
Protector
EM403MP
EM404MP
Metal blade
(with nut, cup, and clamp washer)
Protector (universal type)
Nylon cutting head / Plastic blade
Protector (universal type) with protector extension
EM405MP
EM406MP
Nylon cutting head / Plastic blade
Protector (narrow type)
Installing the protector (cutting tool
guard)
WARNING:
Do not use a cutting tool without
an appropriate protector at any time.
WARNING:
Always use the cutting tool
with the correct combination of the protector.
Otherwise contact with a cutting tool may cause
serious injury.
NOTICE:
Periodically tighten the bolts on the
protector. Tighten the right and left bolts evenly
so that the gap between the clamp and the protec-
tor is constant.
Fix the protector to the clamp with bolts.
Protector (universal type)
►
Fig.5:
1.
Clamp
2.
Protector
Protector (narrow type)
►
Fig.6:
1.
Clamp
2.
Protector
3.
Cutter
Summary of Contents for EM404MP
Page 4: ...Fig 12 3 1 2 Fig 16 1 750 mm 750 mm 100 300 mm Fig 17 1 Fig 18 Fig 19 4 ...
Page 5: ...3 m 80 mm 100 mm 䍺2 7 mm 䍺2 4 mm Fig 20 5 ...
Page 6: ...3 m 80 mm 100 mm 䍺2 7 mm 䍺2 4 mm Fig 21 6 ...
Page 7: ...3 m 80 mm 100 mm 䍺2 7 mm 䍺2 4 mm Fig 22 7 ...
Page 8: ...3 m 80 mm 100 mm 䍺2 7 mm 䍺2 4 mm Fig 23 8 ...
Page 9: ...4 5 m 100 mm 2 4 mm 2 4 mm Fig 24 9 ...
Page 10: ...Fig 25 Fig 26 10 ...


