background image

16

ENGLISH

CAUTION:


Be careful not to injure yourself 

with the cutter mounted on the protector.

NOTE:

 The cutter on the protector keeps the nylon 

cord best length for cutting.

For EM403MP and EM404MP

To install the protector extension, insert the protector 
extension to the protector and then snap the clips on. 

Make sure that the tabs on the protector extension fit 

into the slots on the protector.

► 

Fig.7:


1.

 Protector (universal type) 

2.

 Clip 

3.

 Protector extension 

4.

 Cutter (inside) 

5.

 Slot 

6.

 Tab

To remove the protector extension from the protector, 
unclasp the clips and pull the protector extension out.

CAUTION:


Make sure to push in the protec-

tor extension until it is fully inserted.

 Otherwise 

the protector extension may fall and result in personal 

injury.

CAUTION:


Be careful not to injure your-

self with the cutter mounted on the protector 
extension.

NOTE:

 The cutter on the protector extension keeps 

the nylon cord best length for cutting.

Installing the cutting tool

CAUTION:


Be sure to use genuine MAKITA 

cutting tools.

CAUTION:


Be sure to remove the hex 

wrench after installation.

NOTE:

 When installing the cutting tool, turn the tool 

upside down for ease of the procedure.

Installing the metal blade

For EM403MP and EM404MP

CAUTION:


When handling the metal blade, 

always wear gloves and put the blade cover on 
the blade.

CAUTION:


The outside diameter of the metal 

blade must be 230 mm (9″). Never use any blades 

larger than 230 mm (9″) in outside diameter.

CAUTION:


The metal blade must be well 

polished, free of cracks or breakage. If the metal 
blade hits against a stone during operation, stop 
the motor and check the blade immediately.

CAUTION:


Polish or replace the metal blade 

every three hours of operation.

CAUTION:


Always use the supplied 

wrench(es) to remove or to install the blade.

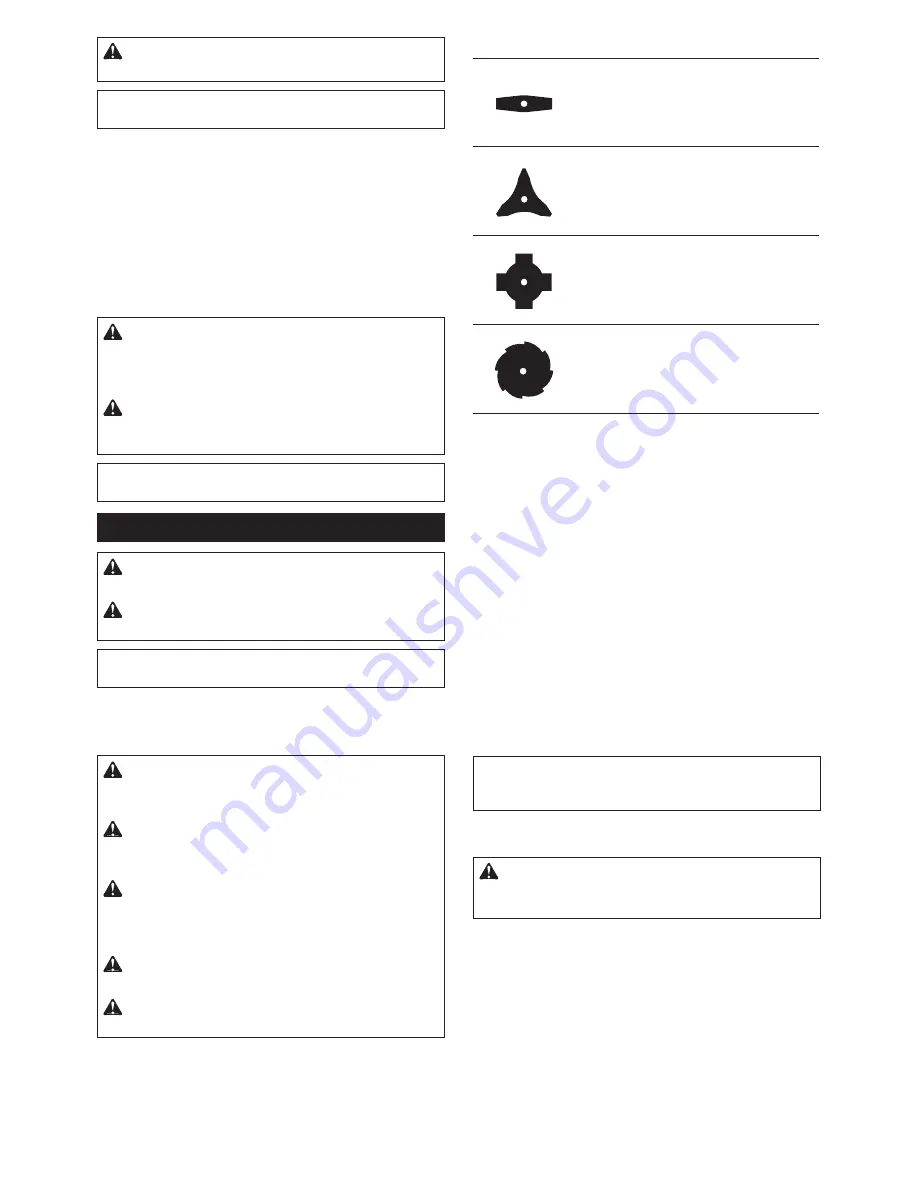
Applicable blade

Metal blade (2-tooth)

Metal blade (3-tooth)

Metal blade (4-tooth)

Metal blade (8-tooth)

1.


Insert the receive washer into the shaft.

2.


Insert the hex wrench through the hole in the gear 

case to lock the shaft. Rotate the shaft until the hex 
wrench is fully inserted.

3.


Mount the metal blade onto the receive washer.

4.


Install the clamp washer and cup, and then tighten 

the nut securely.  

Tightening torque: 16 - 23 N•m

5.


Remove the hex wrench.

► 

Fig.8:


1.

 Nut 

2.

 Cup 

3.

 Clamp washer 

4.

 Metal blade 

5.

 Receive washer 

6.

 Shaft 

7.

 Hex wrench

► 

Fig.9:


1.

 Socket wrench 

2.

 Hex wrench 

3.

 Tighten

Make sure that the arrows on the blade and protector 
indicate the same way.

► 

Fig.10

To remove the metal blade, follow the installation proce-
dure in reverse.

NOTE:

 The resin part on the blade fastening nut 

wears out in course of time. Replace the nut if there 
appears any wear or deformation.

Installing the nylon cutting head

CAUTION:


If the nylon cutting head hits 

against a stone during operation, stop the motor 
and check the nylon cutting head immediately.

1.


Put the receive washer on the shaft.

2.


Insert the hex wrench through the hole in the gear 

case.

3.


Screw the nylon cutting head onto the shaft.

4.


After installing nylon cutting head, remove the hex 

wrench.

► 

Fig.11:


1.

 Nylon cutting head 

2.

 Receive washer 

3.

 Shaft 

4.

 Hex wrench 

5.

 Tighten

Summary of Contents for EM404MP

Page 1: ...IGINALE 41 NL Bosmaaierhulpstuk Graskantmaaierhulpstuk ORIGINELE GEBRUIKSAANWIJZING 51 ES Accesorio para Desbrozadora MANUAL DE INSTRUCCIONES ORIGINAL 61 PT Implemento Roçadeira Implemento Aparador de Grama MANUAL DE INSTRUÇÕES ORIGINAL 71 DA Tilbehør til buskrydder Tilbehør til trådtrimmer OPRINDELIG BRUGSANVISNING 81 EL Προσάρτημα θαμνοκοπτικού Προσάρτημα κουρευτικού με πετονιά ΠΡΩΤΟΤΥΠΟ ΕΓΧΕΙΡΙ...

Page 2: ...Fig 1 12 1 2 3 4 5 11 10 9 8 Fig 2 1 4 5 2 3 Fig 3 1 4 2 3 Fig 4 1 2 Fig 5 2 3 1 Fig 6 1 3 2 4 2 5 6 Fig 7 2 ...

Page 3: ...1 7 2 3 4 5 6 Fig 8 1 2 3 Fig 9 Fig 10 1 4 2 3 5 Fig 11 1 4 2 3 5 Fig 12 1 Fig 13 1 2 3 Fig 14 1 Fig 15 3 ...

Page 4: ...Fig 12 3 1 2 Fig 16 1 750 mm 750 mm 100 300 mm Fig 17 1 Fig 18 Fig 19 4 ...

Page 5: ...3 m 80 mm 100 mm 䍺2 7 mm 䍺2 4 mm Fig 20 5 ...

Page 6: ...3 m 80 mm 100 mm 䍺2 7 mm 䍺2 4 mm Fig 21 6 ...

Page 7: ...3 m 80 mm 100 mm 䍺2 7 mm 䍺2 4 mm Fig 22 7 ...

Page 8: ...3 m 80 mm 100 mm 䍺2 7 mm 䍺2 4 mm Fig 23 8 ...

Page 9: ...4 5 m 100 mm 2 4 mm 2 4 mm Fig 24 9 ...

Page 10: ...Fig 25 Fig 26 10 ...

Page 11: ...s The following symbols are used on the attachment and this instruction manual Understand these definitions Take Particular care and attention Read instruction manual Wear protective helmet eye and ear protection Protective gloves must be worn Wear sturdy boots with nonslip soles Steeltoed safety boots are recommended 15m 50FT Keep bystanders at least 15 m 50 ft away Flying object hazard Kickback ...

Page 12: ...ed Always hand over the instruction manual 3 Stay alert watch what you are doing and use common sense when operating the machine Do not use the machine while you are tired ill or under the influence of drugs alcohol or medication A moment of inattention while oper ating the machine may result in serious personal injury 4 Avoid using the machine in bad weather conditions especially when there is a ...

Page 13: ...tting tool may result in serious injury 5 Stop the motor immediately if you notice any trouble Transportation 1 Stop the motor during transport Otherwise unintentional start up may cause injury 2 When transporting the machine always attach the cover to the cutting blade Contact with bare blades results in injury 3 Ensure safe position of the machine during car transportation to avoid fuel leakage ...

Page 14: ...lock 2 Swing the tool evenly in half circle from right to left like using a scythe This allows the proper segment of blade to contact plants to be cut 3 Never apply the segment between 12 and 2 o clock 4 Never apply the segment between 11 and 12 o clock and between 2 and 5 o clock unless the operator is well trained and experienced and does it at his her own risk Fig 2 5 Never use cutting blades c...

Page 15: ... or adjusting the equipment in an upright position may result in serious injury WARNING Follow the warnings and precau tions in the chapter SAFETY WARNINGS and the instruction manual of the power unit Correct combination of the cutting tool and the protector CAUTION Always use the correct combination of cutting tool and protector The wrong protector may not protect you from flying debris and stone...

Page 16: ...er CAUTION The metal blade must be well polished free of cracks or breakage If the metal blade hits against a stone during operation stop the motor and check the blade immediately CAUTION Polish or replace the metal blade every three hours of operation CAUTION Always use the supplied wrench es to remove or to install the blade Applicable blade Metal blade 2 tooth Metal blade 3 tooth Metal blade 4 ...

Page 17: ...y throttle off and it may cause serious injury Adjusting the hanger position and shoulder harness WARNING Do not use the tool if you cannot adjust the hanger position and shoulder harness length within the range as illustrated Using the tool with improper weight balance may bring the cutting tool upward and result in personal injury When replacing an accessory with another the weight balance of th...

Page 18: ...rease may be purchased from your local Makita dealer Replacing the nylon cord WARNING For the bump and feed type nylon cutting head make sure that the cover of the nylon cutting head is secured to the housing properly as described below Failure to properly secure the cover may cause the nylon cutting head to fly apart resulting in serious personal injury The way to replace the nylon cord varies de...

Page 19: ...ease Refer to the instruction manual of the power unit Cutting tool does not rotate Stop the motor immediately Loose attachment of the cutting tool Tighten securely Cutting tool caught a twig Remove foreign matter Abnormal drive system Contact an authorized service center for repairs Main unit vibrates abnormally Stop the motor immediately Broken bent or worn cutting tool Replace the cutting tool ...

Reviews: