background image

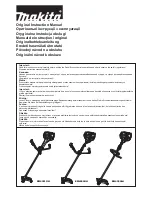
Original Instruction Manual

Оригінальні інструкції з експлуатації

Oryginalna instrukcja obsługi

Manual de instrucţiuni original

Originalbetriebsanleitung

Eredeti használati útmutató

Pôvodný návod na obsluhu

Originální návod k obsluze
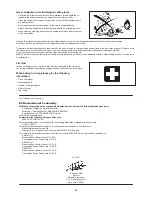
Important:

Read this instruction manual carefully before putting the Petrol Brushcutter into operation and strictly observe the safety regulations!

Preserve instruction manual carefully!

Важливо:

Уважно прочитайте цю інструкцію з експлуатації, перед тим як використовувати бензиновий кущоріз, та суворо дотримуйтеся правил 

безпеки!

Зберігайте цю інструкцію з експлуатації!

Ważne:

Przeczytać uważnie niniejszą instrukcję obsługi przed uruchomieniem kosy spalinowej i ściśle przestrzegać przepisów dotyczących 

bezpieczeństwa!

Przechowywać niniejszy podręcznik z należytą starannością!

Important:

Citiţi cu atenţie acest manual de instrucţiuni înainte de a pune în funcţiune motocositoarea pe benzină şi respectaţi cu stricteţe reglementările 

privind siguranţa!

Păstraţi cu atenţie manualul de instrucţiuni!

Wichtig:

Lesen Sie vor Verwendung der Motorsense diese Betriebsanleitung aufmerksam durch und halten Sie die Sicherheitsbestimmungen strikt ein!

Bewahren Sie diese Betriebsanleitung sorgfältig auf!

Fontos:

A benzinmotoros bozótvágó első üzembe helyezése előtt figyelmesen olvassa át ezt a használati utasítást, és feltétlenül tartsa be a 

biztonsági előírásokat!

Gondosan őrizze meg a használati utasítást!

Dôležité:

Pred použitím benzínového krovinorezu si pozorne prečítajte tento návod na obsluhu a striktne dodržiavajte bezpečnostné nariadenia!

Tento návod na obsluhu starostlivo uschovajte!

Důležité:

Před uvedením motorového křovinořezu do provozu si důkladně prostudujte tento návod k obsluze a pečlivě dodržujte bezpečnostní 

směrnice!

Návod k obsluze pečlivě uschovejte!
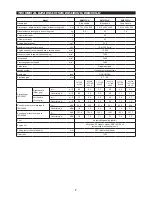
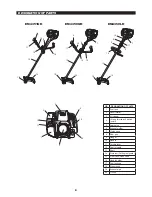
EM4351UH

EM4350UH

EM4350LH

Summary of Contents for EM4351UH

Page 1: ...mportant Citiţi cu atenţie acest manual de instrucţiuni înainte de a pune în funcţiune motocositoarea pe benzină şi respectaţi cu stricteţe reglementările privind siguranţa Păstraţi cu atenţie manualul de instrucţiuni Wichtig Lesen Sie vor Verwendung der Motorsense diese Betriebsanleitung aufmerksam durch und halten Sie die Sicherheitsbestimmungen strikt ein Bewahren Sie diese Betriebsanleitung so...

Page 2: ...signation of parts 8 Mounting of handle 9 Mounting of protector 10 Mounting of metal blade or nylon cutting head 12 Before start of operation 13 Correct handling of machine 15 Points in operation and how to stop 16 Resharpening the cutting tool 18 Servicing instructions 22 Storage 25 Read instruction manual and follow the warnings and safety precautions Take Particular care and attention Forbidden...

Page 3: ...ng which could become entangled with bushes or shrubs In order to avoid either head eye hand or foot injuries as well as to protect your hearing the following protective equipment and protective clothing must be used during operation Always wear a helmet where there is a risk of falling objects The protective helmet 1 is to be checked at regular intervals for damage and is to be replaced at the la...

Page 4: ...the machine Never put the hot brushcutter onto dry grass or onto any combustible materials Always install the approved cutting tool guard onto the equipment before starting the engine Otherwise contact with the cutting tool may cause serious injury All protective installations and guards supplied with the machine must be used during operation Never operate the engine with faulty exhaust muffler Sh...

Page 5: ...t is thrown sideway or toward the operator at great force and it may cause serious injury Kickback occurs particularly when applying the blade segment between 12 and 2 o clock to solids bushes and trees with 3 cm or larger diameter To avoid kickback Apply the segment between 8 and 11 o clock Never apply the segment between 12 and 2 o clock Never apply the segment between 11 and 12 o clock and betw...

Page 6: ...pollution and noise emissions Adjust the carburetor correctly Clean the equipment at regular intervals and check that all screws and nuts are well tightened Never service or store the equipment in the vicinity of naked flames Always store the equipment in locked rooms and with an emptied fuel tank When cleaning servicing and storing the equipment always attach the cover to the metal blade Observe ...

Page 7: ...ontact magnet type Spark plug type NGK CMR6A Electrode gap mm 0 7 0 8 CUTTER BLADE NYLON CUTTING HEAD CUTTER BLADE NYLON CUTTING HEAD CUTTER BLADE NYLON CUTTING HEAD Vibration per ISO 22867 Right handle Rear grip ahv eq m s2 2 2 2 1 3 1 3 5 4 2 2 6 Uncertainty K m s2 0 5 0 6 0 5 0 8 1 1 0 7 Left handle Front grip ahv eq m s2 1 7 2 0 4 8 4 0 3 8 3 7 Uncertainty K m s2 0 5 0 5 2 9 0 9 1 0 1 4 Sound ...

Page 8: ... DESIGNATION OF PARTS 1 Fuel tank 2 Recoil starter 3 Air cleaner 4 I O and throttle lock switch on off 5 Spark plug 6 Exhaust muffler 7 Clutch case 8 Rear grip 9 Hanger 10 Handle 11 Throttle lever 12 Control cable 13 Shaft 14 Protector Cutting tool guard 15 Gear Case Head case 16 Handle holder 17 Fuel tank cap 18 Starter knob 19 Exhaust pipe 20 Oil cap ...

Page 9: ...e grip with the one in the shaft Tighten the screw securely MOUNTING OF HANDLE Loosen knob 1 Place handle 4 between handle clamp 2 and handle holder 3 Adjust handle 4 to an angle that provides a comfortable working position and then secure by firmly hand tightening knob 1 CAUTION Do not forget to mount spring 5 For model EM4350LH Fix the loop handle on the shaft with four screws To keep a proper d...

Page 10: ...iately CAUTION The appropriate protector must always be installed for your own safety and in order to comply with accident prevention regulations Operation of the equipment without the guard being in place is not permitted The outside diameter of the cutter blade must be 300 mm 12 or smaller Never use any blades exceeding 300 mm 12 in outside diameter Use 200 mm saw blade protector only when using...

Page 11: ...cord cutter protector 4 until it is fully inserted Take care not to injure yourself on the cutter for cutting the nylon cord To remove the nylon cord cutter protector 4 apply a hex wrench into the notch on the metal blade protector 3 push it in and meanwhile slide the nylon cord cutter protector 4 Hex wrench 3 2 1 1 2 3 In use of the metal blade fix the protector 3 to the clamp 2 with two bolts 1 ...

Page 12: ... it is locked with the hex wrench Loosen the nut 1 left hand thread with the socket wrench and remove the nut 1 cup 2 and clamp washer 3 4 3 2 1 4 3 2 1 Rotation Hex wrench MOUNTING OF METAL BLADE OR NYLON CUTTING HEAD Mounting of metal blade with the hex wrench still in place Mount the metal blade onto the shaft so that the guide of the receiver washer 4 fits in the arbor hole in the metal blade ...

Page 13: ...ew one For the interval and method of replacement refer to P 22 Recommended oil SAE 10W 30 oil of API Classification Class SF or higher 4 stroke engine for automobile Oil volume Approx 0 10L NOTE If the engine is not positioned as illustrated on a horizontal surface an inaccurate indication of oil level may occur and oil may be overfilled Filling oil above the upper limit may cause oil contaminati...

Page 14: ... is necessary to handle fuel with utmost care Fuel may contain substances similar to solvents Refueling must be performed in a sufficiently ventilated room or in the open air Never inhale fuel vapor and keep fuel away from you If you touch fuel repeatedly or for a long time the skin becomes dry which may cause skin disease or allergy If fuel enters into the eye clean the eye with fresh water If yo...

Page 15: ...yone in the work vicinity WARNING Failure to maintain complete control of the machine at all could result in serious bodily injury or DEATH For EM4350LH To release the machine release the emergency detachment lever 2 by pulling strongly with fingers Be extremely careful to maintain control of the machine at this time Do not allow the machine to be deflected toward you or anyone in the work vicinit...

Page 16: ...n a flat space 2 Set the I O switch 1 to OPERATION POINTS IN OPERATION AND HOW TO STOP EM4350UH EM4351UH STOP OPERATION Lock off lever High speed Low speed Throttle lever 1 OPERATION Lock off lever High speed Low speed Throttle lever EM4350LH STOP 1 3 Choke lever Close the choke lever Choke opening Full closing in cold or when the engine is cold Full or half opening if the engine is a bit warm suc...

Page 17: ...tting tool rotates immediately 6 Once the engine starts release the lock off lever 3 and pull the throttle lever 2 and release them to make the engine idle OPEN 5 Recoil starter Make sure you have a firm footing Hold the unit with your left hand and press it down firmly CAUTION Do not stand or kneel on the throttle cable The internal wire may be pulled and the cutting tool may start rotating unint...

Page 18: ...djusted However after several use the idle speed need to be re adjusted NYLON CUTTING HEAD The nylon cutting head is a dual line trimmer head that has bump feed mechanism The nylon cutting head will feed out the proper length of nylon line after tapping the nylon cutting head on the ground by changes in centrifugal force caused by increasing or decreasing rpms Operation Increase the nylon cutting ...

Page 19: ...ly around the spool in the direction marked on the head for left hand direction indicated by LH Wind all but about 100 mm of the cords leaving the ends temporarily hooked through a notch on the side of the spool Mount the spool in the housing so that the grooves and protrusions on the spool match up with those in the housing Keep the side with letters on the spool visible on the top Now unhook the...

Page 20: ...e lines up firmly to the direction slown by left hand LH arrow on the flange Do not cross the lines 5 Wind all but about 100 mm 3 15 16 of the Cords leaving the end temporarily hooked through a notch on the side of the spool 6 Put tab knob onto the housing hub positioning it can freely move up and down against spring tension Put the spool into the housing aligning the teeth on spool and tap knob a...

Page 21: ...ligning the tabs on cover and the windows on housing Make sure the cover is secured exactly to the housing Outer edge of cover locking tab and outer surface of the housing should be on same circumference Cover locking tab Housing window Outer surface of housing Outer edge of cover locking tab ...

Page 22: ...d the lock button SERVICING INSTRUCTIONS REPLACEMENT OF ENGINE OIL Deteriorated engine oil will shorten the life of the engine Be sure to check the oil and level regularly WARNING The engine and engine oil is still hot just after stopping engine Allow sufficient time for the engine and engine oil to cool down Otherwise a skin burn may result NOTE If the oil filled above the limit it may be contami...

Page 23: ...d separator plate with waste cloth Attaching air cleaner cover Fit the element sponge and element paper Insert the element sponge all the way into the air cleaner cover Insert the side hook onto the air cleaner cover as illustrated and push the lower part of the air cleaner cover until it clicks so that the hook sits into the loop properly And then tighten the air cleaner cover with fixing bolt NO...

Page 24: ...purchased from your MAKITA dealer CLEANING OF FUEL FILTER WARNING INFLAMMABLES STRICTLY PROHIBITED Interval of Cleaning and Inspection Monthly every 50 operating hours Suction head in the fuel tank The fuel filter 1 of the suction head is used to filter the fuel required by the carburetor A periodical visual inspection of the fuel filter is to be conducted Open the tank cap use a wire hook and pul...

Page 25: ...R When the machine is kept out of operation for a long time drain all fuel from the fuel tank and carburetor and keep it at a dry and clean place Drain fuel from the fuel tank and carburetor according to the following procedure 1 Remove the fuel tank cap and drain fuel completely If there is any foreign matter remaining in the fuel tank remove it completely 2 Pull out the fuel filter from the refi...

Page 26: ... Inspect adjust 18 Air cleaner Clean 23 Spark plug Inspect 24 Cooling air passage and cylinder fins Clean inspect 25 Fuel pipe Inspect 25 Replace 2 Gear case grease Refill 24 Fuel filter Clean replace 24 Valve clearance intake valve and exhaust valve Inspect adjust 2 Carburetor Drain fuel 3 25 1 Perform initial replacement after 20h operation 2 For the 200 operating hour inspection request Authori...

Page 27: ... inspection and maintenance Abnormal drive system Make request for inspection and maintenance Engine stops soon Engine speed does not increase Insufficient warm up Perform warm up operation Choke lever is set to CLOSE although engine is warmed up Set to OPEN Clogged fuel filter Clean Contaminated or clogged air cleaner Clean Abnormal carburetor Make request for inspection and maintenance Abnormal ...

Page 28: ...ieren des Griffs 113 Montieren des Schutzes 114 Montieren des Metallblatts Nylon Schneidkopfs 116 Vor dem Betrieb 117 Richtige Handhabung des Werkzeugs 119 Wichtige Betriebsschritte und Stoppen des Werkzeugs 120 Nachschärfen des Schneidwerkzeugs 122 Wartungsanweisungen 126 Aufbewahrung 129 Bitte lesen Sie die Betriebsanleitung und beachten Sie die Warnungen und Sicherheitshinweise Besondere Aufmer...

Page 29: ...Büschen oder Gestrüpp verfangen könnten Um Verletzungen von Gehör Augen Händen und Füßen zu vermeiden aber auch um Ihre Hörleistung zu schützen ist während des Betriebs des Werkzeugs die folgenden Schutzausrüstungen oder Schutzkleidungen zu tragen Tragen Sie stets einen Helm wenn die Gefahr herabfallender Gegenstände besteht Der Schutzhelm 1 muss regelmäßig auf Beschädigungen überprüft und spätest...

Page 30: ... am Werkzeug an bevor Sie den Motor starten Andernfalls kann der Kontakt mit dem Schneidwerkzeug schwere Verletzungen verursachen Während des Betriebs müssen alle mit dem Werkzeug gelieferten Schutzvorrichtungen und Abdeckungen verwendet werden Betreiben Sie den Motor niemals mit beschädigtem Auspuffschalldämpfer Schalten Sie den Motor während des Transports aus Bringen Sie vor dem Transportieren ...

Page 31: ...back ist eine plötzliche Reaktion bei einem Verfangen oder Festsitzen des Metallblatts Tritt ein Rückschlagen auf wird das Werkzeug mit großer Kraft seitwärts oder in Richtung des Bedieners geschleudert und kann schwere Verletzungen verursachen Ein Rückschlagen tritt vor allem auf wenn feste Gegenstände Büsche und Bäume mit einem Durchmesser von mehr als 3 cm im Schneidblattbereich zwischen 12 und...

Page 32: ...lle oder Schäden die durch die Verwendung nicht genehmigter Schneidwerkzeuge Befestigungen der Schneidwerkzeuge und Zubehörteile verursacht werden Erste Hilfe Stellen Sie für den Fall eines Unfalls sicher dass in der Nähe der Schneidarbeiten ein Erste Hilfe Kasten verfügbar ist Ersetzen Sie aus dem Erste Hilfe Kasten entnommene Materialien sofort Machen Sie folgende Angaben wenn Sie Hilfe anforder...

Page 33: ...trodenabstand mm 0 7 0 8 SCHNEIDBLATT NYLON SCHNEIDKOPF SCHNEIDBLATT NYLON SCHNEIDKOPF SCHNEIDBLATT NYLON SCHNEIDKOPF Schwingungen nach ISO 22867 Rechter Griff Hinterer Griff ahv eq m s2 2 2 2 1 3 1 3 5 4 2 2 6 Abweichung K m s2 0 5 0 6 0 5 0 8 1 1 0 7 Linker Griff Vorderer Griff ahv eq m s2 1 7 2 0 4 8 4 0 3 8 3 7 Abweichung K m s2 0 5 0 5 2 9 0 9 1 0 1 4 Durchschnittlicher Schalldruckpegel nach ...

Page 34: ...ndkerze 6 Auspuffschalldämpfer 7 Kupplungsgehäuse 8 Hinterer Griff 9 Einhänger 10 Griff 11 Gashebel 12 Bowdenzug und Steuerkabel 13 Welle 14 Schutz Schutz für Schneidwerkzeug 15 Getriebegehäuse Kopfgehäuse 16 Griffhalterung 17 Kraftstoff Tankdeckel 18 Startergriff 19 Abgasleitung 20 Öldeckel 7 12 8 9 11 4 10 13 15 14 4 11 12 9 10 16 13 14 15 4 11 12 7 10 16 13 14 15 9 5 6 19 20 2 1 17 18 3 ...

Page 35: ...raube ordnungsgemäß fest MONTIEREN DES GRIFFS Lösen Sie den Knauf 1 Richten Sie den Tragegriff 4 zwischen Griffklemme 2 und Griffhalterung 3 aus Richten Sie den Tragegriff 4 in einem Winkel aus der Ihnen eine komfortable Arbeitsposition ermöglicht und sichern Sie diesen anschließend indem Sie den Knauf 1 handfest anziehen ACHTUNG Vergessen Sie nicht die Feder 5 anzubringen Für Modell EM4350LH Befe...

Page 36: ... und überprüfen Sie den Nylon Schneidkopf sofort ACHTUNG Für Ihre eigene Sicherheit und gemäß den Bestimmungen zur Unfallverhinderung müssen Sie stets den entsprechenden Schutz anbringen Der Betrieb des Werkzeugs ohne installierten Schutz ist verboten Der Außendurchmesser des Schneidblatts darf max 300 mm 12 betragen Verwenden Sie niemals ein Blatt mit einem Außendurchmesser über 300 mm 12 Verwend...

Page 37: ...chutz des Nylonfaden Abschneiders 4 indem Sie den Schutz an der Flanke des Schutzes für das Metallblatt 3 hineinschieben wie in der Abbildung dargestellt Entfernen Sie das auf der Schneide aufgeklebte Band am Schutz des Nylonfaden Abschneiders 4 ACHTUNG Stellen Sie sicher dass Sie den Schutz des Nylonfaden Abschneiders 4 vollständig eingedrückt haben Achten Sie darauf dass Sie sich nicht an der Sc...

Page 38: ...sen Sie die Mutter 1 Linksgewinde mit dem Steckschlüssel und entfernen Sie die Mutter 1 Kappe 2 und Klemmscheibe 3 4 3 2 1 4 3 2 1 Drehen Inbusschlüssel MONTIEREN DES METALLBLATTS NYLON SCHNEIDKOPFS Montieren des Metallblatts mit eingestecktem Inbusschlüssel Montieren Sie das Metallblatt so auf die Welle dass die Führung der Aufnahmescheibe 4 in das Wellenloch im Metallblatt passt Befestigen Sie d...

Page 39: ...eise für den Ölwechsel finden Sie auf Seite 126 Empfohlenes Öl Öl der API Klassifikation SAE 10W 30 Klasse SF oder höher Viertaktmotor für Autos Ölmenge ca 0 10 L HINWEIS Wenn sich der Motor nicht wie dargestellt auf einer waagerechten Fläche befindet wird möglicherweise ein nicht zutreffender Ölstand angezeigt wodurch möglicherweise zu viel Öl aufgefüllt wird Bei Auffüllen von Öl über die Obergre...

Page 40: ...t geboten Kraftstoffe können Lösungsmitteln ähnliche Substanzen enthalten Tanken Sie nur in einem gut belüfteten Raum oder im Freien auf Atmen Sie Kraftstoffdämpfe nicht ein und vermeiden Sie jeglichen Körperkontakt mit Kraftstoff Durch anhaltenden oder wiederholten Hautkontakt wird die Haut trocken und es kann zu Hauterkrankungen oder allergischen Reaktionen kommen Falls Kraftstoff in die Augen g...

Page 41: ...nfalls können Sie die Kontrolle über das Werkzeug verlieren wodurch es zu schweren oder gar TÖDLICHEN Verletzungen kommen kann Für EM4350LH Um das Werkzeug zu lösen lösen Sie den Notfall Trennhebel 2 indem Sie mit den Fingern kraftvoll am Hebel ziehen Gehen Sie äußerst vorsichtig vor damit Sie jederzeit die Kontrolle über das Werkzeug behalten Lassen Sie nicht zu dass das Werkzeug in Ihre Richtung...

Page 42: ...IEB WICHTIGE BETRIEBSSCHRITTE UND STOPPEN DES WERKZEUGS EM4350UH EM4351UH STOPP BETRIEB Entriegelungshebel Hohe Drehzahl Niedrige Drehzahl Gashebel 1 BETRIEB Entriegelungshebel Hohe Drehzahl Niedrige Drehzahl Gashebel EM4350LH STOPP 1 3 Choke Hebel Schließen Sie den Choke Hebel Öffnen des Chokes Bei kalten Temperaturen oder wenn der Motor kalt ist ist der Choke völlig geschlossen Wenn der Motor be...

Page 43: ... Motor gestartet hat lassen Sie den Entriegelungshebel 3 los ziehen Sie den Gashebel 2 und lassen Sie die Hebel los damit der Motor im Leerlauf läuft OFFEN 5 Seilzugstarter Achten Sie auf sicheren und festen Stand Halten Sie das Werkzeug mit der linken Hand und drücken Sie es fest nach unten ACHTUNG Stellen oder knien Sie sich niemals auf den Gas Bowdenzug Anderenfalls könnte das Seil im Inneren g...

Page 44: ...e die Leerlaufdrehzahl nachgestellt werden NYLON SCHNEIDKOPF Der Nylon Schneidkopf ist ein zweiseitiger Trimmerkopf mit einem Mechanismus zum Nachführen des Schneidfadens durch leichtes Aufstoßen des Schneidkopfs auf den Boden BUMP FEED Nachdem der Nylon Schneidkopf auf den Boden aufgestoßen wurde gibt er automatisch die richtige Länge an Nylonfaden heraus dies geschieht durch Ändern der Zentrifug...

Page 45: ... Spulenkopf um die Spule Wickeln Sie etwa 100 mm des Fadens um die Spule und lassen Sie die Enden vorübergehend in der Einkerbung an der Seite der Spule eingehängt Montieren Sie die Spule in das Gehäuse sodass die Kerben und Vorsprünge an der Spule mit denen im Gehäuse übereinstimmen Die Seite mit den Buchstaben der Spule muss nach oben zeigen sodass die Buchstaben sichtbar sind Haken Sie nun die ...

Page 46: ...inkshanddrehung LH durch Pfeil auf dem Flansch gekennzeichnet Überkreuzen Sie die Fäden nicht 5 Winden Sie etwa 100 mm des Fadens um die Spule und lassen Sie die Enden vorübergehend in der Einkerbung an der Seite der Spule eingehängt 6 Setzen Sie den Stoßknauf auf die Gehäusemitte auf und positionieren Sie den Knauf so dass er sich frei nach oben und unten gegen die Federspannung bewegen kann Setz...

Page 47: ...e Laschen an der Abdeckung und am Gehäusefenster aus Stellen Sie sicher dass die Abdeckung exakt am Gehäuse gesichert ist Die Außenkante der Haltelasche der Abdeckung und die Außenfläche des Gehäuses müssen bündig abschließen Haltelasche der Abdeckung Gehäusefenster Außenfläche des Gehäuses Außenkante der Haltelasche der Abdeckung ...

Page 48: ...N DES MOTORÖLS Durch überaltertes Motoröl verkürzt sich die Lebenszeit des Motors Überprüfen Sie Öl und Ölstand regelmäßig WARNUNG Kurz nach dem Stoppen des Motors sind Motor und Motoröl sehr heiß Warten Sie ausreichend lange bis sich Motor und Motoröl abgekühlt haben Andernfalls kann es zu Verbrennungen der Haut kommen HINWEIS Falls zu viel Öl eingefüllt wird kann das Öl verschmutzt werden oder m...

Page 49: ...s Schwamm können Schwierigkeiten beim Starten des Motors auftreten Wischen Sie anhaftendes Öl um die Luftfilterabdeckung und Trennplatte mit einem Putzlappen ab Anbringen der Luftfilterabdeckung Passen Sie den Filtereinsatz Schwamm und den Filtereinsatz Papier ein Setzen Sie den Filtereinsatz Schwamm bis zum Anschlag in die Luftfilterabdeckung ein Setzen Sie den seitlichen Haken wie dargestellt in...

Page 50: ...oder Austauschen mit Hilfe der Schlauchklemme an der Kraftstoffleitung Drücken Sie den Kraftstofffilter ganz bis auf den Boden des Kraftstofftanks 0 7 bis 0 8 mm 0 028 0 032 ÜBERPRÜFEN DER ZÜNDKERZE Schrauben Sie die Zündkerze ausschließlich mit dem mitgelieferten Universalschlüssel heraus und ein Der Abstand zwischen den Elektroden der Zündkerze muss zwischen 0 7 und 0 8 mm liegen Wenn der Abstan...

Page 51: ...s Motors befindet Achten Sie bei der Lagerung ganz besonders darauf dass ein Herunterfallen des Gerätes ausgeschlossen ist Andernfalls kann es zu Verletzungen von Personen kommen Bewahren Sie den abgelassenen Kraftstoff in einen zugelassenen Behälter an einem gut belüfteten und schattigen Ort auf AUFBEWAHRUNG Maßnahmen nach einer längeren Lagerung Nehmen Sie nach einer längeren Lagerung vor dem St...

Page 52: ...ftfilter Reinigen 127 Zündkerze Inspizieren 128 Kühlluftweg und Zylinderlamellen Reinigen Inspizieren 129 Kraftstoffleitung Inspizieren 129 Wechseln 2 Getriebe Schmierung Nachfüllen 128 Kraftstofffilter Reinigen Ersetzen 128 Ventilspiel Einlass und Auslassventil Inspizieren Einstellen 2 Vergaser Kraftstoff ablassen 3 129 1 Nehmen Sie den ersten Wechsel nach 20 Betriebsstunden vor 2 Wenden Sie sich...

Page 53: ...Verstopfter Kraftstofffilter Reinigen Verschmutzter oder verstopfter Luftfilter Reinigen Anomaler Vergaser Fordern Sie eine Inspektion und Wartung an Anomales Antriebssystem Fordern Sie eine Inspektion und Wartung an Metallblatt dreht sich nicht Befestigungsmutter des Metallblatts gelöst Ordnungsgemäß festziehen Im Metallblatt oder in der Schutzabdeckung haben sich Zweige o ä verfangen Fremdkörper...

Page 54: ...urkolat felszerelése 140 A fémkés vagy a nejlonszálas vágófej felszerelése 142 A használat megkezdése előtt 143 A gép helyes kezelése 145 A használatra vonatkozó előírások és a leállítás módja 146 A vágóeszköz újraélezése 148 Karbantartási utasítások 152 Tárolás 155 Olvassa el a használati utasítást és tartsa be a figyelmeztetéseket és biztonsági utasításokat Legyen különösen elővigyázatos és figy...

Page 55: ...en hogy a gép használatakor elkerülhetőek legyenek a fej a szem a kéz és a lábsérülések valamint a halláskárosodás viselni kell az alábbi védőeszközöket és védőruházatot A lezuhanó tárgyak kockázata miatt mindig viseljen védősisakot A védősisakot 1 rendszeresen meg kell vizsgálni hogy nem károsodott és legkésőbb 5 év elteltével ki kell cserélni Kizárólag jóváhagyott engedélyezett sisakot szabad ha...

Page 56: ... védőburkolatot helyezze fel a szerszámra mielőtt elindítja a motort Ellenkező esetben a vágószerszámmal való érintkezés súlyos sérüléshez vezethet A géphez adott összes védelmi felszerelést és védőburkolatot használni kell Meghibásodott kipufogóval soha ne használja a motort Szállítás közben állítsa le a motort Az eszköz szállításakor mindig helyezze fel a burkolatot a fémkésre Járműben való szál...

Page 57: ...hirtelen reakciója Ha ez bekövetkezik a gép nagy erővel oldalra vagy kezelő felé vágódik ami súlyos sérüléssel is járhat Visszarúgásra elsősorban akkor kell számítani ha a 12 és 2 órának megfelelő pontok közötti késszakaszt használja 3 cm vagy annál nagyobb vastagságú szilárd anyagokhoz bozóthoz vagy fához A visszarúgás megelőzése A 8 és 11 óra közötti részt használja Sose használja a 12 és 2 óra ...

Page 58: ...miatt Elsősegély Ügyeljen rá hogy baleset esetére legyen egy mentődoboz a vágási műveletek környezetében Az elsősegélydobozból kivett eszközöket azonnal pótolni kell Ha segítséget kell hívni adja meg az alábbi információkat A baleset helyszíne Mi történt A sérült személyek száma A sérülés típusa Az Ön neve Csak európai országokra vonatkozóan EK Megfelelőségi nyilatkozat Mi a Makita Corporation min...

Page 59: ...00 Karburátor Membrános típusú Gyújtásrendszer Érintkezésmentes mágneses típusú Gyújtógyertya típusa NGK CMR6A Elektródahézag mm 0 7 0 8 VÁGÓKÉS NEJLONSZÁLAS VÁGÓFEJ VÁGÓKÉS NEJLONSZÁLAS VÁGÓFEJ VÁGÓKÉS NEJLONSZÁLAS VÁGÓFEJ Vibráció az ISO 22867 szerint Jobb markolat Hátsó fogantyú ahv eq m s2 2 2 2 1 3 1 3 5 4 2 2 6 Tűrés K m s2 0 5 0 6 0 5 0 8 1 1 0 7 Bal markolat Elülső fogantyú ahv eq m s2 1 7...

Page 60: ...rtya 6 Kipufogó hangtompítója 7 Tengelykapcsoló ház 8 Hátsó fogantyú 9 Akasztó 10 Markolat 11 Gázkar 12 Vezérlőkábel 13 Tengely 14 Védőburkolat vágószerszám védőburkolat 15 Fogaskerékház Fej 16 Markolattartó 17 Üzemanyagtartály sapka 18 Indítógomb 19 Kipufogócső 20 Olajbetöltő sapka 7 12 8 9 11 4 10 13 15 14 4 11 12 9 10 16 13 14 15 4 11 12 7 10 16 13 14 15 9 5 6 19 20 2 1 17 18 3 ...

Page 61: ...ató furattal Húzza meg biztonságosan a csavart A FOGANTYÚ FELSZERELÉSE Lazítsa meg a gombot 1 Helyezze a markolatot 4 a markolatszorító 2 és a markolatrögzítő 3 közé Állítsa be a markolatot 4 egy kényelmes munkahelyzetbe majd rögzítse a gombot 1 kézzel erősen becsavarva VIGYÁZAT Ne felejtse el felszerelni a rugót 5 EM4350LH típus esetében Szerelje a kengyel markolatot a tengelyre négy darab csavar...

Page 62: ...szálas vágófejet VIGYÁZAT A saját biztonsága és a baleset megelőzési előírásoknak való megfelelés érdekében a megfelelő védőburkolatot mindig fel kell szerelni A gép védőburkolat nélküli használata nem engedélyezett A vágókés külső átmérője legfeljebb 300 mm lehet Ne használjon 300 mm nél nagyobb külső átmérőjű kést Csak 200 mm es fűrészlaphoz használjon 200 mm es fűrészlapvédő burkolatot Csak 225...

Page 63: ...kolatára 3 Szerelje fel a nejlon vágószál védőburkolatát 4 úgy hogy oldalról a helyére csúsztatja a fém vágókés védőburkolatán 3 az ábra szerint Távolítsa el a nejlon vágószál védőburkolatáról 4 a nejlonszál vágására szolgáló késre ragasztott szalagot VIGYÁZAT Ügyeljen rá hogy addig nyomja be a nejlon vágószál védőburkolatát 4 amíg teljesen be nem tolódik Legyen óvatos nehogy megvágja magát a nejl...

Page 64: ...g a csavaranyát 1 bal menetes majd távolítsa el a csavaranyát 1 a kupakot 2 és a rögzítő alátétet 3 4 3 2 1 4 3 2 1 Forgásirány Imbuszkulcs A FÉMKÉS VAGY A NEJLONSZÁLAS VÁGÓFEJ FELSZERELÉSE A fémkés felszerelése a helyén tartott imbuszkulccsal Szerelje fel fémkést a tengelyre úgy hogy a támasztó alátét 4 vezetője illeszkedjen a fémkésen lévő tengelynyílásba Tegye vissza a rögzítő alátétet 3 a kupa...

Page 65: ...t olaj API besorolású SAE 10W 30 olaj SF vagy magasabb osztályú négyütemű gépjárműmotorokhoz Olaj mennyisége Kb 0 10 l MEGJEGYZÉS Ha a motor nem az ábra szerinti vízszintes helyzetben helyezkedik el előfordulhat hogy az olajszint mérése téves lesz és az olajat túltöltheti A felső határértéknél több olaj betöltése szennyeződést és vagy fehér füstöt okozhat Olajcsere Olajbetöltő sapka Távolítsa el a...

Page 66: ...manyag kezelése különös odafigyelést igényel Az üzemanyag oldószerekhez hasonló anyagokat tartalmazhat A tankolást jól szellőző helyiségben vagy a szabadban kell elvégezni Ne lélegezze be az üzemanyag gőzét és tartsa távol magától az üzemanyagot Ha hosszabb ideig vagy többször is érintkezik az üzemanyaggal a bőr kiszárad ami bőrbetegséget vagy allergiát okozhat Az üzemanyag szembe kerülése esetén ...

Page 67: ... maga felé vagy a munkakörnyezetben tartózkodó személyek felé dőljön FIGYELEM A gép teljes irányításának elvesztése komoly testi sérülést vagy HALÁLT okozhat EM4350LH típus esetén A gép leoldásához ujjaival erősen húzza meg a vészkioldó kart 2 Legyen különösen óvatos ekkor nehogy elveszítse a gép fölötti uralmat Ne hagyja hogy a gép maga felé vagy a munkakörnyezetben tartózkodó személyek felé dőlj...

Page 68: ...A VONATKOZÓ ELŐÍRÁSOK ÉS A LEÁLLÍTÁS MÓDJA EM4350UH EM4351UH LEÁLLÍTÁS HASZNÁLAT Reteszelő kar Magas fordulatszám Alacsony fordulatszám Gázkar 1 HASZNÁLAT Reteszelő kar Magas fordulatszám Alacsony fordulatszám Gázkar EM4350LH LEÁLLÍTÁS 1 3 Hidegindító szelep Zárja be a hidegindító szelepet Hidegindító szelep nyitása Hidegen vagy hideg motornál teljesen zárja be Teljesen vagy félig nyissa ki ha a m...

Page 69: ...erszám azonnal forogni kezd 6 Amint a motor elindul engedje fel a reteszelő kart 3 húzza meg a gázkart 2 és engedje fel mindkettőt hogy a motor alapjáraton működjön NYITOTT 5 Berántószerkezet Mindig szilárd helyzetben dolgozzon Bal kézzel fogja meg a gépet és nyomja le határozottan VIGYÁZAT Ne álljon vagy térdeljen a gázbovdenre Lehet hogy a belső vezeték meghúzódik és a vágószerszám véletlenül el...

Page 70: ...ag van beállítva Ettől függetlenül több használatot követően az alapjárati fordulatszámot újra be kell állítani NEJLONSZÁLAS VÁGÓFEJ A nejlonszálas vágófej kétszálas ütögetésre nejlonszálat adagoló mechanizmusból áll A nejlonszálas vágófej automatikusan adagolja a megfelelő hosszúságú nejlonszálat ha a vágófejet enyhén a talajhoz üti mivel a fordulatszám növekedés vagy csökkenés a centrifugális er...

Page 71: ...szorosan az orsó köré a fejen jelölt balra mutató iránynak megfelelően ahol az irányt az LH rövidítés jelzi Tekerje fel az egész szálat egy kb 100 mm es darabot kivéve úgy hogy a végeket ideiglenesen beakasztja az orsó szélén lévő bevágásba Szerelje fel az orsót a házra úgy hogy az orsón lévő mélyedések és kiemelkedések illeszkedjenek a házon lévőkhöz Az orsó feliratos oldala nézzen felfelé hogy l...

Page 72: ...yíl irányába Ne keresztezze egymással a szálakat 5 Tekerje fel az egész szálat egy kb 100 mm es darabot kivéve úgy hogy a végeket ideiglenesen beakasztja az orsó szélén lévő bevágásba 6 Az érintőgombot helyezze vissza a házra úgy hogy a rugó ellenében könnyen mozgatható legyen felfelé és lefelé Az orsót tegye a házba az orsón és az érintő gombon lévő fogakat váltakozva rendezze mint a fogaskerekek...

Page 73: ...e a védőn lévő füleket és a házon levő nyílást Ellenőrizze hogy a védőburkolat pontosan van e rögzítve a házon A védő rögzítőfülének külső éle és a ház külső felülete ugyanazon a kerületen legyen A védőburkolat rögzítőfüle Nyílás a házon A ház külső felülete A védőburkolat rögzítőfülének külső széle ...

Page 74: ...OK A MOTOROLAJ CSERÉJE Az elhasználódott motorolaj csökkenti a motor élettartamát Rendszeresen ellenőrizze az olajat és az olajszintet FIGYELEM A motor és a motorolaj a motor leállítása után még forró marad Hagyjon elegendő időt a motor és a motorolaj lehűléséhez Ellenkező esetben megégetheti bőrét MEGJEGYZÉS Ha az olajszint a felső határ fölött van az olaj szennyezett lehet vagy fehér füst kísére...

Page 75: ...ré tapadt olajat törölje fel egy ronggyal A légszűrő fedelének csatlakoztatása Illessze össze a szivacsbetétet a papírbetéttel A szivacsbetétet teljesen csúsztassa be a légszűrőház burkolatába Az ábra alapján illessze az oldalsó kampót a légszűrő fedelébe és nyomja be a légszűrő fedelének alsó részét kattanásig úgy hogy a kampó megfelelően illeszkedjen a kengyelbe Ezt követően rögzítse szorosan a ...

Page 76: ...sere után rögzítse az üzemanyagszűrőt az üzemanyagcsőre a tömlőbilinccsel Az üzemanyagszűrőt teljesen nyomja az üzemanyagtartály aljáig 0 7 mm 0 8 mm 0 028 0 032 A GYÚJTÓGYERTYA ELLENŐRZÉSE A gyújtógyertya eltávolításához vagy beszereléséhez csak a mellékelt univerzális kulcsot használja A gyújtógyertya két elektródája közötti hézagnak 0 7 0 8 mm nek kell lennie Ha a hézag túl nagy vagy túl kicsi ...

Page 77: ...igyelmet a gép tárolására azért hogy a gép ne essen le Ellenkező esetben személyi sérülés következhet be A kiöntött üzemanyagot egy speciális tartályban tartsa jól szellőztetett helyiségben TÁROLÁS Figyelem a hosszabb idejű tárolást követően Hosszabb idejű leállást követően a beindítás előtt cserélje le az olajat lásd 152 oldal Az olaj használaton kívül is elhasználódik AZ ÜZEMANYAGCSŐ CSERÉJE VIG...

Page 78: ...fordulatszám Átvizsgálás beállítás 148 Légszűrő Tisztítás 153 Gyújtógyertya Átvizsgálás 154 Hűtőlevegő csatornái és a henger bordái Tisztítás átvizsgálás 155 Üzemanyagcső Átvizsgálás 155 Csere 2 Fogaskerékház kenése Újratöltés 154 Üzemanyagszűrő Tisztítás csere 154 Szelephézag szívószelep és kipufogószelep Átvizsgálás beállítás 2 Karburátor Üzemanyag leeresztése 3 155 1 Az első cserét 20 üzemóra u...

Page 79: ...legedett Állítsa NYITOTT állásba Eltömődött üzemanyagszűrő Tisztítsa meg Szennyezett vagy eltömődött légszűrő Tisztítsa meg Hibás porlasztó Végeztessen átvizsgálást és karbantartást Hibás meghajtórendszer Végeztessen átvizsgálást és karbantartást A fémkés nem forog Meglazult a fémkést rögzítő csavaranya Húzza meg Tüskék akadtak a fémkésbe vagy a növényi részek szétszórását megelőző védőburkolatba ...

Page 80: ...Makita Corporation Anjo Aichi Japan 885118 979 www makita com ALA ...

Reviews: