background image


11

1) Keep the engine level, and detach the oil gauge. 


2)  Fill oil up to the edge of the oil refill port. (Refer to Fig.2 of the preceding 

page). 

Feed oil with the lubricant refill container. 


3)  Securely tighten the oil gauge. Insufficient tightening may cause oil leakage. 


Point 2 in Replacement of Oil: “If oil spills out” 

–  If oil spills out between the fuel tank and engine main unit, the oil is sucked into through the cooling air intake port, which 

will contaminate the engine. Be sure to wipe out spilt oil before start of operation. 


REFUELING 

Handling of Fuel 

It is necessary to handle fuel with utmost care. Fuel may contain substances similar to solvents. Refueling must be performed in a sufficiently 
ventilated room or in the open air. Never inhale fuel vapor, and keep fuel away from you. If you touch fuel repeatedly or for a long time, the skin 
becomes dry, which may cause skin disease or allergy. If fuel enters into the eye, clean the eye with fresh water. If your eye remains still 
irritated, consult your doctor. 
 

Storage Period of Fuel 

Fuel should be used up within a period of 4 weeks, even if it is kept in a special container in a well-ventilated shade. 
If a special container is not used or if the container is not covered, fuel may deteriorate in one day. 


STORAGE OF MACHINE AND REFILL TANK 

–  Keep the machine and tank at a cool place free from direct sunshine. 
–  Never keep the fuel in the cabin or trunk. 


Fuel 

The engine is a four-stroke engine. Be sure to use an automobile gasoline (regular gasoline or premium gasoline). 


Points for Fuel 

–  Never use a gasoline mixture which contains engine oil. Otherwise, it will cause excessive carbon accumulation or 

mechanical troubles. 

–  Use of deteriorated oil will cause irregular startup. 


Refueling 

WARNING: INFLAMMABLES STRICTLY PROHIBITED 

 Gasoline used

: Automobile gasoline (unleaded gasoline) 

– 

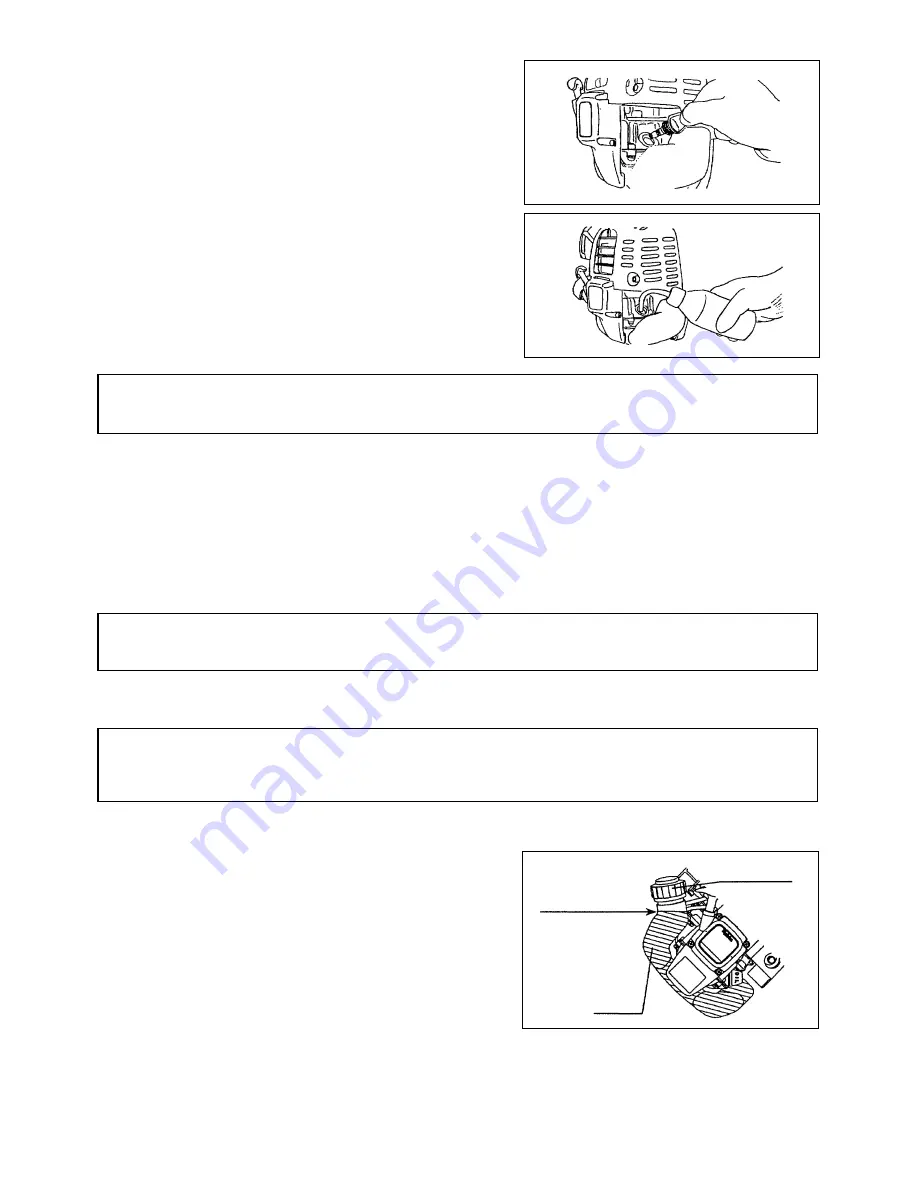
Loosen the tank cap a little so that there will be no difference in atmospheric 
pressure. 

– 

Detach the tank cap, and refuel, discharging air by tilting the fuel tank so that 
the refuel port will be oriented upward. (Never refill fuel full to the oil refill 
port.) 

– 

Wipe well the periphery of the tank cap to prevent foreign matter from 
entering into the fuel tank. 

– 

After refueling, securely tighten the tank cap. 

• 

If there is any flaw or damage on the tank cap, replace it. 

• 

The tank cap is consumable, and therefore should be renewed every two to 
three years. 


Fuel tank cap

Fuel upper limit

Fuel tank 

Summary of Contents for EVH2000

Page 1: ...achten Sie die Sicherheitsvorschriften strikt Bewahren Sie das Anweisungshandbuch sorgf ltig auf Importante Prima di mettere in funzione il leggere attentamente il presente manuale rispettare rigorosa...

Page 2: ...nical data 7 Designetion of parts 8 Assembly instructions 9 Before start of operation 10 Mixing aguricultual chemicals 12 Starting the engine 12 Stopping the engine 14 Operation 15 Inspection and main...

Page 3: ...ng must be used during operation of the power sprayer Pay particular attention to the following regulations Please wear clothing that is functional and tight fitting without restricting movement when...

Page 4: ...ays wear protective gloves during refuelling Change and clean protective clothing at regular intervals Take care not to spill either fuel or oil in order to prevent soil contamination environmental pr...

Page 5: ...d by the trade associations and by insurance companies Do not perform any modifications to the power sprayer as this will risk your safety The performance of maintenance or repair work by the user is...

Page 6: ...68 EEC 89 336 EEC amended 92 31 EEC Measured Sound Power 98 dB Guarantee Sound Power 102 dB These sound power levels wear measured in accordance with Council Directive 2000 14 EC Conformity assessment...

Page 7: ...k capacity L 0 5 Engine oil SAE 10 W 30 oil API SF or later 4 stroke automobile engine oil Engine oil capacity L 0 08 Caburetor type WALBRO WYL Ignition system type Solid state ignition Spark plag typ...

Page 8: ...2 Throttle lever 10 Oil gauge 18 Handgrip 3 Choke lever 11 Primer Pump 19 Nozzle lever 4 Air cleaner cover 12 Chemical tank drain cap 20 Nozzle pipe 5 Plug cover 13 Chemical tank cap 21 Nozzle pipe h...

Page 9: ...in a way shown below without any twists of the shoulder harnesses Instructions are given about the ones for one of the shoulder harnesses Setting upper part of shoulder harness Setting lower part of...

Page 10: ...ecommended oil SAE 10W 30 oil of API Classification Class SF or higher 4 stroke engine for automobile Oil volume Approx 0 08 L Note If the engine is not kept upright oil may go into around the engine...

Page 11: ...a special container in a well ventilated shade If a special container is not used or if the container is not covered fuel may deteriorate in one day STORAGE OF MACHINE AND REFILL TANK Keep the machine...

Page 12: ...t chemical agents to the sprayer tank Mixing the residues of previously used agricultural chemicals with other chemical agents may cause toxin induced diseases STARTING THE ENGINE 1 Before starting th...

Page 13: ...wly the starter handle till a certain resistance is felt Return the starter handle backward once from this position then pull it out with force Never pull the rope to the full Once the start knob is p...

Page 14: ...ble position 5 Pull out slowly the starter handle till a certain resistance is felt Return the starter handle backward once from this position then pullit out with force 6 When the engine is difficult...

Page 15: ...the power sprayer 2 Tightening straps Pull on the free end of the strap Note If straps do not carry any weight they can be tightened with relative ease 3 Serect the desired opereting position the pre...

Page 16: ...bottle fill with new oil up to the top of the oil reservoir 5 Replace and securely tighten the dip stick Insufficient tightening will lead to oil leaks Use the provided oil extraction bottle and lubr...

Page 17: ...gine is running danger of high voltage electric shock 4 Cleaning of fuel filter WARNING INFLAMMABLES STRICTLY PROHIBITED Interval of Cleaning and Inspection Monthly every 50 operating hours Suction he...

Page 18: ...uretor contaminated Fuel tank vent defective fuel supply line interrupted cable or STOP switch faulty Insufficient performance Several systems may simultaneously be affected Engine idling poor Air fil...

Page 19: ...Detached plug cap Attach securely Contaminated spark plug Clean Abnormal clearance of spark plug Adjust clearance Other abnormality of spark plug Replace Abnormal carburetor Make request for inspecti...

Page 20: ...75 Technische gegevens 79 Benaming van onderdelen 80 Montage instrukties 81 Voor gebruik 82 Het mengen van chemische bestrijdingsmiddelen 84 Starten van de motor 84 Stoppen van de motor 86 Werken met...

Page 21: ...orsproeier Draag geen kleding of sieraden die verstrikt kan raken in het gewas of in de machine zelf U moet de volgende beschermingsmiddelen en kledingstukken gebruiken wanneer u met de motorsproeier...

Page 22: ...e brandstoftank helemaal leeg en droog is voor u de motorsproeier opstuurt Tanken Schakel de motor uit bij tanken 7 houdt de machine weg bij open vuur en rook beslist niet Voorkom huidcontact met benz...

Page 23: ...g alle relevante veiligheidsinstrukties uitgegeven door overheidsinstellingen en verzekeraars Voer geen enkele modifikatie uit aan uw motorsproeier omdat dit uw veiligheid in gevaar brengt Het uitvoer...

Page 24: ...zoals gewijzigd bij 92 31 EEC Gemeten geluidsdrukniveau 98 dB Gegarandeerd geluidsdrukniveau 102 dB Deze geluidsdruk waarden waren gemeten in overeenstemming met EU richtlijnen 2000 14 EC Conformitei...

Page 25: ...L 0 5 Motorolie SAE 10W 30 olie API SF of later 4 takt automotorolie Inhoud olietank L 0 08 Carburateur type WALBRO WYL Ontstekingssysteem type Elektronische ontsteking Bougie type NGK CMR6A C type El...

Page 26: ...del 10 Oliepeilstok 18 Handgreep 3 Chokehendel 11 Opvoerpomp 19 Afsluiter 4 Luchtfilter deksel 12 Sproeiertank dop aflaatopening 20 NozSproeipijp 5 Bougie afdekking 13 Sproeiertank dop vulopening 21 S...

Page 27: ...en hieronder en controleer of de riemen niet verdraaid zijn Deze instructie beschrijft de procedure voor 1 riem Monteer de 2de riem op dezelfde manier Instellen van het bovenste deel van de schouderri...

Page 28: ...an API Classificatie SF Klasse of hoger 4 takt olie voor auto s Hoeveelheid olie Ongeveer 0 08 L NOOT Als de motor niet recht wordt gehouden kan er olie in de motor terecht komen en kunt u teveel olie...

Page 29: ...wordt het bewaard in een speciale container in een goed geventileerde donkere ruimte Als u geen speciale container gebruikt of als de container open is kan brandstof binnen een dag onbruikbaar worden...

Page 30: ...et mondstuk extra goed uitspoelen voor u een ander chemisch middel in de sproeiertank gaat doen Mengen van restjes van eerder gebruikte chemische middelen met andere middelen kan leiden tot ziektes en...

Page 31: ...t uzelf schrap 7 Trek rustig aan de trekstarter tot u weerstand voelt compressiepunt Laat de trekstarter vervolgens terugkeren en trek er dan krachtig aan Trek de trekstarter nooit volledig uit Laat n...

Page 32: ...otor van zijn plaats komt en zet uzelf schrap 5 Trek de hendel van de trekstarter voorzichtig uit tot u weerstand voelt Laat de trekstarter terugkeren naar de uitgangspositie en trek er vervolgens ste...

Page 33: ...ast zit Trek aan het losse uiteinde van het riempje 2 Strakker trekken van de riempjes Opmerking Als de riempjes niet belast zijn zijn ze relatief gemakkelijk te verstellen 3 Selecteer de gewenste wer...

Page 34: ...stok weer terug en doe deze stevig vast Als u de peilstok niet goed vast doet kan er olielekkage optreden Gebruik de meegeleverde afgewerkte oliefles en de olievulfles alleen voor de bestemde doeleind...

Page 35: ...de bougiekabel aan met draaiende motor gevaar voor elektrische schok met hoog voltage 4 Schoonmaken van het brandstoffilter GEVAAR ONTVLAMBARE MATERIALEN TEN STRENGSTE VERBODEN Interval voor reiniging...

Page 36: ...doende vermogen Diverse oorzaken Stationairloop onregelmatig Luchtfilter vervuild carburateur vervuild uitlaat verstopt uitlaatpoort vervuild Onderdeel Bedrijfsuren Voor gebruik Na smering Dagelijks 1...

Page 37: ...in te draaien Start de motor vervolgens zoals beschreven Losse bougiedop Zet de bougiedop weer vast Vuile bougie Maak de bougie schoon Abnormale elektrodenafstand Stel de afstand tussen de elektroden...

Reviews: