background image

19. 

On rooftops and other high locations, nail as 
you move forward. It is easy to lose your 
footing if you nail while inching backward. 
When nailing against perpendicular surface, 
nail from the top to the bottom. You can 
perform nailing operations with less fatigue by 
doing so. 

20. 

A nail will be bent or the tool can become 
jammed if you mistakenly nail on top of 
another nail or strike a knot in the wood. The 
nail may be thrown and hit someone, or the 
tool itself can react dangerously. Place the 
nails with care. 

21. 

Do not point the ejection port at anyone in the 
vicinity. Keep hands and feet away from the 
ejection port area. 

• 

Never carry the tool with your finger on the trigger 
or hand it to someone in this condition. Accidental 
firing can be extremely dangerous. 

22. 

Handle the tool carefully, as there is high 
pressure inside the tool that can be dangerous 
if a crack is caused by rough handling 
(dropping or striking). Do not attempt to carve 
or engrave on the tool. 

23. 

Stop nailing operations immediately if you 
notice something wrong or out of the ordinary 
with the tool. 

• 

Always remove the fuel cell, the battery cartridge 
and all of the nails: 

 When 

unattended. 


Before performing any maintenance or repair. 


Before cleaning a jam. 


Before moving the tool to a new location. 

24. 

Perform cleaning and maintenance right after 
finishing the job. Keep the tool in tip-top 
condition. Lubricate moving parts to prevent 
rusting and minimize friction-related wear. 
Wipe off all dust from the parts. 

25. 

Do not modify tool without authorization from 
Makita. 

26. 

Do not attempt to keep the trigger or contact 
element depressed with tape or wire. Death or 
serious injury may occur. 

27. 

Always check contact element as instructed in 
this manual. Nails may be driven accidentally if 
the safety mechanism is not working correctly. 

28. 

Ask Makita's Authorized service centers for 
periodical inspection of the tool. 

29. 

To maintain product SAFETY and RELIABILITY, 

maintenance and repairs should be performed 
by Makita Authorized or Factory Service 
Centers, always using Makita replacement 
parts. 

SAVE THESE INSTRUCTIONS. 


WARNING: 

MISUSE or failure to follow the safety rules stated in 
this instruction manual may cause serious personal 
injury. 

ENC009-1 

IMPORTANT SAFETY 
INSTRUCTIONS 
FOR BATTERY CARTRIDGE 

1. 

Before using battery cartridge, read all 
instructions and cautionary markings on (1) 
battery charger, (2) battery, and (3) product 
using battery. 

2. 

Do not disassemble battery cartridge. 

3. 

If operating time has become excessively 
shorter, stop operating immediately. It may 
result in a risk of overheating, possible burns 
and even an explosion. 

4. 

If electrolyte gets into your eyes, rinse them 
out with clear water and seek medical 
attention right away. It may result in loss of 
your eyesight. 

5. 

Do not short the battery cartridge: 

(1) 

Do not touch the terminals with any 
conductive material. 

(2) 

Avoid storing battery cartridge in a 
container with other metal objects such as 
nails, coins, etc. 

(3) 

Do not expose battery cartridge to water 
or rain. 

A battery short can cause a large current flow, 
overheating, possible burns and even a 
breakdown. 

6. 

Do not store the tool and battery cartridge in 
locations where the temperature may reach or 
exceed 50

C (122

F). 

7. 

Do not incinerate the battery cartridge even if 
it is severely damaged or is completely worn 
out. The battery cartridge can explode in a fire. 

8. 

Be careful not to drop or strike battery.   

9. 

Do not use a damaged battery.   

SAVE THESE INSTRUCTIONS. 

Tips for maintaining maximum battery life 

1. 

Charge the battery cartridge before 
completely discharged. 
Always stop tool operation and charge the 
battery cartridge when you notice less tool 
power. 

2. 

Never recharge a fully charged battery 
cartridge. 
Overcharging shortens the battery service life. 

Summary of Contents for FG01

Page 1: ... MANUAL MANUEL D INSTRUCTION MANUAL DE INSTRUCCIONES IMPORTANT Read Before Using IMPORTANT Lire avant usage IMPORTANTE Leer antes de usar Cordless Brad Nailer Cloueur Brad Sans Fil Clavadora Inalámbrica FG01 012803 ...

Page 2: ...ls Do not use on scaffoldings ladders Warning hot surface Do not touch around this symbol Touching the surface may cause burns or injuries GEA006 2 General Power Tool Safety Warnings WARNING Read all safety warnings and all instructions Failure to follow the warnings and instructions may result in electric shock fire and or serious injury Save all warnings and instructions for future reference The...

Page 3: ...off Any power tool that cannot be controlled with the switch is dangerous and must be repaired 19 Disconnect the plug from the power source and or the battery pack from the power tool before making any adjustments changing accessories or storing power tools Such preventive safety measures reduce the risk of starting the power tool accidentally 20 Store idle power tools out of the reach of children...

Page 4: ...r paint gas adhesives etc they will ignite and explode causing serious injury 8 The area should be sufficiently illuminated to assure safe operations The area should be clear and litter free Be especially careful to maintain good footing and balance 9 Only those involved in the work should be in the vicinity Children especially must be kept away at all times 10 There may be local regulations conce...

Page 5: ...anism is not working correctly 28 Ask Makita s Authorized service centers for periodical inspection of the tool 29 To maintain product SAFETY and RELIABILITY maintenance and repairs should be performed by Makita Authorized or Factory Service Centers always using Makita replacement parts SAVE THESE INSTRUCTIONS WARNING MISUSE or failure to follow the safety rules stated in this instruction manual m...

Page 6: ...old it so that the battery cartridge front shape fits to that of the battery installment opening and slip it into place Insert it all the way until it locks in place with a little click 1 012806 To remove the battery cartridge withdraw it from the tool while pressing the buttons on the side of the cartridge as shown in the figure CAUTION Always insert the battery cartridge all the way until it loc...

Page 7: ...the adaptor 009450 Insert the jet nozzle into the small hole of the adapter properly 012811 Put the fuel cover over the metering valve and push it down to latch Adjusting the nailing depth CAUTION Remove the fuel cell the battery cartridge and nails before adjusting the depth of nailing 1 A B 012812 To get shallower depth turn the adjuster to A direction shown in the figure To get deeper depth tur...

Page 8: ...d the upper part of the hook in both directions and pull the hook from the tool ASSEMBLY CAUTION Always remove the fuel cell and the battery cartridge before carrying out any work on the tool Loading the nailer 012814 Insert a strip of nails into the slit in the rear of the magazine 012815 Pull the pusher lever with pressing the pusher button all the way to the rear of the magazine Then release th...

Page 9: ... gas is injected into combustion chamber and mixed with air by the fan 1 012818 2 Hold the contact element pressing firmly and pull the trigger Fuel gas is combusted and the nail is driven 3 Further driving can be initiated only after both the contact element and the trigger are released Anti dry fire mechanism This mechanism prevents the tool from firing without nail Dry fire prevention automatic...

Page 10: ... then simply lift out the filter Tap the filter lightly to remove any dust Soap and water restores the filter to an almost new condition To maintain product SAFETY and RELIABILITY repairs any other maintenance or adjustment should be performed by Makita Authorized or Factory Service Centers always using Makita replacement parts Thoroughly cleaning If dry fires occur frequently which means the tool...

Page 11: ...GES FROM THE SALE OR USE OF THE PRODUCT THIS DISCLAIMER APPLIES BOTH DURING AND AFTER THE TERM OF THIS WARRANTY MAKITA DISCLAIMS LIABILITY FOR ANY IMPLIED WARRANTIES INCLUDING IMPLIED WARRANTIES OF MERCHANTABILITY AND FITNESS FOR A SPECIFIC PURPOSE AFTER THE ONE YEAR TERM OF THIS WARRANTY This Warranty gives you specific legal rights and you may also have other rights which vary from state to stat...

Page 12: ...e l utilisation formation possible de mélange vapeur air inflammable explosif Évitez d endommager le contenant de le perforer ou de le brûler après l utilisation Utilisez uniquement l outil dans une zone bien aérée pour éviter de souffrir de nausées ou d une perte de connaissance N utilisez jamais l outil dans une atmosphère combustible L échappement de l outil peut enflammer les matériaux inflamm...

Page 13: ...res à semelle antidérapante une coiffure résistante ou une protection d oreilles 12 Évitez les démarrages accidentels Assurez vous que l interrupteur soit en position d arrêt avant de brancher l outil à la prise électrique et ou au bloc piles avant de prendre ou de transporter l outil Vous ouvrez la porte aux accidents si vous transportez les outils électriques avec le doigt sur l interrupteur ou ...

Page 14: ...re dans vos yeux il faut aussi consulter un médecin L électrolyte qui s échappe de la batterie peut causer des irritations ou des brûlures Réparation 28 Faites réparer votre outil électrique par un réparateur qualifié qui utilise des pièces de rechange identiques aux pièces d origine Le maintien de la sûreté de l outil électrique sera ainsi assuré 29 Suivez les instructions de lubrification et de ...

Page 15: ... bois La cloueuse ne doit fonctionner que si ces deux actions sont réalisées Retirez les clous de l outil et tirez complètement le poussoir pour vérifier l absence de tout vice de fonctionnement 14 Pour éviter tout risque de choc électrique de fuite de gaz d explosion etc provoqué par le contact avec des fils dénudés des conduites ou des tuyaux de gaz vérifiez le mur ou le plafond le plancher le t...

Page 16: ... IMPORTANTES POUR LA BATTERIE 1 Avant d utiliser la batterie lisez toutes les instructions et précautions relatives 1 au chargeur de batterie 2 à la batterie et 3 à l outil utilisant la batterie 2 Ne démontez pas la batterie 3 Cessez immédiatement l utilisation si le temps de fonctionnement devient excessivement court Il y a risque de surchauffe de brûlures voire d explosion 4 Si l électrolyte pén...

Page 17: ...n place Insérez la à fond jusqu à ce que vous entendiez un clic 1 012806 Pour retirer la batterie sortez la de l outil tout en appuyant sur les boutons se trouvant de ses deux côtés comme illustré ATTENTION Insérez toujours la batterie jusqu au fond jusqu à ce qu elle verrouille en place Sinon elle risque de tomber accidentellement de l outil en vous blessant ou en blessant une personne se trouvan...

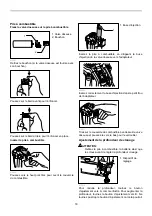
Page 18: ...e vers l adaptateur 009450 Insérez correctement la buse d éjection dans le petit trou de l adaptateur 012811 Tirez sur le couvercle du combustible par dessus la valve doseuse et poussez le vers le bas pour le verrouiller Ajustement de la profondeur de clouage ATTENTION Retirez la pile à combustible la batterie ainsi que les clous avant de régler la profondeur clouage 1 A B 012812 Pour réduire la p...

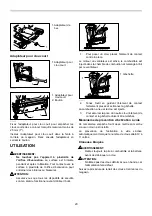
Page 19: ... crochet ouvrez la partie supérieure du crochet dans les deux directions et retirez le de l outil ASSEMBLAGE ATTENTION Retirez toujours la pile à combustible et la batterie avant de manipuler l outil Chargement de la cloueuse 012814 Insérez une bande de clous dans la fente derrière le magasin 012815 Tirez le levier poussoir en appuyant sur le bouton poussoir jusqu à l arrière du magasin Relâchez e...

Page 20: ...tilateur est activé le combustible est injecté dans la chambre de combustion et mélangé à l air par le ventilateur 1 012818 2 Tenez l outil en gardant l élément de contact fermement pressé et actionnez la gâchette La combustion a lieu et le clou est éjecté 3 Pour amorcer la pose d un autre clou l élément de contact et la gâchette doivent être relâchés Mécanisme de prévention d activation à vide Ce...

Page 21: ...èrement sur le filtre pour enlever la poussière En le lavant à l eau et au savon vous pouvez pratiquement remettre à neuf le filtre Pour maintenir la SÉCURITÉ et la FIABILITÉ du produit les réparations tout autre travail d entretien ou de réglage doivent être effectués dans un centre de service Makita agréé ou un centre de service de l usine Makita exclusivement avec des pièces de rechange Makita ...

Page 22: ...IT CET AVIS DE NON RESPONSABILITÉ S APPLIQUE À LA FOIS PENDANT ET APRÈS LA PÉRIODE COUVERTE PAR CETTE GARANTIE MAKITA DÉCLINE TOUTE RESPONSABILITÉ QUANT À TOUTE GARANTIE TACITE INCLUANT LES GARANTIES TACITES DE QUALITÉ MARCHANDE ET ADÉQUATION À UN USAGE PARTICULIER APRÈS LA PÉRIODE D UN AN COUVERTE PAR CETTE GARANTIE Cette garantie vous donne des droits spécifiques reconnus par la loi et possiblem...

Page 23: ... uso se forme un aire de vapor inflamable o explosivo No dañe perfore ni queme incluso tras su uso Use sólo en áreas ventiladas para evitar náuseas y o mareos que afecten su estado consciente Nunca use la herramienta en atmósferas inflamables El escape en la herramienta puede prender fuego con los materiales combustibles No use en tarimas ni escaleras Advertencia superficie caliente No tocar alred...

Page 24: ...apantes casco rígido y protección para oídos utilizado en las condiciones apropiadas reducirá las heridas personales 12 Impida el encendido accidental Asegúrese de que el interruptor esté en la posición de apagado antes de conectar a la alimentación eléctrica y o de colocar el cartucho de la batería así como al levantar o cargar la herramienta Cargar las herramientas eléctricas con su dedo en el i...

Page 25: ...cuda por ayuda médica Puede que el líquido expulsado de la batería cause irritación o quemaduras Servicio de mantenimiento 28 Haga que una persona calificada repare la herramienta utilizando sólo piezas de repuesto idénticas Esto asegura que se mantenga la seguridad de la herramienta eléctrica 29 Siga las instrucciones para la lubricación y cambio de accesorios 30 Mantenga las agarraderas secas li...

Page 26: ...tra la madera Sólo debe activarse cuando ambas acciones sean ejecutadas Compruebe si hay alguna operación defectuosa sin que haya clavos cargados y con el pulsador jalado por completo 14 Revise paredes techos tejados pisos y similares con atención para evitar una descarga eléctrica accidental así como una fuga de gas explosiones etc que sean provocadas por haber insertado el clavo en cables con co...

Page 27: ... 1 Antes de utilizar el cartucho de batería lea todas las instrucciones e indicaciones de precaución sobre 1 el cargador de baterías 2 la batería y 3 el producto con el que se utiliza la batería 2 No desarme el cartucho de batería 3 Si el tiempo de operación se ha acortado en exceso deje de operar de inmediato Podría correrse el riesgo de sobrecalentamiento posibles quemaduras e incluso explosión ...

Page 28: ...artucho Inserte por completo hasta que se fije en su lugar con un pequeño clic 1 012806 Para quitar el cartucho de batería retírelo de la herramienta mientras presiona los botones sobre el costado de cartucho como se ilustra en la figura PRECAUCIÓN Inserte siempre el cartucho de la batería a tope hasta que se bloquee en su sitio En caso contrario podrá caerse accidentalmente de la herramienta y oc...

Page 29: ... a presión de la válvula de medición hacia el adaptador 009450 Inserte la boquilla de chorro a presión correctamente en el orificio pequeño del adaptador 012811 Coloque la tapa de combustible sobre la válvula de medición y empújela hasta que embone Ajuste de la profundidad del clavado PRECAUCIÓN Retire la pila de combustible el cartucho de la batería y los clavos antes de realizar el ajuste de pro...

Page 30: ...cualquier lado de la herramienta Puede quitarse sin necesidad de alguna herramienta Para instalar el gancho expanda la parte superior del gancho e insértela en la herramienta Para quitar el gancho expanda la parte superior del gancho en ambas direcciones y jale el gancho desde la herramienta ENSAMBLE PRECAUCIÓN Quite siempre la pila de combustible y el cartucho de batería antes de llevar a cabo cu...

Page 31: ...ertura de ventilación del escape puede que cause quemaduras o lesiones PRECAUCIÓN Asegúrese de que todos los sistemas de seguridad funcionen adecuadamente antes de utilizar la herramienta 012817 1 Para colocar un clavo coloque el elemento de contacto contra la pieza de trabajo El motor del ventilador se activa se inyecta combustible en la cámara de combustión y se mezcla con el aire del ventilador...

Page 32: ...era recargarse como se indica por la luz indicadora en rojo Limpie la herramienta con un paño limpio y suave Revise el filtro y límpielo en caso de tener residuos de polvo Limpieza del filtro de aire 1 012893 1 2 012820 Ejerza una leve presión hacia arriba sobre la tapa del filtro para abrirla Y luego simplemente levante separándola del filtro Golpetee levemente el filtro para eliminar residuos de...

Page 33: ...rantía no será aplicable cuando EN NINGÚN CASO MAKITA SE HARÁ RESPONSABLE DE NINGÚN DAÑO INDIRECTO FORTUITO O CONSECUENCIAL DERIVADO DE LA VENTA O USO DEL PRODUCTO ESTA RENUNCIA SERÁ APLICABLE TANTO DURANTE COMO DESPUÉS DEL TÉRMINO DE ESTA GARANTÍA MAKITA RENUNCIA LA RESPONSABILIDAD POR CUALQUIER GARANTÍA IMPLÍCITA INCLUYENDO GARANTÍAS IMPLÍCITAS DE COMERCIALIDAD E IDONEIDAD PARA UN FIN ESPECÍFICO...

Page 34: ...34 ...

Page 35: ...35 ...

Page 36: ... polvos creados por el lijado aserrado esmerilado taladrado y otras actividades de la construcción contienen sustancias químicas reconocidas por el Estado de California como causantes de cáncer defectos de nacimiento y otros peligros de reproducción Algunos ejemplos de estos productos químicos son plomo de pinturas a base de plomo sílice cristalino de ladrillos y cemento y otros productos de albañ...

Reviews: