background image

5

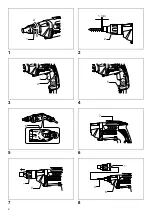
Lighting up the lamps (Fig. 4)

CAUTION:

• Do not look in the light or see the source of light 

directly.

To turn on the lamp, pull the trigger. Release the trigger to 
turn it off.

NOTE:

• Use a dry cloth to wipe the dirt off the lens of lamp. Be 

careful not to scratch the lens of lamp, or it may lower 
the illumination.

Reversing switch action (Fig. 5)

CAUTION:

• Always check the direction of rotation before operation.
• Use the reversing switch only after the tool comes to a 

complete stop. Changing the direction of rotation 
before the tool stops may damage the tool.

This tool has a reversing switch to change the direction of 
rotation. Move the reversing switch lever to the 


position (A side) for clockwise rotation or the 

 position 

(B side) for counterclockwise rotation.

Hook (Fig. 6)

The hook is convenient for temporarily hanging the tool.

ASSEMBLY

CAUTION:

• Always be sure that the tool is switched off and 

unplugged before carrying out any work on the tool.

Installing or removing the bit

To remove the bit, first remove the locator by pulling the 
lock ring away from the gear housing. Then pull the 
magnetic socket bit. 

(Fig. 7)

To install the magnetic socket bit, insert it into the tool as 
far as it will go. Then install the locator by pushing it firmly 
back onto the gear housing. 

(Fig. 8)

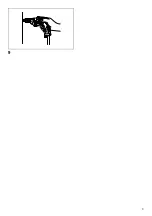
OPERATION (Fig. 9)

Fit the screw on the point of the bit and place the point of 
the screw on the surface of the workpiece to be fastened. 
Apply pressure to the tool and start it. Withdraw the tool 
as soon as the clutch cuts in. Then release the switch 
trigger.

CAUTION:

• When fitting the screw onto the point of the bit, be 

careful not to push in on the screw. If the screw is 
pushed in, the clutch will engage and the screw will 
rotate suddenly. This could damage a workpiece or 
cause an injury.

• Make sure that the bit is inserted straight in the screw 

head, or the screw and/or bit may be damaged.

• Hold the tool only by the handle when performing an 

operation. Do not touch the metal part.

MAINTENANCE

CAUTION:

• Always be sure that the tool is switched off and 

unplugged before attempting to perform inspection or 
maintenance.

To maintain product SAFETY and RELIABILITY, repairs, 
carbon brush inspection and replacement, any other 
maintenance or adjustment should be performed by 
Makita Authorized Service Centers, always using Makita 
replacement parts.

ACCESSORIES

CAUTION:

• These accessories or attachments are recommended 

for use with your Makita tool specified in this manual. 
The use of any other accessories or attachments might 
present a risk of injury to persons. Only use accessory 
or attachment for its stated purpose.

If you need any assistance for more details regarding 
these accessories, ask your local Makita Service Center.
• Phillips Insert bits
• Socket bits
• Magnetic bit holder
• Locator

For European countries only         
Noise

ENG102-2

The typical A-weighted noise level determined according 
to EN60745:

Sound pressure level (L

pA

): 83 dB (A)

Sound power level (L

WA

): 94 dB (A)

Uncertainty (K): 3 dB (A)

Wear ear protection

Vibration        

ENG204-2

The vibration total value (tri-axial vector sum) determined 
according to EN60745:

Work mode: screwdriving without impact
Vibration emission (a

h

): 2.5 m/s

2

 or less

Uncertainty (K): 1.5 m/s

2

EC Declaration of Conformity        

ENH101-12

We Makita Corporation as the responsible 
manufacturer declare that the following Makita 
machine(s):

Designation of Machine: Screwdriver
Model No./ Type: FS2500
are of series production and

Conforms to the following European Directives:

98/37/EC until 28th December 2009 and then with 
2006/42/EC from 29th December 2009

And are manufactured in accordance with the following 
standards or standardised documents:

EN60745

Summary of Contents for FS2500K

Page 1: ...nstructions D Schrauber Betriebsanleitung I Avvitatore Istruzioni per l uso NL Schroevendraaier Gebruiksaanwijzing E Atornillador Manual de instrucciones P Parafusadeira Manual de instruções DK Skruetrækker Brugsanvisning GR Κατσαβίδι Οδηγίες χρήσης FS2500 ...

Page 2: ...2 1 2 3 4 5 6 7 8 1 A B 2 1 mm 3 4 5 6 A B 7 1 8 1 9 8 ...

Page 3: ...3 9 ...

Page 4: ...o follow the safety rules stated in this instruction manual may cause serious personal injury FUNCTIONAL DESCRIPTION CAUTION Always be sure that the tool is switched off and unplugged before adjusting or checking function on the tool Depth adjustment Fig 1 The depth can be adjusted by turning the lock ring Turn it in B direction for less depth and in A direction for more depth One full turn of the...

Page 5: ...is could damage a workpiece or cause an injury Make sure that the bit is inserted straight in the screw head or the screw and or bit may be damaged Hold the tool only by the handle when performing an operation Do not touch the metal part MAINTENANCE CAUTION Always be sure that the tool is switched off and unplugged before attempting to perform inspection or maintenance To maintain product SAFETY a...

Page 6: ...pt by our authorised representative in Europe who is Makita International Europe Ltd Michigan Drive Tongwell Milton Keynes MK15 8JD England 30th January 2009 Tomoyasu Kato Director Makita Corporation 3 11 8 Sumiyoshi cho Anjo Aichi JAPAN ...

Page 7: ...ez l outil fermement 4 Gardez les mains éloignées des pièces en rotation 5 Ne touchez ni l embout ni la pièce immédiatement après le fonctionnement ils risquent d être extrêmement chauds et de vous brûler la peau CONSERVEZ CES INSTRUCTIONS AVERTISSEMENT Une UTILISATION INCORRECTE de l outil ou un non respect des consignes de sécurité indiquées dans ce manuel d instructions peuvent causer des bless...

Page 8: ...e s emballe Ensuite relâchez la gâchette ATTENTION Quand vous ajustez la vis sur le bout de l embout faites attention de ne pas pousser sur la vis Si la vis est poussée l embrayage s enclenche et la vis tourne soudainement Cela pourrait endommager la pièce de travail ou causer des blessures Assurez vous que l embout se trouve inséré bien droit dans la tête de vis faute de quoi la vis et ou l embou...

Page 9: ... EN60745 La documentation technique est disponible auprès de notre représentant en Europe qui est Makita International Europe Ltd Michigan Drive Tongwell Milton Keynes MK15 8JD Angleterre 30 janvier 2009 Tomoyasu Kato Directeur Makita Corporation 3 11 8 Sumiyoshi cho Anjo Aichi JAPAN ...

Page 10: ...das Werkzeug an erhöhten Orten verwendet wird 3 Halten Sie das Werkzeug mit festem Griff 4 Halten Sie Ihre Hände von beweglichen Teilen fern 5 Berühren Sie kurz nach dem Betrieb nicht den Bit Einsatz oder das Werkstück Diese können extrem heiß sein und zu Verbrennungen führen BEWAHREN SIE DIESE ANLEITUNG SORGFÄLTIG AUF WARNUNG Bei MISSBRÄUCHLICHER Verwendung des Werkzeugs und Missachtung der in di...

Page 11: ...use ziehen Ziehen Sie dann den magnetischen Bit Einsatz heraus Abb 7 Um den magnetischen Bit Einsatz anzubringen stecken Sie den Einsatz so weit wie möglich in das Werkzeug Drücken Sie zum Einsetzen des Zentrierring diesen wieder fest auf das Gehäuse Abb 8 BETRIEB Abb 9 Setzen Sie die Schraube auf die Spitze des Bit Einsatzes und setzen Sie dann die Schraubenspitze auf der Oberfläche des zu befest...

Page 12: ...Schrauber Nummer Typ des Modells FS2500 in Serienfertigung hergestellt werden und den folgenden Richtlinien der Europäischen Union genügen 98 37 EC bis 28 Dezember 2009 und 2006 42 EC ab dem 29 Dezember 2009 Außerdem werden die Geräte gemäß den folgenden Standards oder Normen gefertigt EN60745 Die technische Dokumentation erfolgt durch unseren Bevollmächtigten in Europa Makita International Europe...

Page 13: ...po aver utilizzato l utensile in quanto possono raggiungere temperature elevate e provocare ustioni CONSERVARE QUESTE ISTRUZIONI AVVERTENZA L USO IMPROPRIO o la mancata osservanza delle norme di sicurezza contenute in questo manuale può provocare lesioni personali gravi DESCRIZIONE FUNZIONALE ATTENZIONE Prima di regolare o controllare le funzioni dell utensile verificare sempre di averlo spento e ...

Page 14: ... la vite sulla punta prestare attenzione a spingere la punta sulla vite Se si spinge la vite si innesta la frizione e la vite inizia a girare all improvviso Questo potrebbe danneggiare il pezzo in lavorazione o provocare lesioni Accertarsi di aver inserito la punta correttamente nella testa della vite In caso contrario la punta o la vite potrebbero danneggiarsi Durante il funzionamento tenere l ut...

Page 15: ...eguito EN60745 La documentazione tecnica viene conservata dal rappresentante autorizzato Makita in Europa ovvero Makita International Europe Ltd Michigan Drive Tongwell Milton Keynes MK15 8JD Inghilterra 30 gennaio 2009 Tomoyasu Kato Direttore Makita Corporation 3 11 8 Sumiyoshi cho Anjo Aichi JAPAN ...

Page 16: ...hap stevig vast 4 Houd uw handen uit de buurt van draaiende delen 5 Raak de bit en het werkstuk niet onmiddellijk na gebruik aan Zij kunnen bijzonder heet zijn en brandwonden op uw huid veroorzaken BEWAAR DEZE INSTRUCTIES WAARSCHUWING VERKEERD GEBRUIK of het niet volgen van de veiligheidsinstructies in deze gebruiksaanwijzing kan leiden tot ernstig persoonlijk letsel BESCHRIJVING VAN DE FUNCTIES L...

Page 17: ... de diepte instelring weg te trekken van het tandwielhuis Trek vervolgens aan de magnetische dopbit zie afb 7 Om de magnetische dopbit aan te brengen steekt u deze zo ver mogelijk in het gereedschap Plaats daarna de opzetkop terug door deze stevig op het tandwielhuis te drukken zie afb 8 BEDIENING zie afb 9 Plaats de schroef op de punt van de bit en plaats de punt van de schroef op het oppervlak v...

Page 18: ...tion als de verantwoordelijke fabrikant verklaren dat de volgende Makita machine s Aanduiding van de machine Schroevendraaier Modelnr Type FS2500 in serie is geproduceerd en Voldoet aan de volgende Europese richtlijnen 98 37 EC tot en met 28 december 2009 en daarna aan 2006 42 EC vanaf 29 december 2009 En is gefabriceerd in overeenstemming met de volgende normen of genormaliseerde documenten EN607...

Page 19: ...as partes giratorias 5 No toque la punta ni la pieza de trabajo inmediatamente después de la tarea ya que pueden estar extremadamente calientes y producir quemaduras en la piel GUARDE ESTAS INSTRUCCIONES ADVERTENCIA El MAL USO o la no observancia de las normas de seguridad expuestas en este manual de instrucciones pueden ocasionar graves daños corporales DESCRIPCIÓN DEL FUNCIONAMIENTO PRECAUCIÓN A...

Page 20: ... del zócalo magnético Fig 7 Para instalar la punta del zócalo magnético insértela en la herramienta lo máximo posible A continuación instale el posicionador empujándolo firmemente de nuevo en el alojamiento del engranaje Fig 8 MANEJO Fig 9 Encaje el tornillo en el extremo de la punta y coloque la punta del tornillo en la superficie de la pieza de trabajo que se va a atornillar Ejerza presión sobre...

Page 21: ...osotros Makita Corporation en calidad de fabricante responsable declaramos que las siguientes máquinas Makita Designación de la máquina Atornillador Nº de modelo Tipo FS2500 son de producción serie y Cumplen con las siguientes Directivas europeas 98 37 EC hasta el 28 de diciembre de 2009 y después con 2006 42 EC desde el 29 de diciembre de 2009 Y se han fabricado de acuerdo con los siguientes está...

Page 22: ...que podem estar demasiado quentes GUARDE ESTAS INSTRUÇÕES AVISO A UTILIZAÇÃO INCORRECTA ou o não cumprimento das regras de segurança fornecidas neste manual de instruções podem provocar ferimentos graves DESCRIÇÃO DO FUNCIONAMENTO PRECAUÇÃO Certifique se sempre de que a ferramenta está desligada no interruptor e da tomada antes de proceder a ajustes ou testes à mesma Ajuste da profundidade Fig 1 A...

Page 23: ...na ferramenta e inicie a Retire a ferramenta logo que a embraiagem seja activada De seguida solte o gatilho PRECAUÇÃO Quando colocar o parafuso na ponta da broca tenha cuidado para não pressionar o parafuso Se o parafuso for pressionado a embraiagem será accionada e o parafuso rodará repentinamente Isto poderia danificar uma peça de trabalho ou provocar um ferimento Certifique se de que a broca es...

Page 24: ...eias seguintes 98 37 EC até 28 de Dezembro de 2009 e de seguida com a 2006 42 EC a partir de 29 de Dezembro de 2009 E são fabricadas de acordo com as normas ou os documentos padronizados seguintes EN60745 A documentação técnica é mantida pelo nosso representante autorizado na Europa que é Makita International Europe Ltd Michigan Drive Tongwell Milton Keynes MK15 8JD Inglaterra 30 de Janeiro de 200...

Page 25: ... varme og kan forårsage forbrændinger af huden GEM DISSE INSTRUKTIONER ADVARSEL MISBRUG eller manglende overholdelse af sikkerhedsreglerne i denne brugsanvisning kan medføre alvorlig personskade FUNKTIONSBESKRIVELSE FORSIGTIG Sørg altid for at værktøjet er slukket og at stikket er taget ud af stikkontakten før du justerer værktøjet eller kontrollerer dets funktion Dybdejustering Fig 1 Dybden kan j...

Page 26: ...uen aktiveres koblingen og skruen begynder pludselig at dreje rundt Dette kan beskadige arbejdsemnet eller medføre personskade Sørg for at bitten sættes lige ned i skruehovedet ellers kan skruen og eller bitten blive beskadiget Hold kun i håndtaget når der arbejdes med værktøjet Undlad at røre ved metaldelen VEDLIGEHOLDELSE FORSIGTIG Sørg altid for at værktøjet er slukket og at stikket er taget ud...

Page 27: ...indes hos vores autoriserede repræsentant i Europa Makita International Europe Ltd Michigan Drive Tongwell Milton Keynes MK15 8JD England 30 januar 2009 Tomoyasu Kato Direktør Makita Corporation 3 11 8 Sumiyoshi cho Anjo Aichi JAPAN ...

Page 28: ...πάντοτε ότι στέκεστε σταθερά Όταν χρησιμοποιείτε το εργαλείο σε υψηλές τοποθεσίες να βεβαιώνεστε ότι δεν βρίσκεται κανένας από κάτω 3 Να κρατάτε το εργαλείο σταθερά 4 Μην πλησιάζετε τα χέρια σας σε περιστρεφόμενα μέρη 5 Μην αγγίζετε τη μύτη ή το τεμάχιο εργασίας αμέσως μετά τη λειτουργία του εργαλείου Μπορεί να είναι εξαιρετικά θερμά και να προκληθεί έγκαυμα στο δέρμα σας ΦΥΛΑΞΤΕ ΑΥΤΕΣ ΤΙΣ ΟΔΗΓΙΕΣ...

Page 29: ...μακριά τον ασφαλιστικό δακτύλιο από το κέλυφος των οδοντοτροχών Στη συνέχεια τραβήξτε τη μαγνητική υποδοχή της μύτης Εικ 7 Για να τοποθετήσετε την μαγνητική υποδοχή της μύτης εισχωρήστε την μέσα στο εργαλείο όσο βαθιά μπορεί να μπει Μετά τοποθετήστε τον εντοπιστή σπρώχνοντάς τον γερά προς τα πίσω πάνω στο κέλυφος των οδοντοτροχών Εικ 8 ΛΕΙΤΟΥΡΓΙΑ Εικ 9 Τοποθετήστε τη βίδα στο άκρο της μύτης και το...

Page 30: ...1 12 Η Εταιρία Makita ως υπεύθυνος κατασκευαστής δηλώνει ότι το παρακάτω μηχάνημα ή μηχανήματα της Makita Ονομασία Μηχανήματος Κατσαβίδι Αρ Μοντέλου Τύπος FS2500 αποτελούν παραγωγή σε σειρά και Συμμορφώνονται με τις ακόλουθες Ευρωπαϊκές Οδηγίες 98 37 ΕΚ έως την 28η Δεκεμβρίου 2009 και επακόλουθα με την 2006 42 ΕΚ από την 29η Δεκεμβρίου 2009 Και κατασκευάζονται σύμφωνα με τα παρακάτω πρότυπα ή τυπο...

Page 31: ...31 ...

Page 32: ...Makita Corporation Anjo Aichi Japan 884913A998 ...

Reviews: