background image

11 ENGLISH

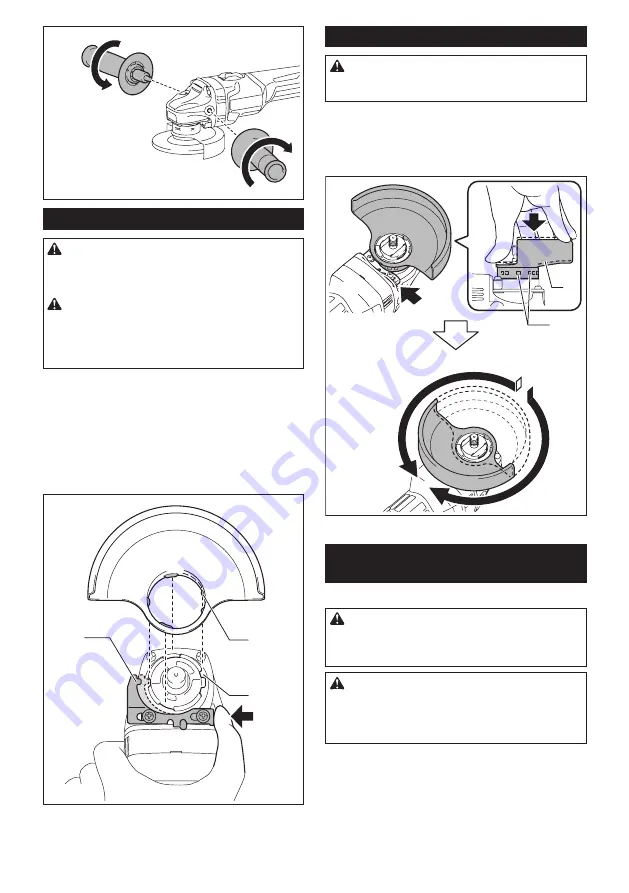
Installing or removing wheel guard

WARNING:


When using a depressed center wheel, 

flap disc, flex wheel or wire wheel brush, the wheel 

guard must be fitted on the tool so that the closed side 

of the guard always points toward the operator.

WARNING:


When using an abrasive cut-off / 

diamond wheel, be sure to use only the special wheel 

guard designed for use with cut-off wheels.

(In some European countries, when using a diamond wheel, the 

ordinary guard can be used. Follow the regulations in your country.)

For depressed center wheel, flap disc, 

flex wheel, wire wheel brush / abrasive 

cut-off wheel, diamond wheel

While pushing the lock lever, mount the wheel guard 

with the protrusions on the wheel guard aligned with the 

notches on the bearing box, and then rotate the wheel 

guard until the wheel guard is locked in place.

1

2

3

►    

1.

 Lock lever 

2.

 Notch 

3.

 Protrusion

To remove wheel guard, follow the installation proce-

dure in reverse.

Adjusting angle of wheel guard

WARNING:

 Make sure that the wheel guard is 

securely locked by the lock lever with one of the holes 

on the wheel guard.

The angle of the wheel guard can be adjusted by 

rotating the wheel guard with pushing it down while 

pushing the lock lever. Adjust the angle of the wheel 

guard according to the work so that the operator can be 

protected.

2

1

►    

1.

 Wheel guard 

2.

 Hole

Installing or removing depressed 

center wheel or flap disc

Optional accessory

WARNING:


When using a depressed center 

wheel or flap disc, the wheel guard must be fitted 

on the tool so that the closed side of the guard 

always points toward the operator.

CAUTION:


Make sure that the mounting part 

of the inner flange fits into the inner diameter of 

the depressed center wheel / flap disc perfectly.


Mounting the inner flange on the wrong side may 

result in the dangerous vibration.

Mount the inner flange onto the spindle.

Make sure to fit the dented part of the inner flange onto 

the straight part at the bottom of the spindle.

Fit the depressed center wheel / flap disc on the inner 

flange and screw the lock nut onto the spindle.

Summary of Contents for GA007G

Page 1: ...INSTRUCTION MANUAL Cordless Angle Grinder GA003G GA004G GA005G GA006G GA007G GA008G ENGLISH Original instructions Read before use ...

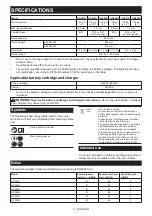
Page 2: ...dence WARNING Only use the battery cartridges and chargers listed above Use of any other battery cartridges and chargers may cause injury and or fire Symbols The followings show the symbols used for the equip ment Be sure that you understand their meaning before use Read instruction manual Wear safety glasses Ni MH Li ion Only for EU countries Do not dispose of electric equipment or battery pack t...

Page 3: ...ormal side grip Model Vibration emission ah AG m s 2 Uncertainty K m s 2 GA003G 5 0 1 5 GA004G 5 5 1 5 GA005G 6 5 1 5 GA006G 5 0 1 5 GA007G 5 5 1 5 GA008G 6 5 1 5 Work mode surface grinding with anti vibration side grip Model Vibration emission ah AG m s 2 Uncertainty K m s 2 GA003G 5 5 1 5 GA004G 5 5 1 5 GA005G 5 5 1 5 GA006G 5 5 1 5 GA007G 5 5 1 5 GA008G 5 5 1 5 Work mode disc sanding with norma...

Page 4: ...e the cord Never use the cord for carrying pulling or unplugging the power tool Keep cord away from heat oil sharp edges or moving parts Damaged or entangled cords increase the risk of electric shock 5 When operating a power tool outdoors use an extension cord suitable for outdoor use Use of a cord suitable for outdoor use reduces the risk of electric shock 6 If operating a power tool in a damp lo...

Page 5: ...ntangle ment of cloth work gloves in the moving parts may result in personal injury Battery tool use and care 1 Recharge only with the charger specified by the manufacturer A charger that is suitable for one type of battery pack may create a risk of fire when used with another battery pack 2 Use power tools only with specifically desig nated battery packs Use of any other battery packs may create ...

Page 6: ...an the power tool s air vents The motor s fan will draw the dust inside the housing and excessive accumulation of powdered metal may cause electrical hazards 14 Do not operate the power tool near flammable materials Sparks could ignite these materials 15 Do not use accessories that require liquid coolants Using water or other liquid coolants may result in electrocution or shock Kickback and Relate...

Page 7: ...the disc or kickback Safety Warnings Specific for Wire Brushing Operations 1 Be aware that wire bristles are thrown by the brush even during ordinary operation Do not overstress the wires by applying excessive load to the brush The wire bristles can easily penetrate light clothing and or skin 2 If the use of a guard is recommended for wire brushing do not allow any interference of the wire wheel o...

Page 8: ...h a manner that it cannot move around in the packaging 11 When disposing the battery cartridge remove it from the tool and dispose of it in a safe place Follow your local regulations relating to disposal of battery 12 Use the batteries only with the products specified by Makita Installing the batteries to non compliant products may result in a fire exces sive heat explosion or leak of electrolyte ...

Page 9: ... If not it may accidentally fall out of the tool causing injury to you or someone around you CAUTION Do not install the battery cartridge forcibly If the cartridge does not slide in easily it is not being inserted correctly Indicating the remaining battery capacity Press the check button on the battery cartridge to indi cate the remaining battery capacity The indicator lamps light up for a few sec...

Page 10: ...n firm grasp on tool To start the tool slide the slide switch toward the I ON position by pushing the rear of the slide switch For continuous operation press the front of the slide switch to lock it To stop the tool press the rear of the slide switch then slide it toward the O OFF position 1 1 Slide switch Accidental re start preventive function Even if the battery cartridge is installed on the to...

Page 11: ...everse Adjusting angle of wheel guard WARNING Make sure that the wheel guard is securely locked by the lock lever with one of the holes on the wheel guard The angle of the wheel guard can be adjusted by rotating the wheel guard with pushing it down while pushing the lock lever Adjust the angle of the wheel guard according to the work so that the operator can be protected 2 1 1 Wheel guard 2 Hole I...

Page 12: ...oving abrasive disc Optional accessory NOTE Use sander accessories specified in this man ual These must be purchased separately For 100 mm 4 model 1 2 3 4 1 Sanding lock nut 2 Abrasive disc 3 Rubber pad 4 Inner flange 1 Mount the inner flange onto the spindle 2 Mount the rubber pad onto the spindle 3 Fit the disc on the rubber pad and screw the sand ing lock nut onto the spindle 4 Hold the spindle...

Page 13: ...e arrow points the notch Otherwise a lock nut wrench is required to loosen it Insert one pin of the wrench into a hole and turn Ezynut counterclockwise Installing abrasive cut off diamond wheel Optional accessory WARNING When using an abrasive cut off diamond wheel be sure to use only the special wheel guard designed for use with cut off wheels In some European countries when using a diamond wheel...

Page 14: ... Diamond wheel 4 mm 5 32 or thicker 4 Inner flange Installing wire cup brush Optional accessory CAUTION Do not use brush that is damaged or which is out of balance Use of damaged brush could increase potential for injury from contact with broken brush wires 1 1 Wire cup brush Remove the battery cartridge from the tool and place it upside down allowing easy access to spindle Remove any accessories ...

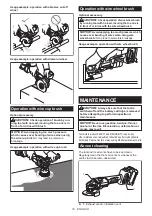
Page 15: ...ne hand on housing and the other on the side grip handle Grinding and sanding operation Turn the tool on and then apply the wheel or disc to the workpiece In general keep the edge of the wheel or disc at an angle of about 15 to the workpiece surface During the break in period with a new wheel do not work the grinder in forward direction or it may cut into the workpiece Once the edge of the wheel h...

Page 16: ...e wire wheel brush NOTICE Avoid applying too much pressure which causes over bending of wires when using wire wheel brush It may lead to premature breakage Usage example operation with wire wheel brush MAINTENANCE CAUTION Always be sure that the tool is switched off and the battery cartridge is removed before attempting to perform inspection or maintenance NOTICE Never use gasoline benzine thinner...

Page 17: ...cover from inhalation vent and clean it for smooth air circulation 1 1 Dust cover NOTICE Clean out the dust cover when it is clogged with dust or foreign matters Continuing operation with a clogged dust cover may damage the tool ...

Page 18: ... 2 model 125 mm 5 model 1 Grip 36 2 Wheel Guard for grinding wheel 3 Inner flange 4 Depressed center wheel Flap disc 5 Lock nut 6 Back up pad 7 Flex wheel 8 Inner flange and rubber pad 76 Rubber pad 100 Rubber pad 115 9 Abrasive disc 10 Sanding lock nut 11 Wire wheel brush 12 Wire cup brush 13 Wheel Guard for cut off wheel 1 14 Abrasive cut off wheel Diamond wheel Lock nut wrench NOTE 1 In some Eu...

Page 19: ...19 ...

Page 20: ...www makita com Makita Europe N V Makita Corporation 3 11 8 Sumiyoshi cho Anjo Aichi 446 8502 Japan Jan Baptist Vinkstraat 2 3070 Kortenberg Belgium 885767 225 EN 20191011 ...

Reviews: