background image

15 ENGLISH

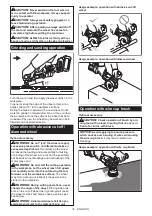
When installing the diamond wheel:
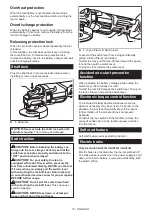
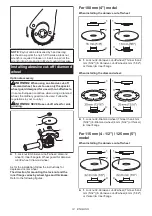
1

1

4

4

2

3

►    

1.

 Lock nut 

2.

 Diamond wheel (Thinner than 4 mm 

(5/32″)) 

3.

 Diamond wheel (4 mm (5/32″) or thicker) 

4.

 Inner flange

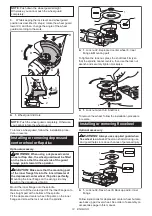
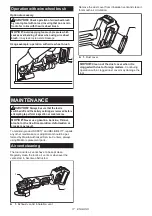
Installing wire cup brush

Optional accessory

CAUTION:


Do not use brush that is damaged, 

or which is out of balance.

 Use of damaged brush 

could increase potential for injury from contact with 

broken brush wires.

1

►    

1.

 Wire cup brush

Remove the battery cartridge from the tool and place it 

upside down allowing easy access to spindle.

Remove any accessories on spindle. Thread wire cup 

brush onto spindle and tighten with supplied wrench.

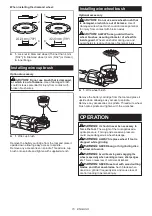
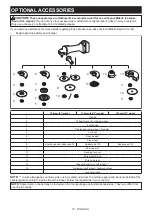
Installing wire wheel brush

Optional accessory

CAUTION:


Do not use wire wheel brush that 

is damaged, or which is out of balance.

 Use of 

damaged wire wheel brush could increase potential 

for injury from contact with broken wires.

CAUTION:


ALWAYS use guard with wire 

wheel brushes, assuring diameter of wheel fits 

inside guard.

 Wheel can shatter during use and 

guard helps to reduce chances of personal injury.

1

►    

1.

 Wire wheel brush

Remove the battery cartridge from the tool and place it 

upside down allowing easy access to spindle.

Remove any accessories on spindle. Thread wire wheel 

brush onto spindle and tighten with the wrenches.

OPERATION

WARNING:


It should never be necessary to 

force the tool.

 The weight of the tool applies ade-

quate pressure. Forcing and excessive pressure 

could cause dangerous wheel breakage.

WARNING:


ALWAYS replace wheel if tool is 

dropped while grinding.

WARNING:


NEVER bang or hit grinding disc 

or wheel onto work.

WARNING:


Avoid bouncing and snagging the 

wheel, especially when working corners, sharp edges 

etc.

 This can cause loss of control and kickback.

WARNING:


NEVER use tool with wood cutting 

blades and other saw blades.

 Such blades when 

used on a grinder frequently kick and cause loss of 

control leading to personal injury.

Summary of Contents for GA012G

Page 1: ...INSTRUCTION MANUAL Cordless Angle Grinder GA011G GA012G GA013G GA014G GA015G GA016G ENGLISH Original instructions Read before use ...

Page 2: ... WARNING Only use the battery cartridges and chargers listed above Use of any other battery cartridges and chargers may cause injury and or fire Symbols The followings show the symbols which may be used for the equipment Be sure that you understand their meaning before use Read instruction manual Wear safety glasses Ni MH Li ion Only for EU countries Do not dispose of electric equipment or battery...

Page 3: ...de surface grinding with normal side grip Model Vibration emission ah AG m s 2 Uncertainty K m s 2 GA011G 4 5 1 5 GA012G 5 0 1 5 GA013G 6 0 1 5 GA014G 4 5 1 5 GA015G 5 0 1 5 GA016G 6 0 1 5 Work mode surface grinding with anti vibration side grip Model Vibration emission ah AG m s 2 Uncertainty K m s 2 GA011G 4 5 1 5 GA012G 5 0 1 5 GA013G 6 5 1 5 GA014G 4 5 1 5 GA015G 5 0 1 5 GA016G 6 5 1 5 Work mo...

Page 4: ...e the cord Never use the cord for carrying pulling or unplugging the power tool Keep cord away from heat oil sharp edges or moving parts Damaged or entangled cords increase the risk of electric shock 5 When operating a power tool outdoors use an extension cord suitable for outdoor use Use of a cord suitable for outdoor use reduces the risk of electric shock 6 If operating a power tool in a damp lo...

Page 5: ...ntangle ment of cloth work gloves in the moving parts may result in personal injury Battery tool use and care 1 Recharge only with the charger specified by the manufacturer A charger that is suitable for one type of battery pack may create a risk of fire when used with another battery pack 2 Use power tools only with specifically desig nated battery packs Use of any other battery packs may create ...

Page 6: ...ean the power tool s air vents The motor s fan will draw the dust inside the housing and excessive accumulation of powdered metal may cause electrical hazards 14 Do not operate the power tool near flammable materials Sparks could ignite these materials 15 Do not use accessories that require liquid coolants Using water or other liquid coolants may result in electrocution or shock Kickback and Relat...

Page 7: ...nding paper Larger sanding paper extending beyond the sanding pad presents a laceration hazard and may cause snagging tearing of the disc or kickback Safety Warnings Specific for Wire Brushing Operations 1 Be aware that wire bristles are thrown by the brush even during ordinary operation Do not overstress the wires by applying excessive load to the brush The wire bristles can easily penetrate ligh...

Page 8: ...red Please also observe possibly more detailed national regulations Tape or mask off open contacts and pack up the battery in such a manner that it cannot move around in the packaging 11 When disposing the battery cartridge remove it from the tool and dispose of it in a safe place Follow your local regulations relating to disposal of battery 12 Use the batteries only with the products specified by...

Page 9: ... If not it may accidentally fall out of the tool causing injury to you or someone around you CAUTION Do not install the battery cartridge forcibly If the cartridge does not slide in easily it is not being inserted correctly Indicating the remaining battery capacity Press the check button on the battery cartridge to indi cate the remaining battery capacity The indicator lamps light up for a few sec...

Page 10: ...thorized service center for proper repairs BEFORE further usage CAUTION Do not pull the switch lever hard without pulling the lock off lever This can cause switch breakage CAUTION NEVER tape down or defeat pur pose and function of lock off lever 1 2 1 Lock off lever 2 Switch lever To prevent the switch lever from being accidentally pulled a lock off lever is provided To start the tool pull the loc...

Page 11: ...ake sure that the wheel guard is securely locked by the lock lever with one of the holes on the wheel guard WARNING When using an abrasive cut off diamond wheel be sure to use only the special wheel guard designed for use with cut off wheels In some European countries when using a diamond wheel the ordinary guard can be used Follow the regulations in your country For depressed center wheel flap di...

Page 12: ...ectly Mounting the inner flange on the wrong side may result in the dangerous vibration Mount the inner flange onto the spindle Make sure to fit the dented part of the inner flange onto the straight part at the bottom of the spindle Fit the depressed center wheel flap disc on the inner flange and screw the lock nut onto the spindle 2 3 4 1 1 Lock nut 2 Depressed center wheel 3 Inner flange 4 Mount...

Page 13: ...t the rubber pad onto the spindle 2 Fit the disc on the rubber pad and screw the sand ing lock nut onto the spindle 3 Hold the spindle with the shaft lock and securely tighten the sanding lock nut clockwise with the lock nut wrench To remove the disc follow the installation procedure in reverse Installing or removing Ezynut Optional accessory CAUTION Do not use Ezynut with Super Flange or angle gr...

Page 14: ...3 Inner flange 4 Wheel guard for abrasive cut off wheel diamond wheel As for the installation follow the instructions for depressed center wheel The direction for mounting the lock nut and the inner flange varies by wheel type and thickness Refer to the following figures For 100 mm 4 model When installing the abrasive cut off wheel 16 mm 5 8 16 mm 5 8 1 1 4 4 2 3 1 Lock nut 2 Abrasive cut off whee...

Page 15: ...CAUTION ALWAYS use guard with wire wheel brushes assuring diameter of wheel fits inside guard Wheel can shatter during use and guard helps to reduce chances of personal injury 1 1 Wire wheel brush Remove the battery cartridge from the tool and place it upside down allowing easy access to spindle Remove any accessories on spindle Thread wire wheel brush onto spindle and tighten with the wrenches OP...

Page 16: ...sive depth of cut Overstressing the wheel increases the loading and susceptibility to twisting or binding of the wheel in the cut and the possibility of kickback wheel breakage and overheating of the motor may occur WARNING Do not start the cutting operation in the workpiece Let the wheel reach full speed and carefully enter into the cut moving the tool forward over the workpiece surface The wheel...

Page 17: ...maintenance NOTICE Never use gasoline benzine thinner alcohol or the like Discoloration deformation or cracks may result To maintain product SAFETY and RELIABILITY repairs any other maintenance or adjustment should be per formed by Makita Authorized Service Centers always using Makita replacement parts Air vent cleaning The tool and its air vents have to be kept clean Regularly clean the tool s ai...

Page 18: ... 2 model 125 mm 5 model 1 Grip 36 2 Wheel Guard for grinding wheel 3 Inner flange 4 Depressed center wheel Flap disc 5 Lock nut 6 Back up pad 7 Flex wheel 8 Inner flange and rubber pad 76 Rubber pad 100 Rubber pad 115 9 Abrasive disc 10 Sanding lock nut 11 Wire wheel brush 12 Wire cup brush 13 Wheel Guard for cut off wheel 1 14 Abrasive cut off wheel Diamond wheel Lock nut wrench NOTE 1 In some Eu...

Page 19: ...19 ...

Page 20: ...www makita com Makita Europe N V Makita Corporation 3 11 8 Sumiyoshi cho Anjo Aichi 446 8502 Japan Jan Baptist Vinkstraat 2 3070 Kortenberg Belgium 885776 224 EN 20191219 ...

Reviews: