background image

9 ENGLISH

1

2

3

4

►    

1.

 Lock nut 

2.

 Flex wheel 

3.

 Back up pad 

4.

 Inner 

flange

Follow instructions for depressed center wheel but also 

use back up pad over wheel. See order of assembly on 

accessories page in this manual.

Installing or removing abrasive disc

Optional accessory

1

2

3

►    

1.

 Sanding lock nut 

2.

 Abrasive disc 

3.

 Rubber pad

1.


Mount the rubber pad onto the spindle.

2.


Fit the disc on the rubber pad and screw the sand-

ing lock nut onto the spindle.

3.

  Hold the spindle with the shaft lock, and securely 

tighten the sanding lock nut clockwise with the lock nut 

wrench.
To remove the disc, follow the installation procedure in 

reverse.

NOTE:

 Use sander accessories specified in this man

-

ual. These must be purchased separately.

OPERATION

WARNING:


It should never be necessary to 

force the tool.

 The weight of the tool applies ade-

quate pressure. Forcing and excessive pressure 

could cause dangerous wheel breakage.

WARNING:


ALWAYS replace wheel if tool is 

dropped while grinding.

WARNING:


NEVER bang or hit grinding disc 

or wheel onto work.

WARNING:


Avoid bouncing and snagging 

the wheel, especially when working corners, 

sharp edges etc.

 This can cause loss of control and 

kickback.

WARNING:


NEVER use tool with wood cutting 

blades and other saw blades.

 Such blades when 

used on a grinder frequently kick and cause loss of 

control leading to personal injury.

CAUTION:


Never switch on the tool when it 

is in contact with the workpiece, it may cause an 

injury to operator.

CAUTION:


Always wear safety goggles or a 

face shield during operation.

CAUTION:


After operation, always switch off 

the tool and wait until the wheel has come to a 

complete stop before putting the tool down.

CAUTION:


ALWAYS hold the tool firmly with 

one hand on housing and the other on the side 

handle.

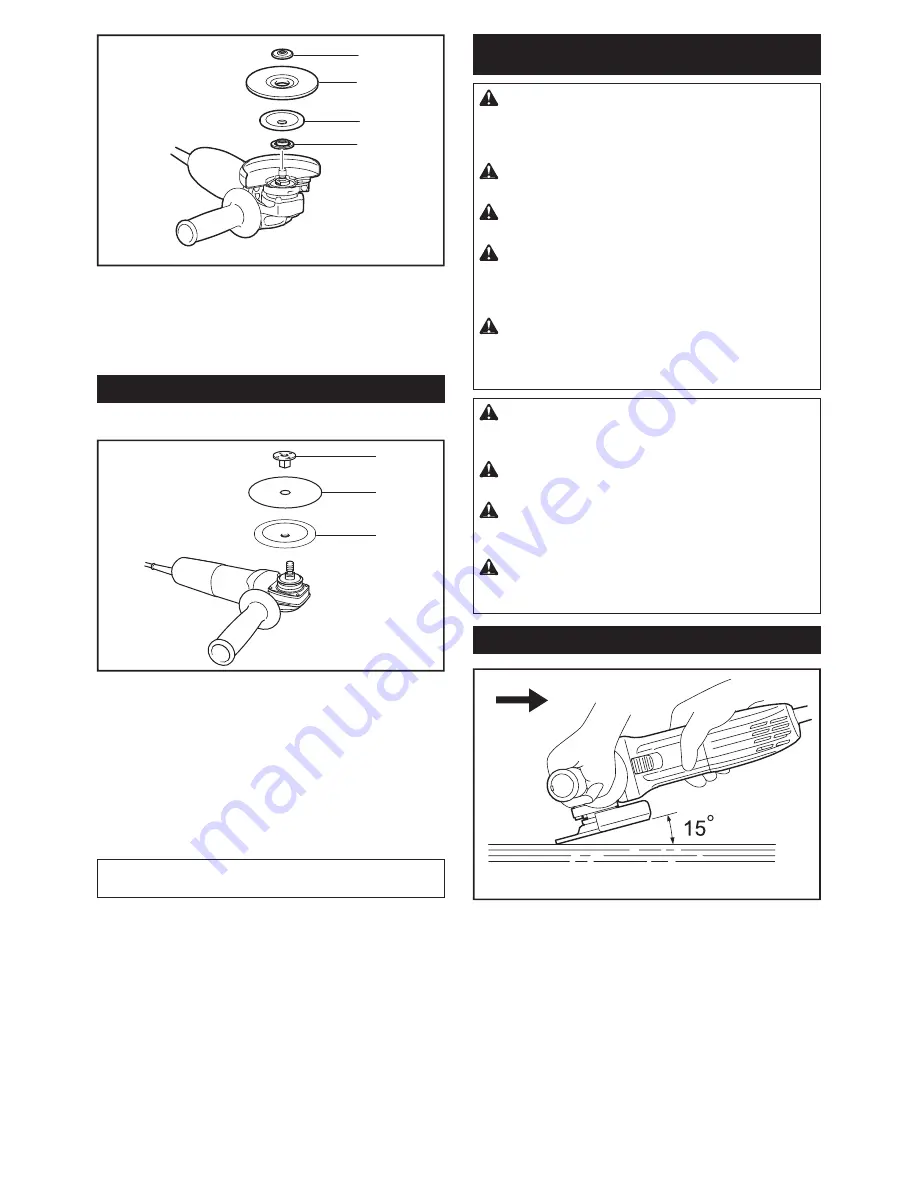
Grinding and sanding operation

Turn the tool on and then apply the wheel or disc to the 

workpiece.

In general, keep the edge of the wheel or disc at an 

angle of about 15° to the workpiece surface.

During the break-in period with a new wheel, do not 

work the grinder in forward direction or it may cut into 

the workpiece. Once the edge of the wheel has been 

rounded off by use, the wheel may be worked in both 

forward and backward direction.

Summary of Contents for GA4530R

Page 1: ...INSTRUCTION MANUAL Angle Grinder GA4030R GA4530R GA5030R ENGLISH Original instructions DOUBLE INSULATION Read before use ...

Page 2: ...water Power supply The tool should be connected only to a power supply of the same voltage as indicated on the nameplate and can only be operated on single phase AC supply They are double insulated and can therefore also be used from sockets without earth wire Noise The typical A weighted noise level determined accord ing to EN60745 Sound pressure level LpA 85 dB A Sound power level LWA 96 dB A Un...

Page 3: ...ncreased risk of elec tric shock if your body is earthed or grounded 3 Do not expose power tools to rain or wet con ditions Water entering a power tool will increase the risk of electric shock 4 Do not abuse the cord Never use the cord for carrying pulling or unplugging the power tool Keep cord away from heat oil sharp edges or moving parts Damaged or entangled cords increase the risk of electric ...

Page 4: ...apart 5 The outside diameter and the thickness of your accessory must be within the capacity rating of your power tool Incorrectly sized accessories cannot be adequately guarded or controlled 6 Threaded mounting of accessories must match the grinder spindle thread For acces sories mounted by flanges the arbour hole of the accessory must fit the locating diameter of the flange Accessories that do n...

Page 5: ...otect the operator from broken wheel fragments acci dental contact with wheel and sparks that could ignite clothing 4 Wheels must be used only for recommended applications For example do not grind with the side of cut off wheel Abrasive cut off wheels are intended for peripheral grinding side forces applied to these wheels may cause them to shatter 5 Always use undamaged wheel flanges that are of ...

Page 6: ...ion that the wheel continues to rotate after the tool is switched off 15 If working place is extremely hot and humid or badly polluted by conductive dust use a short circuit breaker 30 mA to assure opera tor safety 16 Do not use the tool on any materials contain ing asbestos 17 When use cut off wheel always work with the dust collecting wheel guard required by domestic regulation 18 Cutting discs ...

Page 7: ... diamond wheel WARNING When using a depressed center wheel flap disc flex wheel or wire wheel brush the wheel guard must be fitted on the tool so that the closed side of the guard always points toward the operator WARNING When using an abrasive cut off diamond wheel be sure to use only the special wheel guard designed for use with cut off wheels In some European countries when using a diamond whee...

Page 8: ...the dangerous vibration Mount the inner flange onto the spindle Make sure to fit the dented part of the inner flange onto the straight part at the bottom of the spindle Fit the depressed center wheel flap disc on the inner flange and screw the lock nut onto the spindle 1 2 4 3 1 Lock nut 2 Depressed center wheel 3 Inner flange 4 Mounting part To tighten the lock nut press the shaft lock firmly so ...

Page 9: ...t grinding disc or wheel onto work WARNING Avoid bouncing and snagging the wheel especially when working corners sharp edges etc This can cause loss of control and kickback WARNING NEVER use tool with wood cutting blades and other saw blades Such blades when used on a grinder frequently kick and cause loss of control leading to personal injury CAUTION Never switch on the tool when it is in contact...

Page 10: ... cutting operations never change the angle of the wheel Placing side pres sure on the cut off wheel as in grinding will cause the wheel to crack and break causing serious per sonal injury WARNING A diamond wheel shall be oper ated perpendicular to the material being cut 1 2 3 4 1 Lock nut 2 Abrasive cut off wheel diamond wheel 3 Inner flange 4 Wheel guard for abrasive cut off wheel diamond wheel A...

Page 11: ...hat no one is in front of or in line with the wire wheel brush CAUTION Do not use wire wheel brush that is damaged or which is out of balance Use of damaged wire wheel brush could increase potential for injury from contact with broken wires CAUTION ALWAYS use guard with wire wheel brushes assuring diameter of wheel fits inside guard Wheel can shatter during use and guard helps to reduce chances of...

Page 12: ...kita tool spec ified in this manual The use of any other accessories or attachments might present a risk of injury to persons Only use accessory or attachment for its stated purpose If you need any assistance for more details regarding these accessories ask your local Makita Service Center 2 5 2 2 11 12 4 3 5 6 7 8 9 10 1 13 3 14 5 3 100 mm 4 model 115 mm 4 1 2 model 125 mm 5 model 1 Grip 36 2 Whe...

Page 13: ...or cut off wheel 1 14 Abrasive cut off wheel Diamond wheel Lock nut wrench NOTE 1 In some European countries when using a diamond wheel the ordinary guard can be used instead of the special guard covering the both side of the wheel Follow the regulations in your country NOTE Some items in the list may be included in the tool package as standard accessories They may differ from country to country ...

Page 14: ...14 ...

Page 15: ...15 ...

Page 16: ...www makita com Makita Jan Baptist Vinkstraat 2 3070 Belgium Makita Corporation Anjo Aichi Japan 885462 227 EN 20150731 ...

Reviews: