background image

7

attached to your power tool, it does not assure safe 
operation.

4.

The rated speed of the accessory must be at least 
equal to the maximum speed marked on the power 
tool.

 Accessories running faster than their rated 

speed can break and fly apart.

5.

The outside diameter and the thickness of your 
accessory must be within the capacity rating of 
your power tool.

 Incorrectly sized accessories 

cannot be adequately guarded or controlled.

6.

Threaded mounting of accessories must match 
the grinder spindle thread. For accessories 
mounted by flanges, the arbour hole of the 
accessory must fit the locating diameter of the 
flange.

 Accessories that do not match the mounting 

hardware of the power tool will run out of balance, 
vibrate excessively and may cause loss of control.

7.

Do not use a damaged accessory. Before each use 
inspect the accessory such as abrasive wheels for 
chips and cracks, backing pad for cracks, tear or 
excess wear, wire brush for loose or cracked 
wires. If power tool or accessory is dropped, 
inspect for damage or install an undamaged 
accessory. After inspecting and installing an 
accessory, position yourself and bystanders away 
from the plane of the rotating accessory and run 
the power tool at maximum no-load speed for one 
minute.

 Damaged accessories will normally break 

apart during this test time.

8.

Wear personal protective equipment. Depending 
on application, use face shield, safety goggles or 
safety glasses. As appropriate, wear dust mask, 
hearing protectors, gloves and workshop apron 
capable of stopping small abrasive or workpiece 
fragments.

 The eye protection must be capable of 

stopping flying debris generated by various 
operations. The dust mask or respirator must be 
capable of filtrating particles generated by your 
operation. Prolonged exposure to high intensity noise 
may cause hearing loss.

9.

Keep bystanders a safe distance away from work 
area. Anyone entering the work area must wear 
personal protective equipment.

 Fragments of 

workpiece or of a broken accessory may fly away and 
cause injury beyond immediate area of operation.

10.

Hold the power tool by insulated gripping surfaces 
only, when performing an operation where the 
cutting accessory may contact hidden wiring or its 
own cord. 

Cutting accessory contacting a “live” wire 

may make exposed metal parts of the power tool “live” 
and could give the operator an electric shock.

11.

Position the cord clear of the spinning accessory.


If you lose control, the cord may be cut or snagged 
and your hand or arm may be pulled into the spinning 
accessory. 

12.

Never lay the power tool down until the accessory 
has come to a complete stop.

 The spinning 

accessory may grab the surface and pull the power 
tool out of your control.

13.

Do not run the power tool while carrying it at your 
side.

 Accidental contact with the spinning accessory 

could snag your clothing, pulling the accessory into 
your body. 

14.

Regularly clean the power tool’s air vents.

 The 

motor’s fan will draw the dust inside the housing and 
excessive accumulation of powdered metal may 
cause electrical hazards.

15.

Do not operate the power tool near flammable 
materials.

 Sparks could ignite these materials.

16.

Do not use accessories that require liquid 
coolants. 

Using water or other liquid coolants may 

result in electrocution or shock.

Kickback and Related Warnings

Kickback is a sudden reaction to a pinched or snagged 
rotating wheel, backing pad, brush or any other 
accessory. Pinching or snagging causes rapid stalling of 
the rotating accessory which in turn causes the 
uncontrolled power tool to be forced in the direction 
opposite of the accessory’s rotation at the point of the 
binding.
For example, if an abrasive wheel is snagged or pinched 
by the workpiece, the edge of the wheel that is entering 
into the pinch point can dig into the surface of the material 
causing the wheel to climb out or kick out. The wheel may 
either jump toward or away from the operator, depending 
on direction of the wheel’s movement at the point of 
pinching. Abrasive wheels may also break under these 
conditions.
Kickback is the result of power tool misuse and/or 
incorrect operating procedures or conditions and can be 
avoided by taking proper precautions as given below.

a) 

Maintain a firm grip on the power tool and 

position your body and arm to allow you to resist 
kickback forces. Always use auxiliary handle, if 
provided, for maximum control over kickback or 
torque reaction during start-up.

 The operator can 

control torque reactions or kickback forces, if proper 
precautions are taken.
b) 

Never place your hand near the rotating 

accessory. 

Accessory may kickback over your hand.

c) 

Do not position your body in the area where 

power tool will move if kickback occurs.

 Kickback 

will propel the tool in direction opposite to the wheel’s 
movement at the point of snagging.
d) 

Use special care when working corners, sharp 

edges etc. Avoid bouncing and snagging the 
accessory.

 Corners, sharp edges or bouncing have a 

tendency to snag the rotating accessory and cause 
loss of control or kickback.
e) 

Do not attach a saw chain woodcarving blade or 

toothed saw blade.

 Such blades create frequent 

kickback and loss of control.

Safety Warnings Specific for Grinding and Abrasive 
Cutting-Off Operations:

a) 

Use only wheel types that are recommended for 

your power tool and the specific guard designed 
for the selected wheel.

 Wheels for which the power 

tool was not designed cannot be adequately guarded 
and are unsafe.
b) 

The grinding surface of centre depressed 

wheels must be mounted below the plane of the 
guard lip.

 An improperly mounted wheel that projects 

through the plane of the guard lip cannot be 
adequately protected.
c) 

The guard must be securely attached to the 

power tool and positioned for maximum safety, so 
the least amount of wheel is exposed towards the 

Summary of Contents for GA9030S

Page 1: ...gle Grinder Instruction manual ID Gerinda Sudut Petunjuk penggunaan VI Maùy Maøi Goùc Caàm Tay Hoaït Taøi lieäu höôùng daãn Ñoäng Baèng Ñoäng Cô Ñieän TH 007051 GA7030 GA7030S GA7040S GA9030 GA9030S GA9040S ...

Page 2: ...2 1 006733 2 007349 3 006734 4 006735 5 006736 6 010644 7 010645 8 006746 1 2 3 4 5 6 A B 7 8 9 7 9 10 11 10 11 12 13 14 15 ...

Page 3: ...3 9 006738 10 010948 11 006741 12 010950 13 010949 14 010828 16 1 12 17 18 A B 15 19 20 12 21 15 22 ...

Page 4: ...4 15 010946 16 006744 17 001146 18 006745 12 23 21 24 45 78 78 22 25 26 27 28 29 30 31 ...

Page 5: ...neral Power Tool Safety Warnings GEA005 3 WARNING Read all safety warnings and all instructions Failure to follow the warnings and instructions may result in electric shock fire and or serious injury Save all warnings and instructions for future reference The term power tool in the warnings refers to your mains operated corded power tool or battery operated cordless power tool Work area safety 1 K...

Page 6: ...ection of dust extraction and collection facilities ensure these are connected and properly used Use of dust collection can reduce dust related hazards Power tool use and care 18 Do not force the power tool Use the correct power tool for your application The correct power tool will do the job better and safer at the rate for which it was designed 19 Do not use the power tool if the switch does not...

Page 7: ...he spinning accessory could snag your clothing pulling the accessory into your body 14 Regularly clean the power tool s air vents The motor s fan will draw the dust inside the housing and excessive accumulation of powdered metal may cause electrical hazards 15 Do not operate the power tool near flammable materials Sparks could ignite these materials 16 Do not use accessories that require liquid co...

Page 8: ... paper Larger sanding paper extending beyond the sanding pad presents a laceration hazard and may cause snagging tearing of the disc or kickback Safety Warnings Specific for Wire Brushing Operations a Be aware that wire bristles are thrown by the brush even during ordinary operation Do not overstress the wires by applying excessive load to the brush The wire bristles can easily penetrate light clo...

Page 9: ...e it NOTE Models GA7030S GA9030S GA7040S GA9040S GA7030SF GA9030SF GA7040SF and GA9040SF begin to run slowly when they are turned on This soft start feature assures smoother operation ASSEMBLY CAUTION Always be sure that the tool is switched off and unplugged before carrying out any work on the tool Installing side grip handle Fig 4 CAUTION Always be sure that the side grip is installed securely b...

Page 10: ...ged brush could increase potential for injury from contact with broken brush wires Fig 12 Unplug tool and place it upside down allowing easy access to spindle Remove any accessories on spindle Mount wire cup brush onto spindle and tighten with supplied wrench When using brush avoid applying too much pressure which causes over bending of wires leading to premature breakage Operation with wire wheel...

Page 11: ...brushes should be replaced Keep the carbon brushes clean and free to slip in the holders Both carbon brushes should be replaced at the same time Use only identical carbon brushes Use a screwdriver to remove the brush holder caps Take out the worn carbon brushes insert the new ones and secure the brush holder caps Fig 18 To maintain product SAFETY and RELIABILITY repairs any other maintenance or ad...

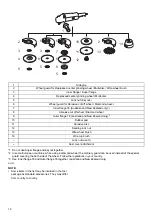
Page 12: ... accessories They may differ from country to country 1 Side grip 2 Wheel guard for Depressed center grinding wheel Multi disc Wire wheel brush 3 Inner flange Super flange 4 Depressed center grinding wheel Multi disc 5 Lock nut Ezynut 1 6 Wheel guard for Abrasive cut off wheel Diamond wheel 2 7 Inner flange 78 Australia and New Zealand only 3 8 Abrasive cut off wheel Diamond wheel 9 Outer flange 78...

Page 13: ...jala listrik yang digunakan untuk perangkat ini harus dilindungi dengan sekering atau pemutus arus protektif yang aktivasinya lambat Peringatan Keselamatan Umum Mesin Listrik GEA005 3 PERINGATAN Bacalah semua peringatan keselamatan dan semua petunjuk Kelalaian mematuhi peringatan dan petunjuk dapat menyebabkan sengatan listrik kebakaran dan atau cedera serius Simpanlah semua peringatan dan petunju...

Page 14: ...ubungkan mesin ke sumber daya dan atau baterai atau mengangkat atau membawanya Membawa mesin listrik dengan jari Anda pada sakelarnya atau mengalirkan listrik pada mesin listrik yang sakelarnya hidup on akan mengundang kecelakaan 14 Lepaskan kunci kunci penyetel sebelum menghidupkan mesin listrik Kunci kunci yang masih terpasang pada bagian mesin listrik yang berputar dapat menyebabkan cedera 15 J...

Page 15: ...ng perputaran aksesori dan jalankan mesin listrik pada kecepatan tanpa beban maksimum selama satu menit Aksesori yang rusak biasanya akan hancur selama pengujian ini 8 Kenakan alat pelindung diri Tergantung pemakaian gunakanlah pelindung wajah dan kacamata pengaman Jika perlu pakailah masker debu pelindung pendengaran sarung tangan dan apron kerja yang mampu menahan kepingan kecil bahan abrasif at...

Page 16: ... roda pemotong Roda gerinda abrasif pemotong dimaksudkan untuk penggerindaan pada tepi luarnya gaya samping yang diberikan pada roda dapat memecahkannya e Selalu gunakan flensa roda utuh yang ukuran dan bentuknya tepat untuk roda yang Anda pilih Flensa roda yang tepat mendukung roda dan oleh sebab itu mengurangi kemungkinan pecahnya roda Flensa untuk roda pemotong dapat berbeda dengan flensa roda ...

Page 17: ... pemutus arus hubung singkat 30 mA untuk memastikan keselamatan pengguna 32 Jangan menggunakan mesin pada bahan yang mengandung asbes 33 Jika menggunakan roda pemotong bekerjalah selalu dengan pelindung roda pengumpul debu sesuai ketentuan peraturan setempat 34 Cakram pemotong tidak boleh mendapat tekanan dari samping SIMPAN PETUNJUK INI PERINGATAN JANGAN biarkan kenyamanan atau terbiasanya Anda d...

Page 18: ...melepas pelindung roda ikuti prosedur pemasangan secara terbalik Untuk alat dengan pelindung roda jenis tuas klem Gb 6 7 Kendurkan tuas pada pelindung roda Pasang pelindung roda dengan tonjolan pada setrip pelindung roda terluruskan dengan takik pada boks bantalan Kemudian putar pelindung roda sampai ke posisi yang terlihat dalam gambar Kencangkan tuas untuk mengencangkan pelindung roda Jika tuas ...

Page 19: ...idak seimbang Penggunaan sikat kawat roda yang rusak dapat meningkatkan potensi cedera akibat terkena kawat yang putus SELALU gunakan pelindung dengan sikat kawat roda dengan memastikan bahwa diameter roda dapat termuat di dalam pelindung Roda dapat pecah berkeping keping saat digunakan dan pelindung membantu mengurangi kemungkinan timbulnya cedera Gb 13 Cabut steker alat dan letakkan secara terba...

Page 20: ...stel arang yang identik Gunakan obeng untuk melepas tutup borstel arang Lepaskan borstel arang yang sudah aus masukkan borstel baru dan kencangkan tutup borstel Gb 18 Untuk menjaga KEAMANAN dan KEHANDALAN perbaikan perawatan lain atau penyetelan harus dilakukan oleh Pusat Servis Resmi Makita dan gunakan selalu suku cadang Makita AKSESORI TAMBAHAN PERHATIAN Aksesori atau alat tambahan ini dianjurka...

Page 21: ...apan ini dapat berbeda dari satu negara ke negara lainnya 1 Gagang samping 2 Pelindung roda untuk Roda gerinda nap cekung Multi cakram Sikat kawat roda 3 Flensa dalam Flensa super 4 Roda gerinda nap cekung Multi cakram 5 Mur pengunci Ezynut 1 6 Pelindung roda untuk Roda gerinda pemotong Roda intan 2 7 Flensa dalam 78 Khusus Australia dan Selandia Baru 3 8 Roda gerinda pemotong Roda intan 9 Flensa ...

Page 22: ...oäng xaáu OÅ caém nguoàn ñieän söû duïng cho thieát bò naøy phaûi ñöôïc baûo veä baèng caàu chì hoaëc caàu dao coù ñaëc tính ngaét chaäm Caûnh baùo An toaøn Chung daønh cho Duïng cuï Maùy GEA005 3 CAÛNH BAÙO Ñoïc taát caû caûnh baùo an toaøn vaø höôùng daãn Vieäc khoâng tuaân theo caùc caûnh baùo vaø höôùng daãn coù theå daãn ñeán ñieän giaät hoaû hoaïn vaø hoaëc thöông tích nghieâm troïng Löu giö...

Page 23: ...oaù hoaëc chìa vaën ñieàu chænh tröôùc khi baät duïng cuï maùy Vieäc chìa vaën hoaëc khoaù vaãn coøn gaén vaøo boä phaän quay cuûa duïng cuï maùy coù theå daãn ñeán thöông tích caù nhaân 15 Khoâng vôùi quaù cao Luoân giöõ thaêng baèng toát vaø coù choã ñeå chaân phuø hôïp Ñieàu naøy cho pheùp kieåm soaùt duïng cuï maùy toát hôn trong nhöõng tình huoáng baát ngôø 16 AÊn maëc phuø hôïp Khoâng maëc q...

Page 24: ...ûng an toaøn Baát kyø ai vaøo khu vöïc laøm vieäc ñeàu phaûi ñeo thieát bò baûo veä caù nhaân Maûnh vuïn phoâi hoaëc phuï tuøng bò vôõ coù theå bay xa vaø gaây thöông tích beân ngoaøi khu vöïc vaän haønh 10 Chæ caàm duïng cuï maùy ôû phaàn tay naém ñöôïc caùch ñieän khi thöïc hieän coâng vieäc maø phuï tuøng caét coù theå tieáp xuùc vôùi daây ñieän ngaàm hoaëc daây cuûa chính duïng cuï Phuï tuøng ...

Page 25: ... vaøo veát caét Ñóa coù theå bò boù keït naåy leân hoaëc baät ngöôïc laïi neáu duïng cuï caét ñöôïc baét ñaàu laïi ngay töø phoâi gia coâng e Haõy gaù caùc taám hoaëc baát kyø phoâi gia coâng quaù côõ naøo ñeå giaûm thieåu nguy cô keït ñóa vaø löïc ñaåy ngöôïc Phoâi gia coâng lôùn thöôøng voõng xuoáng do troïng löôïng cuûa noù Phaûi ñaët caùc taám ñôõ beân döôùi phoâi gia coâng gaàn ñöôøng caét va...

Page 26: ... Ñoái vôùi duïng cuï coù coâng taéc khoaù vò trí baät Ñeå khôûi ñoäng duïng cuï chæ caàn keùo boä khôûi ñoäng coâng taéc theo chieàu B Nhaû boä khôûi ñoäng coâng taéc ñeå döøng Khi vaän haønh lieân tuïc keùo boä khôûi ñoäng coâng taéc theo chieàu B roài aán laãy khoaù vaøo theo chieàu A Ñeå döøng duïng cuï töø vò trí khoaù keùo boä khôûi ñoäng coâng taéc heát côõ theo chieàu B roài nhaû ra Ñoái vô...

Page 27: ...ng khi ñang maøi KHOÂNG goõ hay ñaäp ñóa maøi khi laøm vieäc Traùnh laøm cho ñóa bò naûy hoaëc baät nhaát laø khi laøm vieäc vôùi caùc goùc caïnh saéc v v Laøm nhö vaäy coù theå khieán bò maát kieåm soaùt vaø duïng cuï seõ baät ngöôïc laïi KHOÂNG söû duïng duïng cuï vôùi löôõi cöa goã vaø caùc löôõi cöa khaùc Khi söû duïng nhöõng löôõi naøy treân maùy maøi thöôøng taïo ra va ñaäp vaø gaây maát kie...

Page 28: ...eân vaønh trong vaø sieát ñai oác haõm vaøo truïc quay Hình 14 Daønh cho Australia vaø New Zealand Laép hoaëc thaùo ñóa caét ñóa kim cöông phuï tuøng tuyø choïn Hình 15 BAÛO DÖÔÕNG THAÄN TROÏNG Luoân ñaûm baûo taét duïng cuï vaø ruùt phích caém tröôùc khi coá gaéng thöïc hieän kieåm tra hoaëc baûo döôõng Khoâng bao giôø duøng xaêng eùt xaêng dung moâi coàn hoaëc hoùa chaát töông töï Coù theå xaûy ...

Page 29: ... duïng cuï laøm caùc phuï kieän chuaån Caùc muïc naøy ôû moãi quoác gia coù theå khaùc nhau 1 Tay naém beân 2 Vaønh baûo veä ñóa cho Ñóa maøi loõm taâm Ñóa nhieàu lôùp Choåi maøi daây 3 Vaønh trong Vaønh cao caáp 4 Ñóa maøi loõm taâm Ñóa nhieàu lôùp 5 Ñai oác haõm Ezynut 1 6 Vaønh baûo veä cho Ñóa caét Ñóa kim cöông 2 7 Vaønh trong 78 chæ daønh cho Australia vaø New Zealand 3 8 Ñóa caét Ñóa kim cö...

Page 30: ...NF100 1 56 7 56 5 56 0 23 6 7 1 B 2 6 3 C B 4 5 76 6 B 7 I 8 9 L 10 B 11 12 B B 13 6 14 15 16 B B 17 18 19 20 21 7 22 I 7 23 78 24 78 25 7 26 7 27 6 28 29 30 I M 7 31 GA7030 GA7030S GA7040S GA9030 GA9030S GA9040S 6 6 180 230 6 5 6 5 M14 M14 B n B 5 n0 8 500 1 6 600 1 511 511 V 6 0 6 4 6 3 6 7 II ...

Page 31: ...C Y Z 3 1 1 4 3 V 5 3 4 3 3 4 7 7B 5 4 4 3 1 7Y 8 5 6 3 1 1 7Y 7 3 4 7 7B 8 3 7 7Y 9 3 3 RCD 7 RCD 7Y 10 RCD 4 30 mA 11 4 1 3 3 4 E 7 5 7 5 B 12 3 3 56 7 I C 7 7 B 13 3 F 4 1 F 5 76 7 6 5 M 76 14 F 3 6 7 5 B 15 8 56 16 4 1 1 4 7 17 1 89 7 B I C 7 I C 1 3 18 8H 3 3 V ...

Page 32: ...3 7 7 4 23 1 24 3 4 4 I I 4 7 4 25 3 4 7 J 7 26 K4 4 4 27 1 HL GEB033 7 4 J 1 3 4 4 N 4 1 4 3 W 7B B 2 3 7 6 B 3 4 J O 1 4 56 B 7 4 4 1 3 N 56 B B 7 B 5 P1 4 1 3 56 6 N 4 4 1 4 P1 56 8 7 4 4 O 4 3 4 4 4 1 4 1 F 3 1 4 56 7 7 8 3 3 89 4 89 3 4 3 3 P 4 P 1 4 7 47 Z8 I C 4 ...

Page 33: ... 56 12 3 4 4 56 8 5 13 F 4 3 56 5 Z8 8 56 5 14 P 3 6 4I C 4 7B 15 3 16 4 7 B 7B W 8 56 56 Z8 56 5 7 7 8 Z8 a 7 8 5 7 7 6 W 7 a 3 4 4 K4 4 4 4 F W W 7 b 1 4 1 56 5 c 1 3 4 5 d N 4 P I I 3 4 56 e J7 Q J J O a 3 8 J O b 4 P1 1 3 8 c 8 3 J 8 1 K4 4 7 W 4 B d J 8 7 7 ...

Page 34: ... 4 F 4 3 4 4O 4 7 d 4 4 1 1 7 a 8 M Z 5 7 e 4 4 4 7 8 7 7 f N 4 P 1 4 Y J O a 4 K4 4 1 4 4 J O a 4 J 4 b 8 8 6 8 5 6 4 4 17 P1 O 4 18 4 7 7 5h6 B 19 J O 4 4 4 4 20 1 4 F 4 21 4 4 F 4 1 J 4 22 4 23 1 24 4 4 1 4 25 P 1 4 4 1 1 26 1 27 O 28 29 4 30 1 F 4 31 4 HL 89 N 3 ...

Page 35: ...5 56 2 76 Z 90 7 C B 76 Z 76 B 76 B 76 OFF B 76 ON W 7 8 7 5 B ON 3 4 F 7 8 76 B 76 8 76 B B A B 8 76 B 4 F 76 8 8 B M 7 B A 8 76 B 76 4 F F 76 8 8 B M 7 B A 8 76 B 76 B A 8 76 B 8 B A B 8 76 B GA7030S GA9030S GA7040S GA9040S GA7030SF GA9030SF GA7040SF GA9040SF 7 M 76 5 Z 6 6 7 8 M 76 4 7 B ...

Page 36: ... 7 7 I 8 1 5 8 I I L I W I W 8 6 7 B I 8 I I L I B 8 I B 8 I B B I I W 0 3 8 B B B B B 7 B B B m 9 W 7 6 5 4 F B B 1 3 5 0 3 7 56 56 Z 10 B B B B B 7 B B B m W 7 B IL 7 7 5 5 o o 56 7 7 Z8 B M 76 7 W B I C 5 B M 76 5 8 8 M 76 7 7 7 ...

Page 37: ...7 7 7 B 12 8 56 7 7 7 7 0 3 M 7 7 7 7 B 7 I 6 I 7 I 7 B 13 8 56 7 7 7 7 0 3 5 7 7 7 I 4 7 7 7 7 I 7 7 8 7 5 Z8 6 7 8 B 7 a 8 M 5 7 7 7 B 7 7 B B 14 4 7 0 3 15 M 76 4 7 7 Z 6 p 6 Z 4 7 7 7 16 17 Z 6 6 M 56 8 4 7 7 45 7 I M 7 8 M I M 7 18 ...

Page 38: ...38 5h6 5h6 6 Makita Z Z 4 7 Makita 7 56 Makita 5 7 56 7 B 7 56 5 56 6 Makita 5 ...

Page 39: ...39 1 7 Ezynut 2 7 7 7 I I 4 W 3 7 78 78 Z 6 013093 56 56 7 2 3 5 6 3 8 9 2 5 4 10 1 11 12 13 14 7 8 5 6 1 2 I 6 3 4 6 5 B B Ezynut 1 6 I 7 2 7 78 Z 6 3 8 7 9 78 Z 6 3 10 11 12 B B 13 14 v B B v 56 I I C ...

Page 40: ...ALA Makita Corporation 3 11 8 Sumiyoshi cho Anjo Aichi 446 8502 Japan 884649C379 www makita com ...

Reviews: