12
1
1
1
1
2
2
2
2
2
3
3
2
3
3
2
2
4
5
6
7
8
8
9
10
8
012928
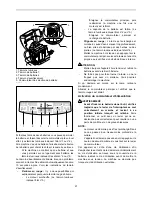
There are two types of blades. Mount a blade in the right
direction as shown in the figure.
NOTE:
•
Mount the blades symmetrically on right and left
sides.
•
Mount the lock pin and snap pin in in the right
direction shown in the figure so that it does not
come off by itself.
MAINTENANCE
1.
REMOVE THE LOCK KEY. Store it in a safe place
out of the reach of children.
2.
Remove mud, straw waste, weeds and the like from
the blade and the equipment. Clean your
equipment with running water. Do not run or splash
water in the electric part area (main switch, lock-off
switch, switch lever, motor, indication lamp). After
cleaning, wipe the equipment with a dry rag.
NOTE:
•
When cleaning the equipment with water, do not
fold the handle or do not keep the handle in contact
with the ground. Cleaning the equipment with the
handle folded or keeping in contact with the
ground may cause the switch breakage.
•
When using a power washer to clean the equipment,
use an adjustable spray-type nozzle with as low
power dispersion as possible and keep the
equipment more than 2 m (7 ft.) away from the
equipment. Failure to do this may cause removal of
warning/caution labels, above- mentioned-electrical
part damage and flood into the gearbox casing
resulting in damage to mechanical parts, such as
gears, bearings and the like.
Follow warnings, cautions and instructions stated
in labels and instruction manual of the power
washer for proper use. Failure to do this may
cause a personal injury and failure, damage or
breakage to the equipment.
•
If the battery ports or the area around them should
be splashed with water or flooded during
1. Direction of blade rotation
2. Blade facing inward
3. Blade facing outward
4. Left inner blades (outside view)
5. Left outer blades (outside view)
6. Right inner blades (outside view)
7. Right outer blades (outside view)
8. Outside
9. Back view
10. Lock pin


