8
ENGLISH
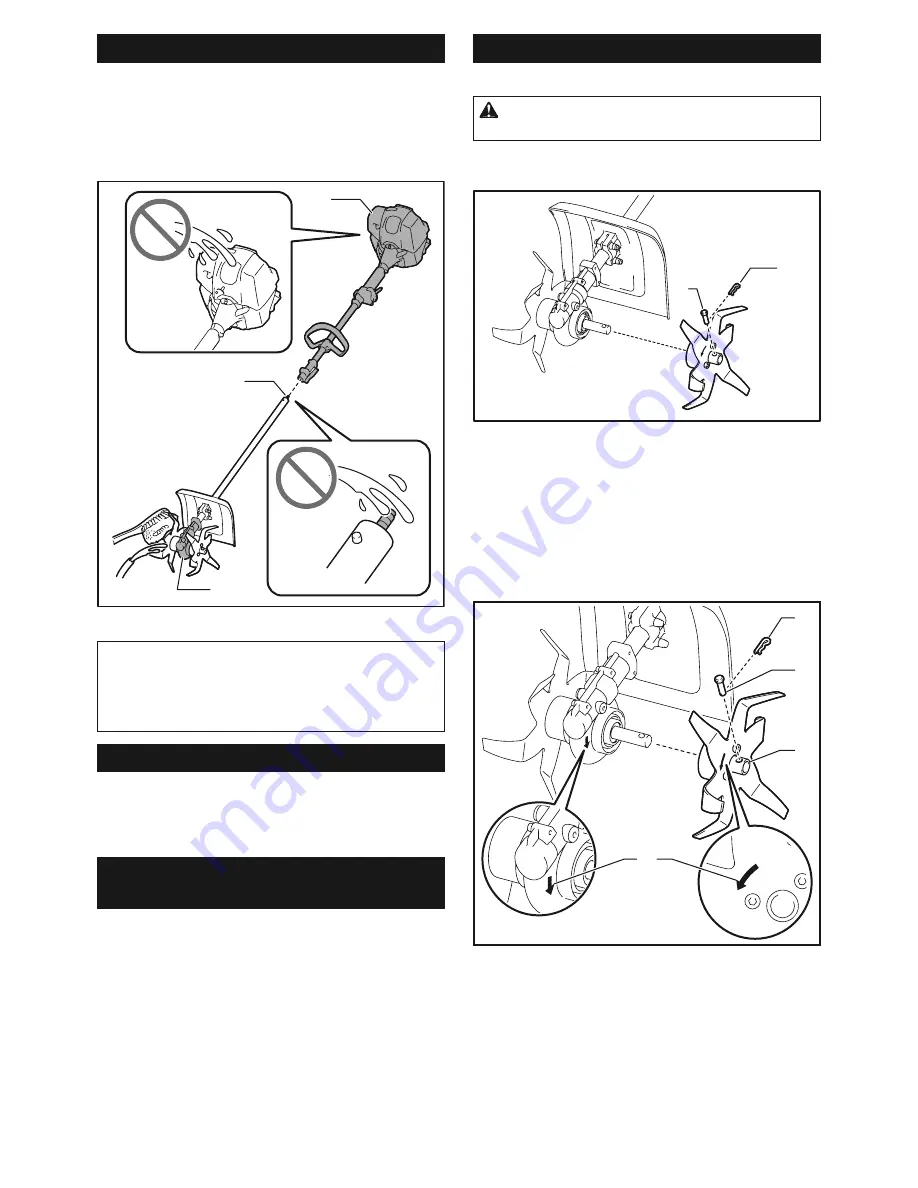
Cleaning the cultivator
The cultivator can be washed with water. Use a nylon
brush or the similar to wash off dirt.
For ease of cleaning, you can remove the rotor blade
from the gear case. Refer to "Removing the rotor
blades" in "Replacing the rotor blades" section for how
to remove.
1
2
3
►
1.
Power unit
2.
Pipe end
3.
Gear case
NOTICE:
Do not pour water over the power unit
and pipe end and inside the gear case. When the
rotor blade is removed, be careful not to let for-
eign objects come into the gear case.
It may cause
a malfunction of the cultivator.
Overall inspection
•
Tighten loose bolts, nuts and screws.
•
Check for damaged parts and blades. Ask our
authorized service center to replace them if
necessary.
Inspecting the rotor blades and
protector
Check and clean the rotor blades and protector daily. If
they are worn, bent and cracked, replace them.
Replacing the rotor blades
Optional accessory
CAUTION:
Be sure to use the genuine rotor
blade from Makita.
Removing the rotor blades
1
2
►
1.
Clip
2.
Lock pin
1.
Remove the clip on the lock pin using pliers.
2.
Remove the lock pin.
3.
Remove the rotor blade.
4.
Remove the rotor blade on the other side in the
same way as above.
Installing the rotor blades
1
2
3
4
►
1.
Clip
2.
Lock pin
3.
Hub of the rotor blade
4.
Arrow mark
1.
Put the hub of the rotor blade onto the gear case. Be
sure to install the rotor blade so that the arrow marks on the
rotor blade and the gear case point the same direction.
2.
Insert the lock pin into the hole on the hub of the
rotor blade.
3.
Insert the clip into the hole on the lock pin until it is secured.
4.
Install the rotor blade on the other side in the
same way as above.


