background image

Summary of Contents for LS1220

Page 1: ...Compound Miter Saw 305 mm 12 MODEL LS1220 Equipped wlth Electric Brake INSTRUCTION MANUAL I DOUBLE 1 1 1 IMSULATION ...

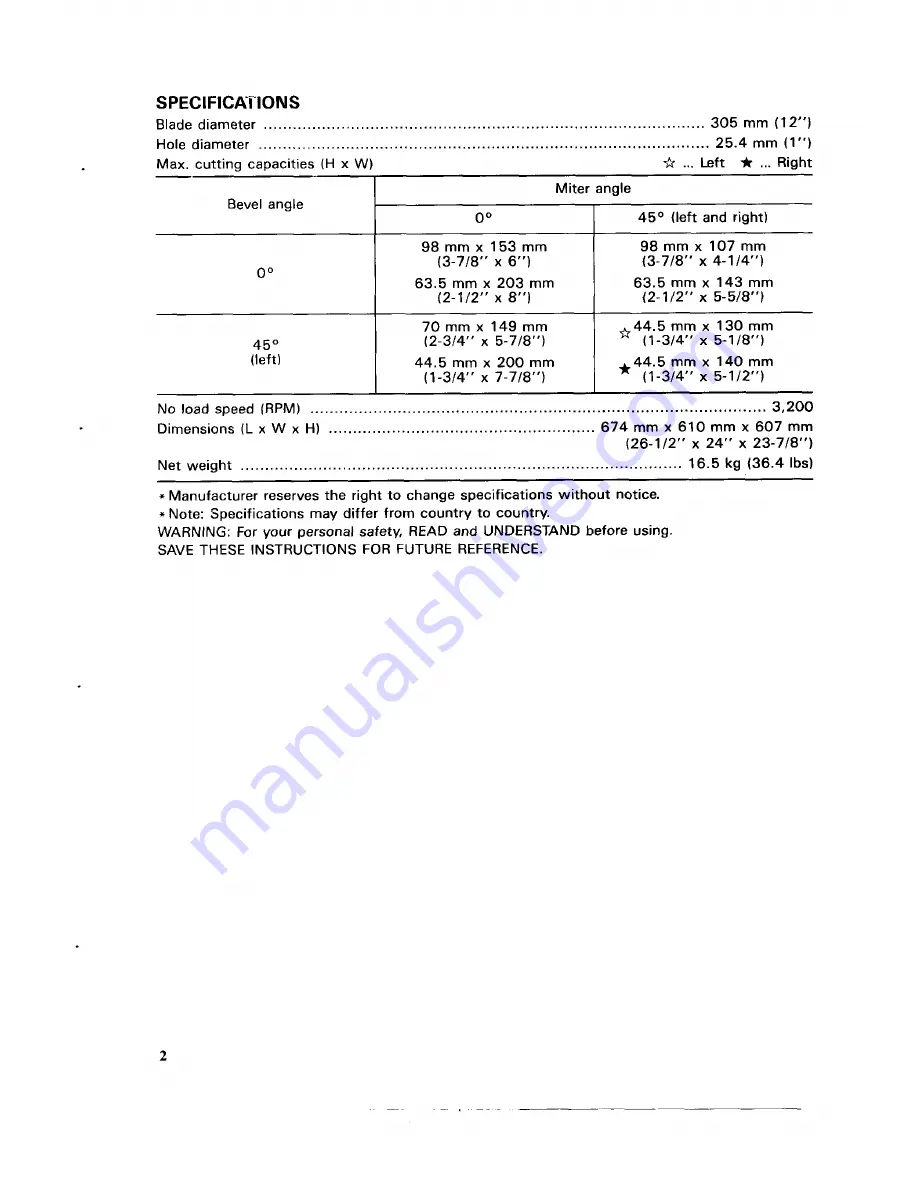
Page 2: ...203 mm 3 7 8 x 6 00 2 1 2 x 8 45O left and right 98 mm x 107 mm 63 5 mm x 143 mm 3 7 8 x 4 1 4 2 1 2 x 5 5 8 450 left 70 mm x 149 mm 44 5 mm x 130 mm 1 2 3 4 x 5 7 8 1 1 3 4 x 5 1 8 44 5 mm x 200 mm 44 5 mm x 140 mm 1 3 4 x 7 7 8 1 3 4 x 5 1 2 2 ...

Page 3: ...ks master switches or by removing starter keys 8 DON T FORCETOOL It will do the job better and safer at the rate for which it was designed 9 USE RIGHT TOOL Don t force tool or attachment to do a job for which it was not designed 10 WEAR PROPER APPAREL Wear no loose clothing gloves neckties rings bracelets or other jewelry which may get caught in moving parts Nonslip footwear is recommended Wear pr...

Page 4: ...injury could occur if the tool is tipped or if the cutting tool is accidentally contacted 20 CHECK DAMAGED PARTS Before further use of the tool a guard or other part that is damaged should be carefully checked to determine that it will operate properly and perform its intended function check for alignment of moving parts binding of moving parts breakage of parts mounting and any other conditions t...

Page 5: ... properly secured so it will not move during operation For your safety removethe chips small pieces etc from the table top before operation Avoid cutting nails Inspect for and removeall nails from the workpiece before operation Make sure the shaft lock is released before the switch is turned on Be sure that the blade does not contact the turn base inthe lowest position Hold the handle firmly Be aw...

Page 6: ...t cross armed as shown in the picture 24 Always use accessories recommended in this manual Use of improper 25 Don t abuse cord Never yank cord to disconnect it from the receptacle Keep 26 Turn off tool and wait for saw blade to stop before moving workpiece or 27 Unplug tool before changing blade or servicing accessories such as abrasive wheels may cause an injury cord away from heat oil water and ...

Page 7: ... holder After using the socket wrench return it to the wrench holder Bench mounting miter saw This tool should be bolted with four bolts to a level and stable surface using the bolt holes provided in the tool s base This will help prevent tipping and possible injury Removing or installingsaw blade CAUTION Always be sure that the tool is switched off and unplugged before removing or installing the ...

Page 8: ...ade Failure to do so may result in overtightening or insufficient tightening of the hex bolt This could cause an injury Safety cover When lowering the handle the safety cover rises automatically The cover returns to its original position when the cut is com pleted and the handle is raised NEVER DEFEAT OR REMOVE THE SAFETY COVER In the interest of your personal safety always maintain the safety cov...

Page 9: ...vent the switch lever from being accidentally pulled a lock off button is pro vided To start the tool press in the lock off but ton and pull the switch lever Release the switch lever to stop Dust nozzle I Dust bag Lock off button Switch lever I I CAUTION Before plugging in the tool always check to see that the switch lever actuates properly When not using the tool remove the lock off button and st...

Page 10: ...that the kerf boards can be easily moved by hand Lower the handle fully and press the stopper pin to lock the handle in the lowered position Adjust the kerf boards so that the kerf boards just contact the sides of blade teeth slightly Tighten the all screws do not tighten firmly After adjust ing the kerf boards release the stopper pin and raise the handle Then tighten the all screws securely Kerf ...

Page 11: ...be a distance of about 203 mm 8 from the front face of the guide fence to the point where the front edge of the blade enters the kerf With the tool unplugged rotate the blade by hand while holding the handle all the way down Be sure that the blade does not contact any part of the lower base when the handle is lowered completely Adjusting bolt 7 Positioningfor adjustingthe miter angle Loosen the kn...

Page 12: ...guide fence The workpiece must also rest steadily on the turn base WARNING Never use your hand to hold the workpiece that requires your hand to be any closer than 4 from the blade area In this case always use the optional vise to secure the workpiece After any cutting operation raise the blade gently Never raise the blade until it has come to a complete stop Serious injury may result 1 Verticalvis...

Page 13: ...lder assem blies and two rods 12 CAUTION I Vise plate Holder Rod 12 Vise nut 2 L V i s e knob knob clockwise to secure the workpiece Then maximum width of workpieces which can be secured by the horizontal vise is 200 mm 7 7 8 CAUTION Always set the vise nut to the right fully when securing the workpiece Failureto do so may result in insufficient securing of the workpiece This could cause the workp...

Page 14: ... of the blade is cut out of the workpiece as well Therefore your cutting line should be on either the left or right side of the groove in the kerf board Switch on the tool and wait until the blade attains full speed before lowering gently into the cut When the blade contacts the workpiece gradual ly bear down on the handle to perform the cut When the cut is completed switch off the tool and WAIT U...

Page 15: ...lade attains full speed Then gently lower the handle to the fully lowered position while applying pres sure in the direction of the arrow in parallel with the blade When the cut is completed switch off the tool and WAIT UNTIL THE BLADE HAS COME TO A COMPLETE STOP before returning the blade to its fully elevated position Sub fence Apply pressure in the direction of thearrow in Parallel with the bla...

Page 16: ... cut on a compoundcut with the moldings laid flat on the turn base There are two common types of crown moldings and one type of cove molding 52 38 wall angle crown molding 45 wall angle crown moldingand 45 wall angle cove mold ing See illustrationsbelow Ceiling Ceiling Ceiling 2 3 2 crown molding crown molding cove molding There are crown and cove moldingjoints to fit Inside 90 corners 0 and in Fi...

Page 17: ...e fence Wall contact edge should be against guide fence Ceiling contact edge Ghouid be against guide fence For inside corner a a For outside corner I Save the right side of blade Left 45 0 a I Right 45 I Save the left side of blade For outside corner Finished piece Finished piece will be on the Left side of blade Finished piece will be on the Right side of blade 17 Position in Fig A Miter angle 0 ...

Page 18: ...m extrusions Thick aluminum extrusions may come loose during operation and round aluminum extrusion cannot be secured firmly with this tool 6 Wood facing Use of wood facing helps to assure splinter free cuts in workiieces Attach a wood fac ing to the guide fence using the holes in the guide fence CAUTION Use straight wood of even thickness as the wood facing See the figure below concerning the dim...

Page 19: ...te on the holder optional accessory as shown in the figure Align the cutting line on your workpiece with either the left or right side of the groove in the kerf board and while holding the workpiece from moving move the set plate flush against the end of the work piece Then secure the set plate with Set plate L H o l d e r 1 Screw the screw When the set plate is not used loosen the screw and turn ...

Page 20: ... Miter angle Loosen the grip and set the turn base at zero degrees by turning the turn base Tighten the grip securely and loosen the hex bolts on the guide fence Square the side of the blade with the face of the guide fence using a triangular rule try square etc by moving the right side of the guide fence Then securely tighten the hex bolts on the guide fence in the order indicated in the figure 2...

Page 21: ... indicate 0 loosen the screw securing the pointer and adjust the pointer b 45 bevel angle Adjust 45 bevel angle after perform ing 0 bevel angle adjustment To adjust 45 bevel angle loosen the lever and tilt the blade to the left fully Make sure that the pointer on the arm indicates 45 on the bevel scale on the arm If the pointer does not indicate 45 turn the right hex bolt B at the rear of the turn...

Page 22: ...on brushes insert the new ones and secure the brush holder caps I L i m i t mark Brush holder cap After use After use wipe off chips and dust adhering to the tool with a cloth or the like Keep the safety cover clean according to the direction in the previously covered Safety cover Lubricate the sliding portions with machine oil to prevent rust To maintain product SAFETY and RELIABILITY repairs any...

Page 23: ...hould be used only in the proper and intended manner Dust bag Part No 122523 9 Triangular rule Part No 762001 3 Set plate Part No 122551 4 Elbow Part No 416368 8 Crown molding stopper set Part No 192669 5 Holder set with screws Part No 192671 8 Socket wrench 13 Part No 782212 4 Lock off button 2 pcs Part No 416404 0 Holder rod assembly Holder assembly Part No 122446 1 Carbide tipped saw blade 1 Ho...

Page 24: ...Vertical vise with screw Part No 192672 6 Horizontal vise Part No 122470 4 24 ...

Page 25: ...0ct 16 97 US COMPOUND MITER SAW 305 mm 12 Model LS1220 25 ...

Page 26: ...125 r 111 Note The switch and other part configurations may differ from country to country 26 ...

Page 27: ...ng Tapping Screw Bind CT 4x12 DESCRIPTION MACHINE 10 11 12 13 14 15 16 17 18 19 20 21 22 23 24 25 26 27 28 29 30 31 32 33 34 35 36 37 38 39 40 41 42 43 44 45 46 47 48 49 50 51 52 53 54 55 56 57 58 59 60 61 62 63 Tapping Screw Flange 4x25 Tapping Screw 4x18 Strain Relief Cord Cord Guard Handle Set lWith Item 141 Tapping Screw 4x18 Lock Off Lever Compression Spring 4 Switch Button Switch S w m h Lev...

Page 28: ...r improperly maintained alterations have been made to the tool IN NO EVENT SHALL MAKITA BE LIABLE FOR ANY INDIRECT INCIDENTALOR CON SEQUENTIAL DAMAGES FROM THE SALE OR USE OF THE PRODUCT THIS DISCLAIMER APPLIES BOTH DURING AND AFTER THE TERM OF THIS WARRANTY MAKITA DlSCLAlMS LIABILITY FOR ANY IMPLIED WARRANTIES INCLUDING IMPLIED WARRANTIES OF MERCHANTABILITY AND FITNESS FOR A SPECIFIC PURPOSE AFTE...

Reviews: