9 ENGLISH
Cutting capacity
Maximum cutting capacity varies depending on the
cutting angle and workpiece shape.
Max. cutting capacity with a brand-new cut-off
wheel
Cutting angle /
Workpiece shape
90°
45°
127 mm
127 mm
102 x 194 mm
70 x 233 mm
115 x 103 mm
119 x 119 mm
106 x 106 mm
137 x 137 x 10 mm 100 x 100 x 10 mm
Securing workpiece
CAUTION:
Always place the thread holder on
the shaft threads when securing the workpiece.
Failure to do so may result in insufficient securing of
the workpiece. This could cause the workpiece to be
ejected or cause a dangerous breakage of the wheel.
While the thread holder is lifted, the vise plate can be
moved in and out quickly. To grip a workpiece, push the
handle until the vise plate contacts the workpiece then
return the thread holder. Turn the handle clockwise until
the workpiece is securely retained.
►
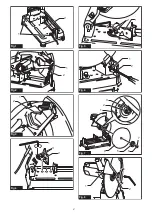
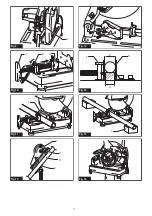
Fig.10:
1.
Handle
2.
Thread holder
3.
Vise plate
When the cut-off wheel has worn down considerably,
place a spacer block behind the workpiece as shown
in the figure. You can more efficiently utilize the worn
wheel by using the mid point on the periphery of the
wheel to cut the workpiece. Use a sturdy and non-flam
-
mable material for a spacer block.
►
Fig.11:
1.
Spacer block
When cutting workpieces over 85 mm wide at an angle,
attach a straight piece of wood (spacer) over 190 mm
long x 45 mm wide to the guide plate as shown in the
figure. Attach this spacer with screws through the holes
in the guide plate. Make sure that the cut-off wheel does
not contact the spacer when the tool head is depressed.
►
Fig.12:
1.
Guide plate
2.
Spacer block (over 190
mm long x45 mm wide)
3.
Workpiece (over
85 mm wide)
4.
Vise plate
►
Fig.13
When the cut-off wheel has worn down, raise the cutting
position by putting a spacer block which is slightly nar
-
rower than the workpiece as shown in the figure. This
will help you to utilize the wheel economically.
►
Fig.14:
1.
Vise plate
2.
Workpiece diameter
3.
Guide plate
4.
Spacer block width
Long workpieces must be supported by blocks on
either side so that it will be level with the base top. Use
non-flammable material for supporting blocks.
►
Fig.15:
1.
Supporting block
Carrying tool
Fold down the tool head and lock it. Hold the handle
when carrying.
►
Fig.16
MAINTENANCE
CAUTION:
Always be sure that the tool is
switched off and unplugged before attempting to
perform inspection or maintenance.
NOTICE:
Never use gasoline, benzine, thinner,
alcohol or the like. Discoloration, deformation or
cracks may result.
Replacing carbon brushes
►
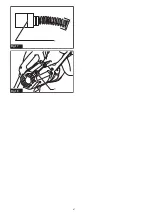
Fig.17:
1.
Limit mark
Check the carbon brushes regularly.
Replace them when they wear down to the limit mark.
Keep the carbon brushes clean and free to slip in the
holders. Both carbon brushes should be replaced at the
same time. Use only identical carbon brushes.
1.
Use a screwdriver to remove the brush holder
caps.
2.
Take out the worn carbon brushes, insert the new
ones and secure the brush holder caps.
►
Fig.18:
1.
Brush holder cap
To maintain product SAFETY and RELIABILITY,
repairs, any other maintenance or adjustment should
be performed by Makita Authorized or Factory Service
Centers, always using Makita replacement parts.


