background image

P 2 / 6

R

epair

[2] LUBRICATION

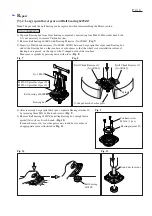
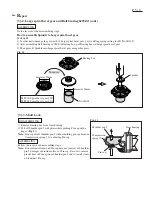
Put approx. 50g of Makita grease N. No.1 in the gear room of Gear housing complete to protect parts and product from
unusual abrasion.

[3] DISASSEMBLY/ASSEMBLY

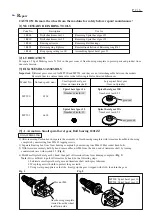
Important: Different gears are used for MT900 and MT901, and they are not interchangeable between the models.
                    Be careful not to confuse them. refer to the following table for detailed differences.

[1] NECESSARY REPAIRING TOOLS

CAUTION: Remove the wheel from the machine for safety before repair/ maintenance ! 

Model No.

No load speed: min-

1

MT900

8,500

6,600

Spiral bevel gear 16

Spiral bevel gear 53B

Spiral bevel gear 53A

Spiral bevel gear 12

MT901

Small spiral bevel gear

(Gear on Armature shaft)

Large spiral bevel gear

(Gear on Spindle)

Number of teeth: 16

Number of teeth: 12

Number of teeth: 53

Number of teeth: 53

1R048

Drill chuck remover 11

Removing Spiral bevel gear 53

1R049

Drill chuck remover 15

Removing Spiral bevel gear 53

1R269

Bearing extractor

Removing Ball bearings

1R005

Retaining ring R pliers

Removal/installation of Retaining ring R-42

Assembling Spiral bevel gear 53 

1R165

Ring spring setting tool B

Code No.

Description

Use for

grooved

not grooved

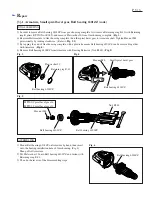
[3] -1. Armature, Small spiral bevel gear, Ball bearing 6301ZZ 

Fig. 2

DISASSEMBLING

Fig. 1

Hex nut M8

1) After removing Carbon brush, separate the assembly of Gear housing complete with Armature from Motor housing
    complete by unscrewing four M5x45 tapping screws.
2) Separate Bearing box from Gear housing complete by unscrewing four M6x22 Hex socket head bolts.
3) With Armature securely held by hand, remove Hex nut M8 from the drive-end of Armature shaft by turning
    counterclockwise with wrench 13. (Fig. 1)
4) Hold Small spiral bevel gear by hand, then pull off Armature from Gear housing complete. (Fig. 2)
    Note: If it is difficult to pull off Armature by hand, do the following steps.
              1. Lubricate small spiral bevel gear and Armature shaft with spray lubricant.
              2. Wrap the gear with cloth to protect the gear teeth.
              3. Using water pump pliers or the like, firmly grip the gear wrapped with cloth, then turn the gear. 

Gear housing complete,
viewed from the wheel
installation side

MT900: Spiral bevel gear 16
MT901: Spiral bevel gear 12

Summary of Contents for maktec MT900

Page 1: ...Rear handle with anti slip surface for more control Machined spiral bevel gear for durability and long service life of the machine Lock nut wrench 1 pc Side grip 1 pc Model No No load speed min 1 rpm Diameter Hole diameter Wheel size mm Protection against electric shock Cord length m ft Net weight kg lbs MT900 MT901 180 7 230 9 2 0 6 6 4 7 10 4 8 500 6 600 Double insulation 22 23 7 8 TECHNICAL INF...

Page 2: ...R pliers Removal installation of Retaining ring R 42 Assembling Spiral bevel gear 53 1R165 Ring spring setting tool B Code No Description Use for grooved not grooved 3 1 Armature Small spiral bevel gear Ball bearing 6301ZZ Fig 2 DISASSEMBLING Fig 1 Hex nut M8 1 After removing Carbon brush separate the assembly of Gear housing complete with Armature from Motor housing complete by unscrewing four M5...

Page 3: ... bearing 6301ZZ Ball bearing 6301ZZ Ball bearing 6301ZZ Ball bearing 6200ZZ 5 In order to remove Ball bearing 6301ZZ from gear housing complete first remove Retaining ring R 42 with Retaining ring R pliers RT 2N No 1R005 and remove Flat washer 20 from Gear housing complete Fig 3 6 Reassemble Armature to Gear housing complete then the spiral bevel gear to Armature shaft Tighten Hex nut M8 provision...

Page 4: ...remove spindle by pressing down with arbor Fig 8 4 After removing Large spiral bevel gear separate Bearing retainer 50 by removing three M5x16 Pan head screws Fig 9 5 Remove Ball bearing 6203ZZ by hitting Bearing box straight down against flat surface of work bench Fig 10 If cannot be removed use arbor press and a round bar for arbor of an appropriate size as illustrated in Fig 11 Note The gear an...

Page 5: ...Be sure to remove plastic dust of Pin cap from Shoulder pin 5 and to install it onto a brand new Pin cap DISASSEMBLING ASSEMBLING Pin cap Gear housing Shoulder pin 5 Compression spring 12 Do the reverse of the disassembling steps How to assemble Spindle to Large spiral bevel gear See Fig 12 1 In order not to damage the gear teeth of Large spiral bevel gear put it on Ring spring setting tool B No 1...

Page 6: ... hooks so that the wires cannot get loose in Motor housing Field lead wire Field lead wire Field lead wire Rib Lead wire holder Power supply cord Switch 1 Motor Housing 2 Handle Switch Fix the following lead wires with lead wire holder two Field lead wires black two lead wires white of Noise suppressor Put Noise suppressor in this portion if used Route the lead wires of Power supply cord between t...

Reviews: