background image

5

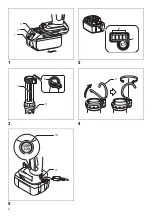
Hold the luminaire and the battery cartridge firmly 
when installing or removing battery cartridge.

Failure to hold the luminaire and the battery cartridge 
firmly may cause them to slip off your hands and result 
in damage to the luminaire and battery cartridge and a 
personal injury.

To remove the battery cartridge, slide it from the luminaire 
while sliding the button on the front of the cartridge.
To install the battery cartridge, align the tongue on the 
battery cartridge with the groove in the housing and slip it 
into place. Insert it all the way until it locks in place with a 
little click. If you can see the red indicator on the upper 
side of the button, it is not locked completely.

 CAUTION:

• Always install the battery cartridge fully until the red 

indicator cannot be seen. If not, it may accidentally fall 
out of the luminaire, causing injury to you or someone
around you.

• Do not install the battery cartridge forcibly. If the 

cartridge does not slide in easily, it is not being inserted 
correctly.

Use of non-genuine Makita batteries, or batteries that 
have been altered, will void the Makita warranty for the 
Makita tool and charger.

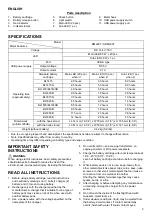
Indicating the remaining battery capacity 
(Fig. 2)

(Only for battery cartridges with “B” at the end of the 
model number.)
Press the check button on the battery cartridge to indicate 
the remaining battery capacity. The indicator lamps light 
up for few seconds.

NOTE:

• Depending on the conditions of use and the ambient 

temperature, the indication may differ slightly from the 
actual capacity.

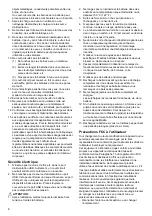
Light switch operations (Fig. 3)

 CAUTION:

• Do not look in the LED light or see the source of light

directly.

Press the light switch as shown below to change modes.

* The LEDs of the two rows on the opposite side of the 

light switch light up.

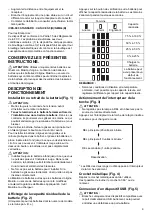
Metal hook (Fig. 4)

Pivot the metal hook upright before using it.
The hook can be turned at 360° and removed.

Connecting USB devices (Fig. 5)

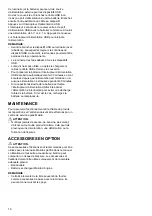
 CAUTION:

• Connect only devices which are compatible with the

USB power supply port. Otherwise it may cause 
malfunction to the battery holder.

This luminaire (with the battery) can work as an external 
power supply for USB devices.
Open the cover and connect the USB cable (not included) 
with the power supply port of the battery holder. And then 
connect the other end of the cable with the device.
Press the USB power supply switch. The switch lights in 
green and the USB power supply port (with the battery) 
starts to supply DC5V, 2.1A. Press the USB power supply 
switch again to turn off the power supply.

NOTE:

• Before connecting USB device to the luminaire (with 

the battery), always backup your data of USB device. 
Otherwise your data may be lost by any possibility.

• The luminaire may not supply power to some USB 

devices.

• When not using or after charging, remove the USB 

cable and close the cover.

• To save the battery power, the USB power supply 

switch will automatically turn off when; 30 minutes is 
past since the power supply is finished; or the power 
supply is not performed for 30 minutes. 

• If the remaining battery capacity become lower, the 

USB power supply switch will turn off and the power
supply will stop to prevent overdischarging of the 
battery. In this case, charge the battery or replace with 
new one.

MAINTENANCE

To maintain product safety and reliability, repairs and 
maintenance should be carried out by a Makita Authorized 
Service Center.

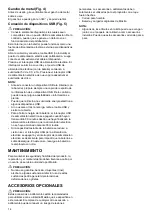
 CAUTION:

• Never use gasoline, benzine, thinner, alcohol or the 

like. Discoloration, deformation or cracks may result.

Indicator lamps

Remaining 

capacity

Lighted

Off

Blinking

75% to 100%

50% to 75%

25% to 50%

0% to 25%

Charge the 

battery.

The battery may 

have 

malfunctioned.

Main LED (20 pcs.) light up

Main LED (10 pcs.) light up*

Sub LED (1 pc.) light up

OFF

Summary of Contents for Outdoor Adventure ADML807

Page 1: ...hlight Instruction manual FRCA Lampe Torche LED Manuel d instructions ESMX Linterna LED Inalámbrica Manual de instrucciones DML807 ADML807 IMPORTANT Read Before Using IMPORTANT Lire avant usage IMPORTANTE Lea antes de usar ...

Page 2: ...2 1 2 3 4 5 1 2 3 5 4 6 7 8 9 11 10 ...

Page 3: ... another Shorting the battery terminals together may cause sparks burns or a fire 7 After charging or before attempting any maintenance or cleaning unplug the charger from the power source 8 Do not touch the inside of the flashlight head with tweezers metal tools etc 9 Under abusive conditions liquid may be ejected from the battery avoid contact If contact accidentally occurs flush with water If l...

Page 4: ...f operating time has become excessively shorter stop operating immediately It may result in a risk of overheating possible burns and even an explosion 9 Do not use a damaged battery 10 Charge the battery cartridge before completely discharged Always stop luminaire operation and charge the battery cartridge when you notice less luminaire power 11 Never recharge a fully charged battery cartridge Ove...

Page 5: ...the light switch light up Metal hook Fig 4 Pivot the metal hook upright before using it The hook can be turned at 360 and removed Connecting USB devices Fig 5 CAUTION Connect only devices which are compatible with the USB power supply port Otherwise it may cause malfunction to the battery holder This luminaire with the battery can work as an external power supply for USB devices Open the cover and...

Page 6: ...of any other accessories or attachments might present a risk of injury to persons The accessories or attachments should be used only in the proper and intended manner Shoulder strap Makita genuine battery and charger NOTE Some items in the list may be included in the luminaire package as standard accessories They may differ from country to country ...

Page 7: ...à 40 C 50 F à 104 F Si la batterie est chaude laissez la refroidir avant de la recharger 6 Lorsque la batterie n est pas utilisée tenez la à distance des objets métalliques tels que trombones pièces de monnaie clés clous vis ou autres petits 1 Batterie 2 Bouton de dégagement de la batterie 3 Indicateur rouge 4 Témoins 5 Bouton de vérification 6 Interrupteur de la torche 7 DEL principale 20 unités ...

Page 8: ...toujours le luminaire hors tension et retirez la batterie 2 Ne rangez pas le luminaire et la batterie dans des endroits où la température risque d atteindre ou de dépasser 50 C 122 F 3 Évitez de faire subir un choc au luminaire en l échappant en le heurtant etc 4 N exposez pas les yeux à la lumière de manière continue Il existe un risque de brûlure aux yeux 5 Le luminaire allumé ne doit être ni co...

Page 9: ...omplètement verrouillée ATTENTION Installez toujours la batterie à fond jusqu à ce que vous ne puissiez plus voir l indicateur rouge Dans le cas contraire la batterie pourrait tomber accidentellement du luminaire et entraîner des blessures Ne forcez pas sur la batterie pour l installer Si la batterie ne glisse pas facilement c est qu elle n est pas insérée correctement L utilisation de batteries a...

Page 10: ...s depuis que l alimentation est terminée ou si aucune alimentation n est réalisée pendant 30 minutes Si la capacité résiduelle de la batterie est faible l interrupteur d alimentation USB s éteindra et l alimentation s interrompra pour éviter une décharge totale de la batterie Si tel est le cas rechargez la batterie ou remplacez la MAINTENANCE Pour assurer le fonctionnement sûr et fiable du produit...

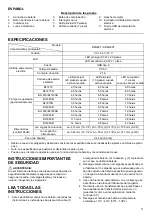
Page 11: ...r o un receptáculo de corriente continua CC 5 Recargue el cartucho de batería a temperatura ambiente a 10 C 40 C 50 F 104 F 1 Cartucho de batería 2 Botón de liberación de la batería 3 Indicador rojo 4 Luces indicadoras 5 Botón de comprobación 6 Interruptor de luz 7 LED principal 20 piezas 8 LED secundario 1 pieza 9 Gancho de metal 10 Interruptor USB de alimentación eléctrica 11 Puerto USB de alime...

Page 12: ...imentación eléctrica De lo contrario puede que un corto circuito genere humo y fuego 2 No conecte la fuente de alimentación eléctrica al puerto USB De lo contrario se corre el riesgo de incendio El puerto USB esta solamente diseñado para recargar un dispositivo de bajo voltaje Coloque siempre la cubierta del puerto USB mientras no se encuentre recargando un dispositivo de bajo voltaje PRECAUCIÓN 1...

Page 13: ...ocasionar lesiones personales Para quitar el cartucho de batería deslícelo de la linterna mientras desliza el botón sobre la parte delantera del cartucho Para colocar el cartucho de batería alinee la lengüeta sobre el cartucho de batería con la ranura en la carcasa y deslice en su lugar Inserte por completo hasta que se fije en su lugar con un pequeño clic Si puede ver el indicador rojo del lado s...

Page 14: ...y sierre la cubierta Para ahorrar energía de la batería el interruptor USB de alimentación eléctrica se apagará cuando hayan transcurrido 30 minutos desde que haya finalizado la alimentación eléctrica o que la alimentación eléctrica no se haya accionado durante 30 minutos Si la capacidad restante de la batería se reduce a cierto nivel el interruptor USG de la alimentación eléctrica se apagará y el...

Page 15: ...15 ...
Page 16: ...Makita Corporation 3 11 8 Sumiyoshi cho Anjo Aichi 446 8502 Japan www makita com DML807 NA3 2111 GER ...

Reviews: