background image

6 ENGLISH

1

►    

1.

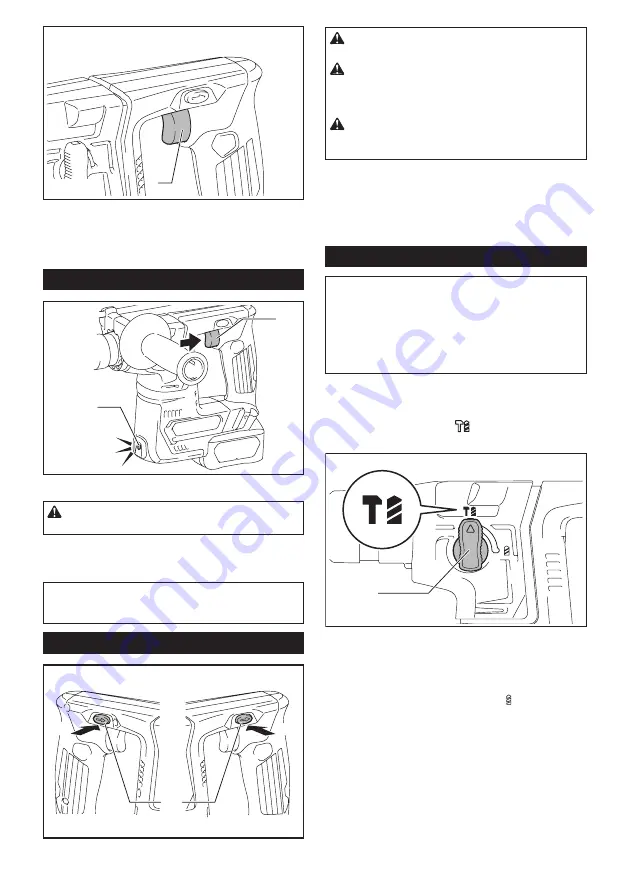
 Switch trigger

To start the tool, simply pull the switch trigger. Tool 

speed is increased by increasing pressure on the switch 

trigger. Release the switch trigger to stop.

Lighting up the front lamp

1

2

►    

1.

 Switch trigger 

2.

 Lamp

CAUTION:


Do not look in the light or see the 

source of light directly.

Pull the switch trigger to light up the lamp. The lamp keeps on 

lighting while the switch trigger is being pulled. The lamp goes 

out approximately 10 seconds after releasing the switch trigger.

NOTE:

 Use a dry cloth to wipe the dirt off the lens of 

the lamp. Be careful not to scratch the lens of lamp, or 

it may lower the illumination.

Reversing switch action

1

A

B

►    

1.

 Reversing switch lever

CAUTION:


Always check the direction of 

rotation before operation.

CAUTION:


Use the reversing switch only after 

the tool comes to a complete stop.

 Changing the 

direction of rotation before the tool stops may dam-

age the tool.

CAUTION:


When not operating the tool, 

always set the reversing switch lever to the neu-

tral position.

This tool has a reversing switch to change the direction 

of rotation. Depress the reversing switch lever from the 

A side for clockwise rotation or from the B side for coun

-

terclockwise rotation.

When the reversing switch lever is in the neutral posi-

tion, the switch trigger cannot be pulled.

Selecting the action mode

NOTICE:


Do not rotate the action mode chang-

ing knob when the tool is running.

 The tool will be 

damaged.

NOTICE:


To avoid rapid wear on the mode 

change mechanism, be sure that the action mode 

changing knob is always positively located in one 

of the action mode positions.

Rotation with hammering

For drilling in concrete, masonry, etc., rotate the action 
mode changing knob to the 

 symbol. Use a car-

bide-tipped drill bit.

1

►    

1.

 Action mode changing knob

Rotation only

For drilling in wood, metal or plastic materials, rotate 
the action mode changing knob to the   symbol. Use a 

twist drill bit or wood drill bit.

Summary of Contents for RH02

Page 1: ...INSTRUCTION MANUAL MANUAL DE INSTRUCCIONES Cordless Rotary Hammer Martillo Rotativo Inalámbrico RH02 IMPORTANT Read Before Using IMPORTANTE Lea antes de usar ...

Page 2: ...ts will reduce risk of electric shock 2 Avoid body contact with earthed or grounded surfaces such as pipes radiators ranges and refrigerators There is an increased risk of elec tric shock if your body is earthed or grounded 3 Do not expose power tools to rain or wet con ditions Water entering a power tool will increase the risk of electric shock 4 Do not abuse the cord Never use the cord for carry...

Page 3: ...rom those intended could result in a hazardous situation 8 Keep handles and grasping surfaces dry clean and free from oil and grease Slippery handles and grasping surfaces do not allow for safe handling and control of the tool in unexpected situations 9 When using the tool do not wear cloth work gloves which may be entangled The entangle ment of cloth work gloves in the moving parts may result in ...

Page 4: ...even an explosion 4 If electrolyte gets into your eyes rinse them out with clear water and seek medical atten tion right away It may result in loss of your eyesight 5 Do not short the battery cartridge 1 Do not touch the terminals with any con ductive material 2 Avoid storing battery cartridge in a con tainer with other metal objects such as nails coins etc 3 Do not expose battery cartridge to wat...

Page 5: ...g inserted correctly Battery protection system The tool is equipped with a battery protection system This system automatically cuts off power to the motor to extend battery life The tool will automatically stop during operation if the tool and or battery are placed under one of the following conditions Overloaded The tool is operated in a manner that causes it to draw an abnormally high current In...

Page 6: ... rotation before the tool stops may dam age the tool CAUTION When not operating the tool always set the reversing switch lever to the neu tral position This tool has a reversing switch to change the direction of rotation Depress the reversing switch lever from the A side for clockwise rotation or from the B side for coun terclockwise rotation When the reversing switch lever is in the neutral posi ...

Page 7: ...l amount of grease about 0 5 1 g This chuck lubrication assures smooth action and lon ger service life Installing or removing drill bit Clean the shank end of the drill bit and apply grease before installing the drill bit 1 2 1 Shank end 2 Grease Insert the drill bit into the tool Turn the drill bit and push it in until it engages After installing the drill bit always make sure that the drill bit ...

Page 8: ... or remove the dust cup set with the drill bit installed in the tool It may damage the dust cup set and cause dust leak NOTE The standard side grip cannot be used with the dust cup set being installed on the tool When the dust cup set is installed on the tool remove the grip from the standard side grip and then attach it to the optional grip base set Before installing the dust cup set remove the b...

Page 9: ...2 1 Bit 2 Chuck cover To remove the dust cup set hold the root of dust cup and pull it out 1 1 Dust cup NOTE If the cap comes off from the dust cup attach it with its printed side facing up so that groove on the cap fits in the inside periphery of the attachment Hook Optional accessory CAUTION Always remove the battery when hanging the tool with the hook CAUTION Never hook the tool at high locatio...

Page 10: ...ition and prevent it from slipping away from the hole Do not apply more pressure when the hole becomes clogged with chips or particles Instead run the tool at an idle then remove the drill bit partially from the hole By repeating this several times the hole will be cleaned out and normal drilling may be resumed NOTE Eccentricity in the drill bit rotation may occur while operating the tool with no ...

Page 11: ...om country to country MAKITA LIMITED ONE YEAR WARRANTY Warranty Policy Every Makita tool is thoroughly inspected and tested before leaving the factory It is warranted to be free of defects from workmanship and materials for the period of ONE YEAR from the date of original purchase Should any trouble develop during this one year period return the COMPLETE tool freight prepaid to one of Makita s Fac...

Page 12: ...ropensas a accidentes 2 No utilice las herramientas eléctricas en atmósferas explosivas tal como en la presen cia de líquidos gases o polvo inflamables Las herramientas eléctricas crean chispas que pueden prender fuego al polvo o los humos 3 Mantenga a los niños y curiosos alejados mientras utiliza una herramienta eléctrica Las distracciones le pueden hacer perder el control Seguridad eléctrica 1 ...

Page 13: ...uido podría ocasionar una lesión grave en una fracción de segundo 9 Utilice siempre gafas protectoras para prote ger sus ojos de lesiones al usar herramientas eléctricas Las gafas deben cumplir con la Norma ANSI Z87 1 en EUA Es responsabilidad del empleador imponer el uso de equipos protectores de seguridad apropiados a los operadores de la herramienta y demás personas cerca del área de trabajo Ma...

Page 14: ...la herramienta La pérdida de con trol puede ocasionar lesiones 3 Sujete la herramienta eléctrica por las superficies de asimiento aisladas al realizar una operación en la que el accesorio de corte pueda entrar en contacto con cableado oculto Si el accesorio de corte entra en contacto con un cable con corriente las piezas metálicas expuestas de la herramienta eléctrica se cargarán también de corrie...

Page 15: ...a no sirva en absoluto El cartucho de batería puede explotar si se tira al fuego 8 Tenga cuidado de no dejar caer ni golpear la batería 9 No use una batería dañada 10 Las baterías de ión de litio están sujetas a los requisitos reglamentarios en materia de bie nes peligrosos Para el trasporte comercial por ej mediante terceros o agentes de transporte se deben tomar en cuenta los requisitos especial...

Page 16: ...No instale el cartucho de batería a la fuerza Si el cartucho no se desliza al interior fácilmente se debe a que no está siendo insertado correctamente Sistema de protección de batería La herramienta está equipada con un sistema de pro tección de batería Este sistema corta en forma auto mática el suministro de energía al motor para prolongar la vida útil de la batería La herramienta se detendrá aut...

Page 17: ...ptor de inversión PRECAUCIÓN Confirme siempre la direc ción de rotación antes de la operación PRECAUCIÓN Utilice el conmutador de inversión solamente después de que la herra mienta haya parado completamente Si cambia la dirección de rotación antes de que la herramienta haya parado podría dañarla PRECAUCIÓN Cuando no esté utilizando la herramienta ponga siempre la palanca del con mutador de inversi...

Page 18: ...Instale la empuñadura lateral de modo que las ranuras en la empuñadura encajen en las protuberancias del cilindro de la herramienta Gire la empuñadura en el sentido de las manecillas del reloj para asegurarla La empuñadura puede fijarse en el ángulo deseado 1 1 Empuñadura lateral Grasa Aplique previamente una pequeña cantidad de grasa alrededor de 0 5 g 1 g en el extremo de la espiga de la broca L...

Page 19: ...tro de la punta Contenedor de polvo 5 6 mm 1 4 14 5 mm 9 16 Contenedor de polvo 9 12 mm 15 32 16 mm 5 8 1 1 Contenedor de polvo Juego contenedor de polvo Accesorio opcional AVISO No utilice el juego contenedor de polvo cuando perfore en metal o un material similar Esto podría dañar el juego contenedor de polvo debido al calor producido por las pequeñas partículas de metal o material similar No ins...

Page 20: ... de modo que las partes salientes del contenedor de polvo encajen en las hendiduras del espaciador 1 2 1 Contenedor de polvo 2 Partes salientes NOTA Si conecta una aspiradora al juego contene dor de polvo retire la tapa guardapolvos antes de conectarla 1 1 Tapa guardapolvos Para extraer la broca jale hasta abajo la cubierta del portabrocas y jale la broca hacia afuera 1 2 1 Punta 2 Cubierta del po...

Page 21: ... podría no alcanzar su máxima capacidad En este caso caliente el cartucho de batería usando la herramienta sin carga durante un rato a fin de lograr que la herramienta alcance su máxima capacidad Operación de taladrado con percusión PRECAUCIÓN En el momento de comenzar a penetrar cuando se obstruye el orificio con viru tas y partículas o cuando se topa contra varillas de refuerzo de concreto se ej...

Page 22: ... en el símbolo Fije el adaptador de mandril en un portabrocas adapta dor sin llave en el que pueda instalarse un tornillo que mida 1 2 20 y después instálelos en la herramienta Cuando lo instale consulte la sección Instalación o extracción de la broca 1 2 1 Portabrocas adaptador sin llave 2 Adaptador de mandril Soplador Accesorio opcional Después de perforar el agujero utilice el soplador para lim...

Page 23: ...ión el reemplazo sin ningún cargo Esta garantía no aplica cuando las reparaciones se hayan hecho o intentado hacer por otros se requieran reparaciones debido al desgaste normal la herramienta haya sido maltratada recibido un mal uso o haya recibido un mantenimiento inapropiado se hayan hecho modificaciones a la herramienta EN NINGÚN CASO MAKITA SE HARÁ RESPONSABLE DE NINGÚN DAÑO INDIRECTO INCIDENT...

Page 24: ...eados por el lijado aserrado esmerilado taladrado y otras actividades de la construcción contienen sustancias químicas reconocidas por el Estado de California como causantes de cáncer defectos de nacimiento y otros peligros de reproducción Algunos ejemplos de estos productos químicos son plomo de pinturas a base de plomo sílice cristalino de ladrillos y cemento y otros productos de albañilería y a...

Reviews: