background image

Overview

Ov e rv ie w

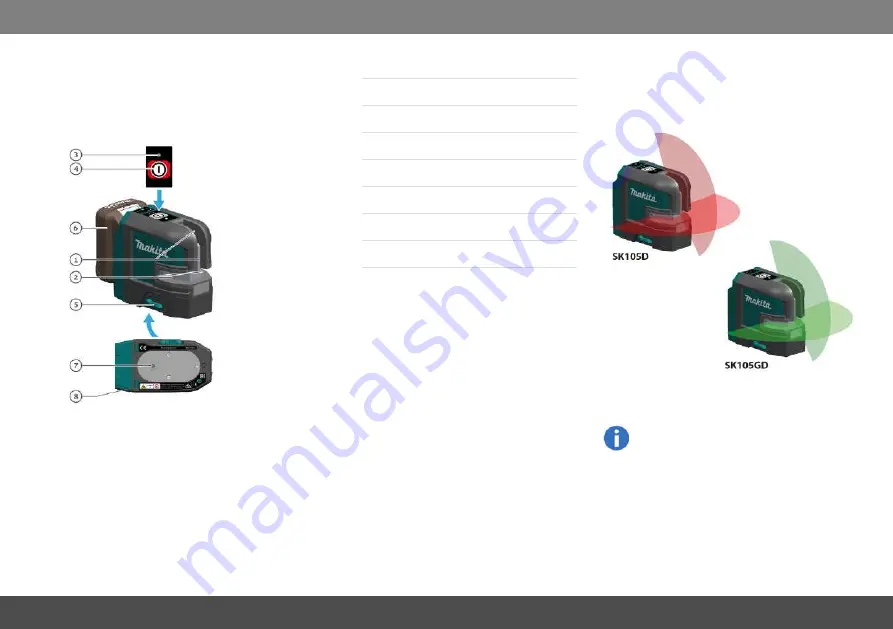
The Makita SK105D/SK105GD is a self-levelling
cross-line laser. It is a reliable precision laser for
any kind of tasks like levelling, plumbing, trans-
fering and setting out right angles.
It supports you on job side with two crossing ver-
tical and horizontal lines.

1  Window of vertical line

2  Window of horizontal line

3  Status LED

4  ON / Set key

5  

Levelling lock / Transportation lock

6  

Battery (optional)

7  Tripod thread 1/4"

8  DC jack

There are 2 different types available:

l

SK105D (red laser)

l

SK105GD (green laser)

On all images in this document only the
SK105D is shown.

Makita SK105D/SK105GD

2

Summary of Contents for SK105GD

Page 1: ...w 2 Technical data 3 Instrument Set up 5 Operations 8 How to use the adapters and wall mount 11 Message Codes 13 Accuracy Check 14 Care 16 Safety instructions 17 Optional accessories 22 Makita SK105D SK105GD 1 ...

Page 2: ...angles It supports you on job side with two crossing ver ticaland horizontallines 1 Window of verticalline 2 Window of horizontalline 3 Status LED 4 ON Set key 5 Levelling lock Transportation lock 6 Battery optional 7 Tripod thread 1 4 8 DC jack There are 2 different types available l SK105D red laser l SK105GD green laser On allimages in this document only the SK105D is shown Makita SK105D SK105G...

Page 3: ...m Class 2 acc IEC 60825 1 Battery cartridge BL1015 BL1016 BL1020B BL1021B BL1040B BL1041B Operating time with Li Ion battery 2 beam 15 h BL1015 BL1016 20 h BL1020B BL1021B 40 h BL1040B BL1041B 7 h BL1015 BL1016 10 h BL1020B BL1021B 20 h BL1040B BL1041B Net weight 0 46 kg Weight with Li Ion battery 0 67 kg 0 84 kg Power supply Makita battery cartridge USB adapter Rated voltage D C 10 8 V 12 Vmax D ...

Page 4: ...weight may differ depending on the attachment s including the bat tery cartridge The lightest and heav iest combination according to EPTA Procedure 01 2014 are shown in the table l Some of the battery cartridges listed above may not be available depending on your region of residence WARNING Only use the battery cartridges listed above Use of any other battery cartridges may cause injury and or fir...

Page 5: ...ially hazardous situation or an unintended use which if not avoided may result in minor injury and or appreciable material financial and environmentaldamage Important paragraphs which must be adhered to in practice as they enable the product to be used in a technically correct and efficient manner Levelling lock Levelling unlocked In the unlocked position the instrument auto matically levels itsel...

Page 6: ... button 1 on the front of the cartridge To installthe battery cartridge align the tongue on the battery cartridge with the groove in the hous ing and slip it into place Insert it allthe way untilit locks in place with a little click If you can see the red indicator 2 on the upper side of the button it is not locked completely CAUTION Always installthe battery cartridge fully untilthe red indicator...

Page 7: ... with the indicator Press the check button 2 on the battery cartridge to indicate the remaining battery capacity The indicator lamps 1 light up for a few seconds and show the remaining capacity Depending on the conditions of use and the ambient temperature the indication may dif fer slightly from the actualcapacity Makita SK105D SK105GD 7 ...

Page 8: ...Operations Op e r a t i o n s Switching ON Set key If the instrument is locked press laser key 3 times to switch off Brightness reduction Makita SK105D SK105GD 8 ...

Page 9: ...Operations Functions with unlocked levelling Vertical lines and horizontal lines Horizontal line Vertical line Makita SK105D SK105GD 9 ...

Page 10: ...Operations Functions with locked levelling Horizontal line Vertical line Horizontal line tilted Makita SK105D SK105GD 10 ...

Page 11: ...en battery cart ridge BL1040B or BL1041B is inserted Alignment of vertical laser lines Turn the instrument 360 to adjust the verticalline PRO L adapter optional accessory Put the instrument on PRO L adapter and fix it by thread Turn the instrument 360 to adjust the verticalline PRO L Adapter can not be used when bat tery cartridge BL1040B or BL1041B is inser ted Makita SK105D SK105GD 11 ...

Page 12: ... adjustment knob of the wallmount to loose and fix the slide for fine adjustment of the horizontalline to the desired reference level The wallmount is a single item and willnot be delivered with the L adapter as shown above Different fixing applications Makita SK105D SK105GD 12 ...

Page 13: ...pply OFF Blinks red Temperature alert Cooldown or heat up instrument Blinks Lights red Instrument is out of self levelling and instrument is at low power Change power supply Blinks Blinks red Instrument is out of self levelling Position the instrument almost horizontal Blinks every 5 seconds Lights red Levelling lock is activated and instrument is at low power Change power supply Blinks every 5 se...

Page 14: ...of the line or the point on wall A1 Rotate the instru ment by 180 and mark the horizontallaser line or the laser point in exactly the same way on wall B1 Then place the instrument at the same elevation as close as possible to wallA and again mark the horizontallaser line or the laser point on wallA A2 Rotate the instrument by 180 again and mark the laser on wallB B2 Measure the dis tances of the m...

Page 15: ...tolerance Checking the accuracy of the vertical line Place the lock switch in the Unlocked position see Levelling lock As a reference use a plumb bob and attach it as close as possible to an approx 3 m high wall Position the instrument at a distance of approx 1 5 m from the wallat an elevation of approx 1 5 m Direct the instrument at the wall and switch on Rotate the instrument and align it with t...

Page 16: ...bility please clean the optics of your instrument regularly Therefore blow off the dust from the glasses without touching the optics with your fingers If necessary use a damp soft cloth and a little bit of pure alcohol To avoid wrong measurements also clean your adapters regularly This could be done also by the proposed recommendation Especially the inter face between the adapter and instrument sh...

Page 17: ...tated limits 3 Deactivation of safety systems and removalof explanatory and hazard labels 4 Opening of the equipment by using tools screwdrivers etc 5 Carrying out modification or conversion of the product 6 Deliberate dazzling of third parties also in the dark 7 Inadequate safeguards at the surveying site e g when measuring on roads con struction sites etc Hazards in use WARNING Watch out for err...

Page 18: ...using battery 2 Do not disassemble battery cartridge 3 If operating time has become excessively shorter stop operating immediately It may result in a risk of overheating pos sible burns and even an explosion 4 If electrolyte gets into your eyes rinse them out with clear water and seek med icalattention right away It may result in loss of your eyesight 5 Do not short the battery cartridge 1 Do not ...

Page 19: ...s of use Refer to section Technicaldata The instru ment is designed for use in areas per manently habitable for humans Do not use the product in explosion hazardous areas or in aggressive environments Disposal CAUTION Flat batteries must not be disposed of with house hold waste Care for the environment and take them to the collection points provided in accord ance with nationalor localregulations ...

Page 20: ... reception which can be determined by turning the equipment off and on the user is encouraged to try to correct the interference by one or more of the following measures 1 Reorient or relocate the receiving antenna 2 Increase the separation between the equipment and the receiver 3 Connect the equipment into an outlet on a circuit different from that to which the receiver is connected 4 Consult the...

Page 21: ...ion is normally afforded by aversion responses including the blink reflex WARNING Looking directly into the beam with opticalaids e g binoculars telescopes can be hazardous CAUTION Looking into the laser beam may be hazardous to the eyes Wavelength SK105D 635 5 nm red SK105GD 525 5 nm green Maximum radiant output power for clas sification 1 mW Pulse duration 45 70 µs Pulse repetition frequency 10 ...

Page 22: ...ments might present a risk of injury to per sons Only use accessory or attachment for its stated purpose l USB adapter l Power supply cable l Laser receiver LDX1 l Wallmount l Tripod l Laser viewing glass l Storage case l Target plate l Hand strap l Aluminium rod l PRO L adapter If you need any assistance for more details regarding these accessories ask your local Makita Service Center Makita SK10...

Page 23: ...gevens 3 Instrument Instellen 5 Bediening 8 Hoe de adapter en wandbevestiging te gebruiken 11 Meldingcodes 13 Nauwkeurigheidscontrole 14 Onderhoud 16 Veiligheidsvoorschriften 17 Optionele accessoires 22 Makita SK105D SK105GD 1 ...

Page 24: ...jondersteunt u op het werk met twee elkaar kruisende horizontale en verticale lijnen 1 Venster voor verticale lijnen 2 Venster voor horizontale lijnen 3 Status LED 4 Toets AAN Set 5 Waterpaslock Transportlock 6 Accu optioneel 7 Statiefschroefdraad 1 4 8 DC aansluiting Er zijn 2 verschillende typen beschikbaar l SK105D rode laser l SK105GD groene laser In de afbeeldingen in dit document wordt allee...

Page 25: ...asertype 635 5 nm Klasse 2 acc IEC 60825 1 525 5 nm Klasse 2 acc IEC 60825 1 Accu BL1015 BL1016 BL1020B BL1021B BL1040B BL1041B Werkduur met Li Ion accu 2 stralen 15 h BL1015 BL1016 20 h BL1020B BL1021B 40 h BL1040B BL1041B 7 h BL1015 BL1016 10 h BL1020B BL1021B 20 h BL1040B BL1041B Netto gewicht 0 46 kg Gewicht met Li Ion accu 0 67 kg 0 84 kg Voeding Makita accu USB adapter Accuspanning D C 10 8 ...

Page 26: ...and verschillen l Het gewicht kan verschillen afhankelijk van de hulpstukken waaronder de accu De lichtste en zwaarste com binatie overeenkomstig de EPTA pro cedure 01 2014 worden getoond in de tabel l Sommige van de hierboven vermelde accu s zijn mogelijk niet leverbaar afhankelijk van uw regio of woon plaats WAARSCHUWING Gebruik uitsluitend de accu s die hierboven worden genoemd Gebruik van enig...

Page 27: ...ORZICHTIG Gebruiksgevaar of gebruik in strijd met de voors chriften dat slechts gering letselmet zich meebrengt maar aanzienlijke schade aan mater iaal bezittingen of milieu kan veroorzaken Belangrijke gebruiksinformatie die de gebruiker helpt het product technisch juist en efficiënt te gebruiken Waterpaslock Zelfstellen vrijgezet In de stand Vrij zalhet instrument zichzelf automatisch waterpas st...

Page 28: ...p Om de accu aan te brengen lijnt u de lip op de accu uit met de groef in de behuizing en duwt u de accu op zijn plaats Steek de accu zo ver mogelijk in het gereedschap tot u een klik hoort Als u het rode deel 2 aan de bovenzijde van de knop kunt zien is de accu niet goed aangebracht VOORZICHTIG Breng de accu altijd helemaalaan totdat het rode deelniet meer zichtbaar is Als u dit niet doet kan de ...

Page 29: ...een indicator Druk op de testknop 2 op de accu om de rest erende acculading te zien De indicatorlampjes 1 branden gedurende enkele seconden om de lad ing te tonen Afhankelijk van de gebruiksomstandigheden en de omgevingstemperatuur is het mogelijk dat de aangegeven acculading ver schilt van de werkelijke acculading Makita SK105D SK105GD 7 ...

Page 30: ...Bediening Be d i e n i n g AAN schakelen Set toets Als het instrument is gelockt de lasertoets 3 maal indrukken om uit te schakelen Helderheid verminderen Makita SK105D SK105GD 8 ...

Page 31: ...Bediening Functies met waterpaslock uit Verticale en horizontale lijnen Horizontale lijn Verticale lijn Makita SK105D SK105GD 9 ...

Page 32: ...Bediening Functies met waterpaslock aan Horizontale lijn Verticale lijn Horizontale lijn onder helling Makita SK105D SK105GD 10 ...

Page 33: ...t worden gebruikt als accu BL1040B of BL1041B is ingezet Uitlijning van verticale laserlijnen Draaihet instrument 360 om de verticale lijn uit te lijnen PRO L adapter Optionele accessoires Plaats het instrument op de PRO L adapter en zet hem vast met de schroef Draaihet instrument 360 om de verticale lijn uit te lijnen De PRO L Adapter kan niet worden gebruikt als accu BL1040B of BL1041B is ingeze...

Page 34: ... op de wandbevestiging naar los en fixeer de slede om de fijnafstelling van de horizontale lijn op het gewenste niveau te bren gen De wandbevestiging is een apart voorwerp en wordt niet samen met de L adapter geleverd zoals hierboven getoond Verschillende manieren van bevesti gen Makita SK105D SK105GD 12 ...

Page 35: ...g UIT Knippert rood Temperatuurwaarschuwing Instrument afkoelen of opwarmen Knippert Brandt rood Instrument is buiten bereik voor zelfstellen en krijgt te weinig stroom Wisselde voeding Knippert Knippert rood Instrument is buiten bereik voor zelfstellen Plaats het instrument vrijwelhori zontaal Knippert elke 5 seconden Brandt rood Waterpaslock is geactiveerd en het instrument krijgt te weinig stro...

Page 36: ...e horizontaallaserlijn of laserspot en markeer de positie van de lijn of de spot op wand A1 Draai het instrument 180 en markeer de horizontaal laserlijn of de laserspot op exact dezelfde wijze op wand B1 Plaats vervolgens het instrument op dezelfde hoo gte zo dicht mogelijk bijwand A en markeer opnieuw de laser op wand A A2 Draaihet instru ment 180 en markeer de laser op wand B B2 Meet de afstande...

Page 37: ...ntrole van de nauwkeurigheid van de ver ticale lijn Zet de lockschakelaar in de stand vrij zie Water pas lock Gebruik een schietlood als referentie en hang deze zo dicht mogelijk tegen een wand van circa 3 m hoog Plaats het instrument op een afstand van circa 1 5 m van de wand en op een hoogte van circa 1 5 m Richt het instrument op de wand en schakelhet instrument in Draaihet instrument en lijn h...

Page 38: ...aak de optiek van het instrument regelmatig schoon voor optimale nauwkeurigheid Blaas daarom stof van de optiek zonder deze aan te raken Gebruik zo nodig een zachte vochtige doek en wat pure alcohol Maak ook de adapters regelmatig schoon om meetfouten te voorkomen Dit kan ook worden uit gevoerd volgens de voorgestelde procedure Vooralhet raakvlak tussen apparaat en adapter moet altijd goed schoon ...

Page 39: ...ebruik buiten de toepassingsgrenzen 3 Onwerkzaam maken van vei ligheidsinrichtingen en verwijderen van aanwijzings en waarschuwingsetiketten 4 Openen van het product met gereed schap schroevendraaier etc 5 Het aanbrengen van modificaties of wijzi gingen aan het product 6 Opzettelijk verblinden van derden ook in het donker 7 Onvoldoende beveiliging van de meet locatie bijv bijhet verrichten van met...

Page 40: ...p brand vergroten Belangrijke veiligheidsinstructies voor een accu 1 Lees alle voorschriften en waarschuwin gen op 1 de acculader 2 de accu en 3 het product waarvoor de accu wordt gebruikt alvorens de accu in gebruik te nemen 2 Neem de accu niet uit elkaar 3 Als de gebruikstijd van een opgeladen accu aanzienlijk korter is geworden moet u het gebruik ervan onmiddellijk stopz etten Voortgezet gebrui...

Page 41: ...ccu op voordat hijvolledig ont laden is Stop het gebruik van het gereed schap en laad de accu op telkens wanneer u vaststelt dat het vermogen van het gereedschap is afgenomen 2 Laad een volledig opgeladen accu nooit opnieuw op Te lang opladen verkort de levensduur van de accu 3 Laad de accu op bijeen omgev ingstemperatuur van 10 C 40 C 50 F 104 F Laat een warme accu afkoelen alvorens hem op te lad...

Page 42: ...ock Gebruik de originele draagtas of vergelijkbare verpakking voor het transporteren en verschepen van uw meet instrument Elektromagnetische compatibiliteit EMC WAARSCHUWING Het instrument voldoet aan de strengste eisen van de relevante normen en regelgeving Desondanks kan de mogelijkheid op storing in andere apparatuur niet volledig worden uit gesloten Makita SK105D SK105GD 20 ...

Page 43: ...oor afwend ingsreacties inclusief knipperreflex WAARSCHUWING Direct in de laserstraalkijken met optische hulp middelen zoals bijv verrekijkers telescopen kan gevaarlijk zijn VOORZICHTIG Het kijken in de laserstraalkan gevaarlijk zijn voor de ogen Golflengte SK105D 635 5 nm rood SK105GD 525 5 nm groen Maximale vermogen uitgezonden straling t b v classificatie 1 mW Pulsduur 45 70 µs Puls herhaalfreq...

Page 44: ...cessoires of hulpstukken bestaat het risico van persoonlijke letsel Gebruik de accessoires of hulpstukken uitsluitend voor hun bestemde doel l USB adapter l Voedingskabel l Laserdetector LDX1 l Wandbevestiging l Statief l Laserbril l Draagtas l Richtplaat l Draagriem l Aluminium stok l PRO L adapter Wenst u meer bijzonderheden over deze accessoires neem dan contact op met het plaatselijke Makita s...

Page 45: ...s 3 Avant de démarrer l instrument 5 Utiliser l instrument 8 Utilisation des adaptateurs et du support mural 11 Codes de message 13 Contrôle de précision 14 Entretien 16 Consignes de sécurité 17 Accessoires optionnels 22 Makita SK105D SK105GD 1 ...

Page 46: ...énérant deux lignes horizontale et verticale quise croisent 1 Fenêtre de sortie de la ligne verticale 2 Fenêtre de sortie de la ligne hori zontale 3 LED d état 4 Touche Marche Arrêt de réglage 5 Verrouillage du transport Ver rouillage lors du transport 6 Batterie en option 7 Filetage de trépied 1 4 8 Prise jack CC Deux types sont disponibles l SK105D laser rouge l SK105GD laser vert Toutes les ima...

Page 47: ...elon CEI 60825 1 525 5 nm classe 2 selon CEI 60825 1 Batterie BL1015 BL1016 BL1020B BL1021B BL1040B BL1041B Autonomie avec batterie Li Ion 2 faisceaux 15 h BL1015 BL1016 20 h BL1020B BL1021B 40 h BL1040B BL1041B 7 h BL1015 BL1016 10 h BL1020B BL1021B 20 h BL1040B BL1041B Poids net 0 46 kg Poids avec batterie Li Ion 0 67 kg 0 84 kg Alimentation électrique Batterie Makita adaptateur USB Tension nomi...

Page 48: ...être différent selon les accessoires notamment la batterie Les associations la plus légère et la plus lourde conformément à la procé dure EPTA 01 2014 sont indiquées dans le tableau l Certaines batteries répertoriées ci des sus peuvent ne pas être disponibles selon la région où vous résidez AVERTISSEMENT N utilisez que les batteries répertoriées ci dessus L utilisation de n importe quelle autre ba...

Page 49: ...n conforme susceptible de provoquer des dommages dont l étendue est faible au niveau corporel mais peut être import ante au niveau matériel financier ou écologique Paragraphes importants auxquels ilconvient de se référer en pratique car ils permettent d utiliser le produit de manière efficace et techniquement correcte Verrouillage du calage Calage déverrouillé En position déverrouillée l instrumen...

Page 50: ...nez la languette sur la batterie avec la rainure sur le com partiment et insérez la Insérez la à fond jusqu à ce qu un léger déclic se fasse entendre Sile voy ant rouge 2 sur le dessus du bouton est visible cela signifie qu elle n est pas bien verrouillée ATTENTION Insérez toujours complètement la batterie jusqu à ce que le voyant rouge ne soit plus visible Sinon elle pourrait tomber accidentellem...

Page 51: ... pour les batteries avec voyant lumineux Appuyez sur le bouton de vérification 2 sur la bat terie pour indiquer la charge restante de la bat terie Les témoins 1 s allument pendant quelques secondes Selon les conditions d utilisation et la tem pérature ambiante l indication peut être légèrement différente de la capacité réelle Makita SK105D SK105GD 7 ...

Page 52: ... Ut i l i s e r l i n s t r u me n t Mise en marche avec la touche Marche Arrêt de réglage Si l instrument est verrouillé appuyer 3 fois sur la touche laser pour l éteindre Réduction de la luminosité Makita SK105D SK105GD 8 ...

Page 53: ...Utiliser l instrument Fonctions avec un calage déver rouillé Lignes verticale et horizontale Ligne horizontale Ligne verticale Makita SK105D SK105GD 9 ...

Page 54: ...Utiliser l instrument Fonctions avec un calage verrouillé Ligne horizontale Ligne verticale Ligne horizontale inclinée Makita SK105D SK105GD 10 ...

Page 55: ...aptateur L si une batterie BL1040B ou BL1041B est insérée Alignement des lignes laser verticales Tourner l instrument de 360 pour régler la ligne verticale Adaptateur L PRO accessoire optionnel Placez l instrument sur l adaptateur L PRO et fixez le au moyen du filetage Tourner l instrument de 360 pour régler la ligne verticale Ilest impossible d utiliser l adaptateur L PRO siune batterie BL1040B o...

Page 56: ...ent du support mural pour desserrer la partie coulissante et la régler au niveau de référence souhaité pour un réglage fin de la ligne horizontale Le support muralest un article à part et ne sera pas fourniavec l adaptateur L comme illustré ci dessus Différentes applications de fixation Makita SK105D SK105GD 12 ...

Page 57: ...e de température Laisser refroidir ou réchauffer l instrument Clignotement Lumière rouge continue Instrument hors plage d autocalage et faible état de charge Remplacer l alimentation Clignotement Clignotement en rouge Instrument hors plage d autocalage Mettre l instrument à peu près à l horizontale Clignotement toutes les 5 secondes Lumière rouge continue Le verrouillage de calage est actif mais l...

Page 58: ... et marquer la position de la ligne ou du point sur le mur A1 Tourner l instrument de 180 et marquer la ligne laser horizontale ou le point laser exactement de la même façon sur le mur B1 Placer ensuite l instrument à la même hauteur le plus près possible du mur A et marquer encore une fois la ligne laser horizontale ou le point laser sur le mur A A2 Tourner l instrument de 180 et marquer la proje...

Page 59: ...on de la ligne verticale Régler l interrupteur de verrouillage dans la pos ition déverrouillée voir Verrouillage du calage Utiliser comme référence un filà plomb et l accrocher le plus près possible d un mur d une hauteur d env 3 m Placer l instrument à une dis tance d env 1 5 m du mur à une hauteur d env 1 5 m Pointer l instrument sur le mur et le mettre sous tension Tourner l instrument et l ali...

Page 60: ...nt de nettoyer régulière ment les éléments optiques de l instrument Eliminer la poussière du verre en soufflant dessus sans toucher les éléments optiques avec les doigts Utiliser au besoin un chiffon doux humide et un peu d alcoolpur Pour éviter des mesures incorrectes nettoyer aussirégulièrement les adaptateurs Pour le faire on peut se référer à la recommandation Ilest par ticulièrement important...

Page 61: ...ndre les installations de sécurité inef ficaces et enlever les plaques sig nalétiques ainsique les avertissements 4 Ouvrir le produit avec des outils par ex tournevis 5 Modifier ou transformer le produit 6 Eblouir intentionnellement des tiers même dans l obscurité 7 Prendre des précautions insuffisantes sur le lieu de mesure par ex exécution de mesures au bord de routes sur des chantiers Risques l...

Page 62: ...utes les instructions de charge et ne chargez pas la batterie ou l outilen dehors de la plage de tem pérature indiquée dans les instructions Une charge incorrecte ou à une tem pérature en dehors de la plage indiquée peut endommager la batterie et aug menter le risque d incendie Consignes de sécurité importantes pour la bat terie 1 Avant d utiliser la batterie lisez toutes les instructions et préca...

Page 63: ...tie Makita pour l outilet le chargeur Makita Conseils pour assurer la durée de vie optimale de la batterie 1 Chargez la batterie avant qu elle ne soit complètement déchargée Arrêtez tou jours l outilet rechargez la batterie quand vous remarquez que la puissance de l outildiminue 2 Ne rechargez jamais une batterie com plètement chargée La surcharge réduit la durée de service de la batterie 3 Charge...

Page 64: ...nstallation donnée même en cas de respect des instructions Sicet équipement perturbe gravement la réception radio ou télé vision ce que l on peut déterminer en éteignant puis en rallumant l équipement l utilisateur est invité à essayer de corriger ces interférences en appliquant une ou plusieurs mesures exposées ci après 1 Réorienter ou repositionner l antenne réceptrice 2 Augmenter la distance en...

Page 65: ... que la fermeture des paupières AVERTISSEMENT Une observation directe du faisceau laser avec des instruments optiques jumelles lunettes etc peut s avérer dangereuse ATTENTION Regarder dans le faisceau laser peut s avérer dangereux pour l œil Longueur d onde SK105D 635 nm 5 nm rouge SK105GD 525 nm 5 nm vert Puissance rayonnante maximale en sortie pour la classification 1 mW Durée d impulsion 45 70 ...

Page 66: ...mentaire peut comporter un risque de blessure N utilisez les accessoires ou pièces complémentaires qu aux fins auxquelles ils ont été conçus l Adaptateur USB l Câble d alimentation électrique l Détecteur laser LDX1 l Support mural l Trépied l Fenêtre du laser l Coffret l Plaque de mire l Dragonne l Tige en aluminium l Adaptateur L PRO Pour obtenir plus de détails sur ces accessoires contactez votr...

Page 67: ...chnische Daten 3 Inbetriebnahme 5 Bedienung 8 Verwendung der Adapter und der Wandhalterung 11 Meldungscodes 13 Überprüfung der Genauigkeit 14 Pflege 16 Sicherheitshinweise 17 Sonderzubehör 22 Makita SK105D SK105GD 1 ...

Page 68: ... Die zweisich kreuzenden vertikalen und hori zontalen Linien erleichtern die Arbeit vor Ort 1 Fenster für vertikale Linie 2 Fenster für horizontale Linie 3 Status LED 4 ON SET Taste 5 Nivellierungslock Transportsperre 6 Batterie optional 7 Stativgewinde 1 4 8 DC Anschluss Es stehen 2 Varianten zur Verfügung l SK105D roter Laser l SK105GD grüner Laser Die Bilder in diesem Dokument zeigen nur die SK...

Page 69: ...asse 2 nach IEC 60825 1 525 5 nm Klasse 2 nach IEC 60825 1 Akku BL1015 BL1016 BL1020B BL1021B BL1040B BL1041B Betriebsdauer mit Li Ionen Akku 2 Strahlen 15 h BL1015 BL1016 20 h BL1020B BL1021B 40 h BL1040B BL1041B 7 h BL1015 BL1016 10 h BL1020B BL1021B 20 h BL1040B BL1041B Nettogewicht 0 46 kg Gewicht mit Li Ion Akku 0 67 kg 0 84 kg Spannungsversorgung Makita Akku USB Adapter Nennspannung DC 10 8 ...

Page 70: ...ewicht kann abhängig von dem Aufsatz den Aufsätzen einschließlich des Akkus unterschiedlich sein Die leichteste und die schwerste Kom bination gemäß dem EPTA Ver fahren 01 2014 sind in der Tabelle angegeben l Einige der oben aufgelisteten Akkus sind je nach Ihrem Wohngebiet even tuellnicht erhältlich WARNUNG Verwenden Sie nur die oben aufgeführten Akkus BeiVerwendung irgendwelcher anderer Akkus be...

Page 71: ...ng die zu geringen Personenschäden aber erheb lichen Sach Vermögens oder Umweltschäden führen kann Nutzungsinformationen die dem Benutzer helfen das Produkt technisch richtig und eff izient einzusetzen Nivellierungslock Nivellierung entriegelt In der Stellung Unlocked nievelliert sich das Instrument innerhalb des angegebenen Nei gungsbereichs automatisch Siehe Tech nische Daten Nivellierung gelock...

Page 72: ...ngen des Akkus dessen Führungsfeder auf die Nut im Gehäuse aus und schieben Sie den hinein Schieben Sie ihn voll ständig ein bis er mit einem hörbaren Klicken ein rastet Falls die rote Anzeige 2 an der Oberseite des Knopfes sichtbar ist ist der Akku nicht voll ständig verriegelt VORSICHT Schieben Sie den Akku stets bis zum Anschlag ein bis die rote Anzeige nicht mehr sichtbar ist Ander enfalls kan...

Page 73: ...ige Drücken Sie die Prüftaste 2 am Akku um die Akku Restkapazität anzuzeigen Die Anzei gelampen 1 leuchten wenige Sekunden lang auf und zeigen die Restkapazität an Abhängig von den Benutzungsbedingungen und der Umgebungstemperatur kann die Anzeige geringfügig von der tatsächlichen Kapazität abweichen Makita SK105D SK105GD 7 ...

Page 74: ...Bedienung Be d i e n u n g Einschalt SET Taste Wenn das Gerät verriegelt ist die Lasertaste zum Ausschalten dreimal drücken Reduzierung der Helligkeit Makita SK105D SK105GD 8 ...

Page 75: ...Bedienung Funktionen bei entriegelter Niv ellierung Vertikale und horizontale Linien Horizontale Linie Vertikale Linie Makita SK105D SK105GD 9 ...

Page 76: ...Bedienung Funktionen bei verriegelter Niv ellierung Horizontale Linie Vertikale Linie Horizontale Linie geneigt Makita SK105D SK105GD 10 ...

Page 77: ...den wenn der Akku BL1040B oder BL1041B eingesetzt ist Ausrichtung der vertikalen Laserlinien Das Gerät um 360 drehen um die vertikale Linie auszurichten PRO L Adapter optionales Zubehör Das Gerät auf den PRO L Adapter aufstecken und am Gewinde fixieren Das Gerät um 360 drehen um die vertikale Linie auszurichten Der TRO L Adapter kann nicht verwendet werden wenn der Akku BL1040B oder BL1041B einges...

Page 78: ...Wandhalterung drehen um den Schieber für die Feineinstellung der hori zontalen Linie auf das gewünschte Refer enzniveau zu lösen und zu fixieren Die Wandhalterung ist ein Einzelteilund wird nicht wie oben gezeigt mit dem L Adapter geliefert Verschiedene Befes tigungsanwendungen Makita SK105D SK105GD 12 ...

Page 79: ... Aus Blinkt rot Temperaturalarm Gerät abkühlen oder warm werden lassen Blinkt Leuchtet rot Gerät außerhalb des Selb stnivellierbereichs und geringe Leistung Spannungsversorgung wechseln Blinkt Blinkt rot Instrument außerhalb des Selb stnivellierbereichs Gerät nahezu waagerecht aus richten Blinkt alle 5 Sekunden Leuchtet rot Nivellierungslock ist aktiviert und Instrument hat nur eine geringe Leistu...

Page 80: ...r Linie oder des Punktes auf der Wand A1 markieren Instrument um 180 drehen und die horizontale Laserlinie oder den Laserpunkt genau so auf der Wand B1 markieren Anschließend Instrument auf gleicher Höhe mög lichst nahe zur Wand A platzieren und erneut die horizontale Laserlinie oder den Laserpunkt auf Wand A A2 markieren Instrument wieder um 180 drehen und Laser auf Wand B B2 mar kieren Abstände ...

Page 81: ...es innerhalb der Toleranz Überprüfung der Genauigkeit der vertikalen Linie Lockschalter auf die Stellung Unlocked stellen siehe Nivellierungslock Als Referenz ein Sch nurlot verwenden und möglichst nahe an einer ca 3 m hohen Wand befestigen Instrument im Abstand von ca 1 5 m von der Wand in einer Höhe von ca 1 5 m platzieren Instrument auf die Wand richten und einschalten Instrument drehen und auf...

Page 82: ... des Gerätes regelmäßig reinigen um optimale Präzision und Sichtbarkeit zu gewähr leisten Staub von den Gläsern abblasen ohne die Optik mit den Fingern zu berühren Gegeben enfalls ein feuchtes weiches Tuch und etwas reinen Alkoholverwenden Um Fehlmessungen zu vermeiden auch die Adapter regelmäßig reinigen Dies kann ebenfalls wie empfohlen erfolgen Insbesondere die Sch nittstelle zwischen Adapter u...

Page 83: ...Unwirksammachen von Sich erheitseinrichtungen und Entfernen von Hinweis und Warnschildern 4 Öffnen des Produkts mit Werkzeugen Schraubenzieher usw 5 Durchführen von Modifikationen oder Umbauten des Geräts 6 Absichtliche Blendung Dritter auch bei Dunkelheit 7 Ungenügende Absicherung des Messstandortes z B beider Durch führung von Messungen an Straßen auf Baustellen usw Gebrauchsgefahren WARNUNG Vor...

Page 84: ...Ladeanweisungen und laden Sie den Akku bzw das Werkzeug nicht außerhalb des in den Anweisungen angegebenen Temperaturbereichs Wird der Ladevorgang unsachgemäß oder beiTemperaturen außerhalb des angegebenen Bereichs durchgeführt kann es zu einer Beschädigung des Akkus und erhöhter Brandgefahr kom men Wichtige Sicherheitsanweisungen für Akku 1 Lesen Sie vor der Benutzung des Akkus alle Anweisungen u...

Page 85: ... und Beschädigung führen Außerdem wird dadurch die Makita Garantie für das Makita Werkzeug und Ladegerät ungültig Hinweise zur Aufrechterhaltung der maximalen Akku Nutzungsdauer 1 Laden Sie den Akku bevor er vollkom men erschöpft ist Schalten Sie das Werkzeug stets aus und laden Sie den Akku wenn Sie ein Nachlassen der Werkzeugleistung feststellen 2 Unterlassen Sie erneutes Laden eines vollaufgela...

Page 86: ...n Sie für den Trans port und Versand Ihres Messinstruments die Originalverpackung oder eine gleichwertige Ver packung Elektromagnetische Verträglichkeit EMV WARNUNG Das Gerät erfüllt die strengen Anforderungen der einschlägigen Normen und Richtlinien Trotzdem kann die Möglichkeit einer Störung anderer Ger äte nicht gänzlich ausgeschlossen werden Makita SK105D SK105GD 20 ...

Page 87: ...ch Abwendungsreaktionen einschließlich des Lid schlussreflexes bewirkt WARNUNG Der direkte Blick in den Strahlmit optischen Hil fsmitteln z B Ferngläser Fernrohre kann gefährlich sein VORSICHT Der Blick in den Laserstrahlkann für die Augen gefährlich sein Wellenlänge SK105D 635 5 nm rot SK105GD 525 5 nm grün MMaximale Strahlungsleistung zur Klas sifizierung 1 mW Impulsdauer 45 70 µs Impulsfolgefre...

Page 88: ...eine Ver letzungsgefahr darstellen Verwenden Sie Zubehörteile oder Vorrichtungen nur für ihren vorgesehenen Zweck l USB Adapter l Stromversorgungskabel l Laserempfänger LDX1 l Wandhalterung l Stativ l Laserschutzbrille l Aufbewahrungsbox l Zieltafel l Trageriemen l Aluminiumstange l PRO L Adapter Wenn Sie weitere Einzelheiten bezüglich dieser Zubehörteile benötigen wenden Sie sich bitte an Ihre Ma...

Reviews: