background image

8 ENGLISH

OPERATION

CAUTION:


Always insert the battery cartridge 

all the way until it locks in place.

 If you can see the 

red indicator on the upper side of the button, it is not 

locked completely. Insert it fully until the red indicator 

cannot be seen. If not, it may accidentally fall out of 

the tool, causing injury to you or someone around 

you.

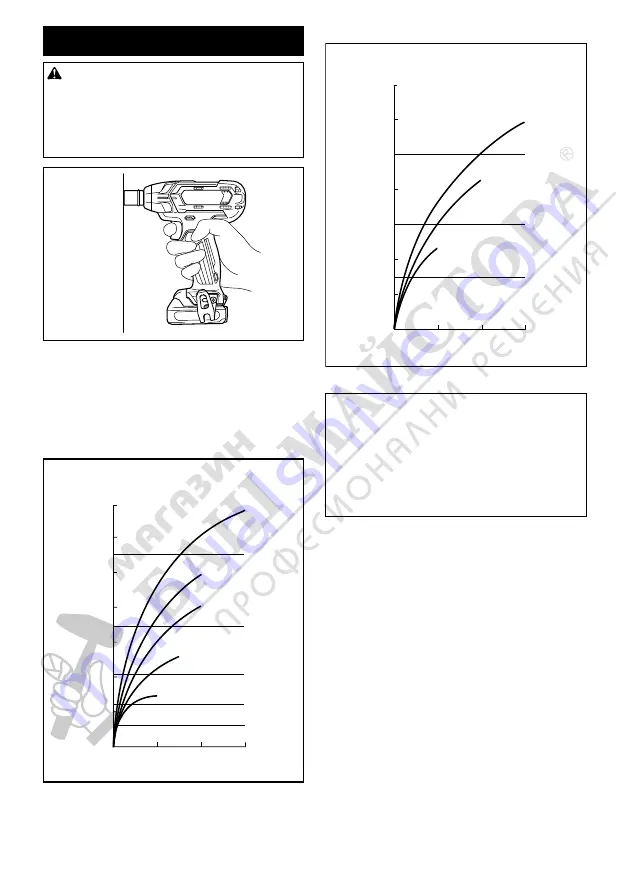
Hold the tool firmly and place the impact socket over 

the bolt or nut. Turn the tool on and fasten for the proper 

fastening time.

The proper fastening torque may differ depending upon 

the kind or size of the bolt, the material of the workpiece 

to be fastened, etc. The relation between fastening 

torque and fastening time is shown in the figures.

Proper fastening torque for standard bolt

N•m

(kgf•cm)

2

1

2

1

3

0

100 

(1020)

120 

(1224)

80 

(816)

60 

(612)

40 

(408)

20 

(204)

M12

M14

M10

M12

M14

M10

M8

M8

140 

(1430)

M16

M16

1.

 Fastening time (second) 

2.

 Fastening torque

Proper fastening torque for high tensile bolt

2

1

140 

(1430)

N•m

(kgf•cm)

2

1

0

80 

(816)

60 

(612)

40 

(408)

20 

(204)

3

100 

(1020)

120 

(1224)

M10

M12

M12

M8

M8

M10

1.

 Fastening time (second) 

2.

 Fastening torque

NOTE:

 Hold the tool pointed straight at the bolt or nut.

NOTE:

 Excessive fastening torque may damage the 

bolt/nut or impact socket. Before starting your job, 

always perform a test operation to determine the 

proper fastening time for your bolt or nut.

NOTE:

 If the tool is operated continuously until the 

battery cartridge has discharged, allow the tool to rest 

for 15 minutes before proceeding with a fresh battery 

cartridge.

The fastening torque is affected by a wide variety of 

factors including the following. After fastening, always 

check the torque with a torque wrench.

1.  When the battery cartridge is discharged almost 

completely, voltage will drop and the fastening 

torque will be reduced.

2.  Impact socket

• 

Failure to use the correct size impact socket 

will cause a reduction in the fastening torque.

• 

A worn impact socket (wear on the hex end 

or square end) will cause a reduction in the 

fastening torque.

3.  Bolt

• 

Even though the torque coefficient and the 

class of bolt are the same, the proper fasten-

ing torque will differ according to the diame-

ter of bolt.

• 

Even though the diameters of bolts are the 

same, the proper fastening torque will differ 

according to the torque coefficient, the class 

of bolt and the bolt length.

4.  The manner of holding the tool or the material of 

driving position to be fastened will affect the torque.

5.  Operating the tool at low speed will cause a reduc-

tion in the fastening torque.

Summary of Contents for TW140DSME

Page 1: ...INSTRUCTION MANUAL Cordless Impact Wrench TW140D ENGLISH Original instructions Read before use ...

Page 2: ...Waste Batteries and Accumulators and their implementation in accordance with national laws electric equipment and batteries and battery pack s that have reached the end of their life must be col lected separately and returned to an envi ronmentally compatible recycling facility Intended use The tool is intended for fastening bolts and nuts Noise The typical A weighted noise level determined accord...

Page 3: ...ng this power tool Personal Safety 1 Stay alert watch what you are doing and use common sense when operating a power tool Do not use a power tool while you are tired or under the influence of drugs alcohol or medication A moment of inattention while oper ating power tools may result in serious personal injury 2 Use personal protective equipment Always wear eye protection Protective equipment such ...

Page 4: ...n tact accidentally occurs flush with water If liquid contacts eyes additionally seek medical help Liquid ejected from the battery may cause irritation or burns 5 Do not use a battery pack or tool that is dam aged or modified Damaged or modified batteries may exhibit unpredictable behaviour resulting in fire explosion or risk of injury 6 Do not expose a battery pack or tool to fire or excessive te...

Page 5: ...y and damage It will also void the Makita warranty for the Makita tool and charger Tips for maintaining maximum battery life 1 Charge the battery cartridge before completely discharged Always stop tool operation and charge the battery cartridge when you notice less tool power 2 Never recharge a fully charged battery car tridge Overcharging shortens the battery service life 3 Charge the battery car...

Page 6: ...turn the tool on to restart If the tool does not start the battery is overheated In this situation let the battery cool before turning the tool on again Low battery voltage The remaining battery capacity is too low and the tool will not operate If you turn the tool on the motor does not run or the motor runs again but stops soon In this situation remove and recharge the battery Switch action 1 1 S...

Page 7: ...artridge is removed before carrying out any work on the tool Selecting correct impact socket Always use the correct size impact socket for bolts and nuts An incorrect size impact socket will result in inac curate and inconsistent fastening torque and or damage to the bolt or nut Installing or removing impact socket 1 2 1 Impact socket 2 Square drive To install the impact socket push it onto the sq...

Page 8: ...essive fastening torque may damage the bolt nut or impact socket Before starting your job always perform a test operation to determine the proper fastening time for your bolt or nut NOTE If the tool is operated continuously until the battery cartridge has discharged allow the tool to rest for 15 minutes before proceeding with a fresh battery cartridge The fastening torque is affected by a wide var...

Page 9: ... always using Makita replacement parts OPTIONAL ACCESSORIES CAUTION These accessories or attachments are recommended for use with your Makita tool specified in this manual The use of any other accessories or attachments might present a risk of injury to persons Only use accessory or attachment for its stated purpose If you need any assistance for more details regard ing these accessories ask your ...

Page 10: ...www makita com Makita Europe N V Makita Corporation 3 11 8 Sumiyoshi cho Anjo Aichi 446 8502 Japan Jan Baptist Vinkstraat 2 3070 Kortenberg Belgium 885641 227 EN 20171205 ...

Reviews: