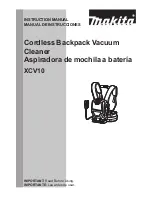
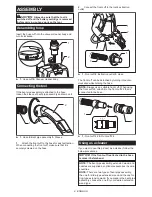
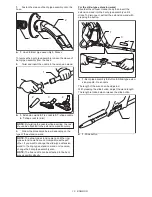
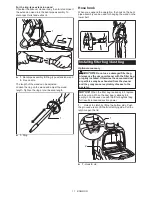
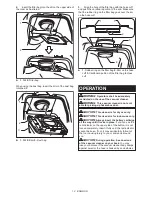
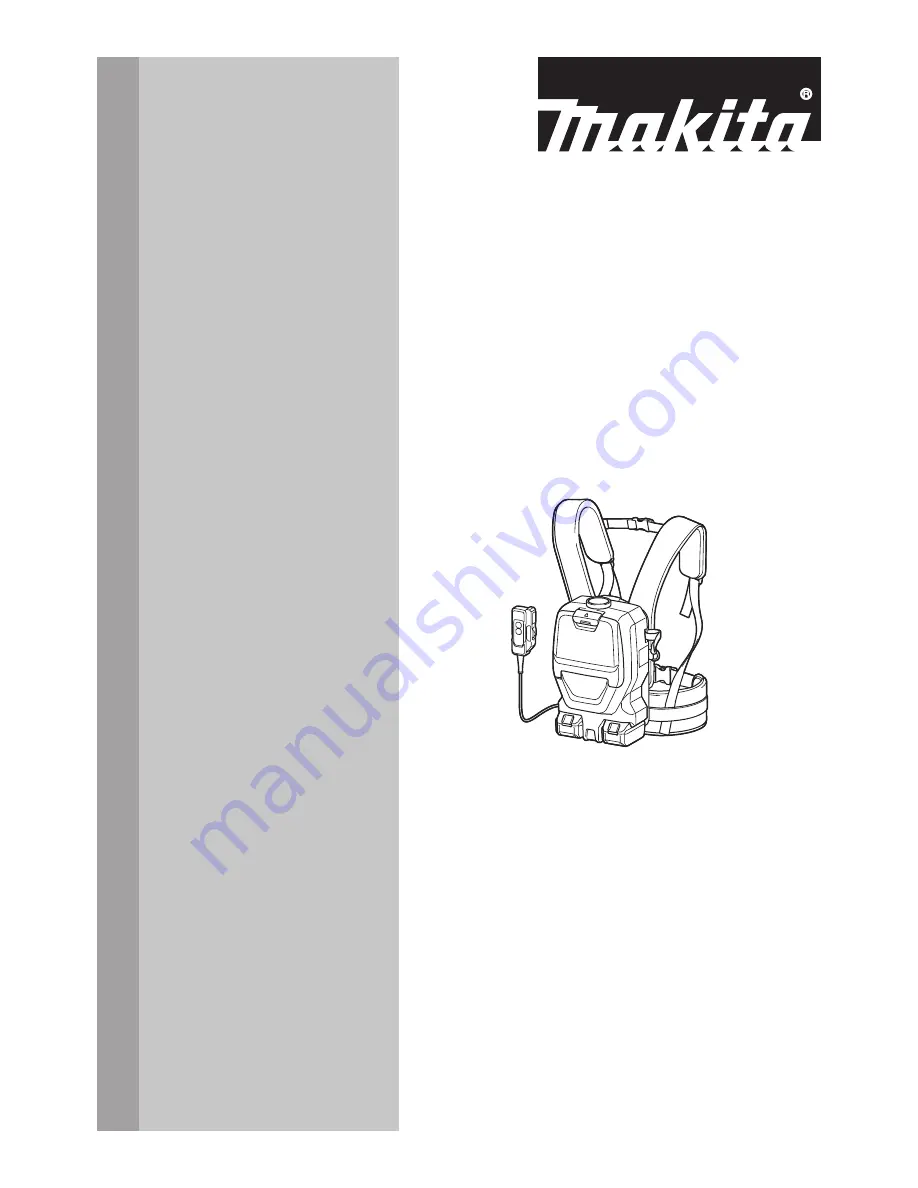
background image

INSTRUCTION MANUAL

MANUAL DE INSTRUCCIONES

Cordless Backpack Vacuum 

Cleaner

Aspiradora de mochila a batería

XCV10

IMPORTANT:

 Read Before Using.

IMPORTANTE:

 Lea antes de usar.

Summary of Contents for XCV10

Page 1: ...INSTRUCTION MANUAL MANUAL DE INSTRUCCIONES Cordless Backpack Vacuum Cleaner Aspiradora de mochila a batería XCV10 IMPORTANT Read Before Using IMPORTANTE Lea antes de usar ...

Page 2: ...dges and chargers listed above may not be available depending on your region of residence WARNING Only use the battery cartridges and chargers listed above Use of any other battery cartridges and chargers may cause injury and or fire SAFETY WARNINGS IMPORTANT SAFETY INSTRUCTIONS When using an electrical appliance basic precautions should always be fol lowed including the following READ ALL INSTRUC...

Page 3: ...ck is not in use keep it away from other metal objects like paper clips coins keys nails screws or other small metal objects that can make a connection from one terminal to another Shorting the battery terminals together may cause burns or a fire 20 Under abusive conditions liquid may be ejected from the battery avoid contact If contact acciden tally occurs flush with water If liq uid contacts eye...

Page 4: ... cutting and grinding materials that contain sil ica All OSHA requirements regarding reducing silica dust can be found at the OSHA website www osha gov 3 Stop operation immediately if you notice anything abnormal 4 If you drop or strike the cleaner check it carefully for cracks or dam age before operation 5 Do not bring close to stoves or other heat sources 6 Do not block the intake hole or vent h...

Page 5: ...ical attention immediately 3 Use the wireless unit only with Makita tools 4 Do not expose the wireless unit to rain or wet conditions 5 Do not use the wireless unit in places where the temperature exceeds 50 C 122 F 6 Do not operate the wireless unit in places where medical instruments such as heart pace makers are near by 7 Do not operate the wireless unit in places where automated devices are ne...

Page 6: ...ck If you can see the red indicator on the upper side of the button it is not locked completely CAUTION Always install the battery cartridge fully until the red indicator cannot be seen If not it may accidentally fall out of the tool causing injury to you or someone around you CAUTION Do not install the battery cartridge forcibly If the cartridge does not slide in easily it is not being inserted c...

Page 7: ...wer belt Arrange the cord so that the switch box comes to your desired side To prevent the cord from being damaged pass the cord through the hook as illustrated 1 2 2 1 1 Hook 2 Cord Adjusting belts The tightness of the shoulder belts upper and lower belts can be adjusted Put your arms through the shoul der belts first then fasten the lower and upper belts To tighten pull the end of the strap as i...

Page 8: ...n power when you turned it off previously When you press button while the vacuum cleaner is running the suction power switches between normal 1 and higher 2 suction power To turn off the vacuum cleaner press button NOTE If you want to run the vacuum cleaner along with the switch operation of the tool connected to the vacuum cleaner wireless activation function set the stand by switch to I ON NOTE ...

Page 9: ...e tool s extraction outlet 2 1 1 3 1 Front cuff 2 Extraction outlet 3 Hose The front cuff can be detached by turning it counter clockwise while holding the hose NOTE Always use a suitable front cuff When using the front cuff 24 attach it to the front cuff 22 that is connected to the hose 1 2 1 Front cuff 22 2 Front cuff 24 Using as a cleaner If you want to use this product as a cleaner follow the ...

Page 10: ...ion wand and the ring type extension wand are not compatible with each other If you want to change the slide type extension wand to the ring type extension wand or vice versa change the bent pipe assembly also NOTE The free nozzle can be attached to the bent pipe assembly directly For the slide type extension wand Shoulder the vacuum cleaner body then insert the extension wand into the bent pipe a...

Page 11: ... be used for hanging the wand on the lower belt Installing filter bag dust bag Optional accessory CAUTION Do not use a damaged filter bag Always use the vacuum cleaner with the filter bag properly installed Otherwise the vacuumed dust or particles may be exhausted from the cleaner and they may cause respiratory disease to the operator NOTICE When the filter bag is already full replace with new one...

Page 12: ...erators shall be adequately instructed on the use of the vacuum cleaner WARNING This vacuum cleaner is not suit able for picking up hazardous dust CAUTION This cleaner is for dry use only CAUTION This cleaner is for indoor use only CAUTION Always insert the battery cartridge all the way until it locks in place If you can see the red indicator on the upper side of the button it is not locked comple...

Page 13: ...ecomes full Open the lid and take out the filter bag Pull the strip on the side of the opening to shut the filter bag and dispose of the filter bag in whole 1 1 Strip When using a dust bag take out the dust bag and dis pose of the dust by releasing the latch 1 1 Latch NOTICE Periodically check the filter bag if it is full Continuous use with the filter bag full results in reduced suction power NOT...

Page 14: ...e sure that the wireless unit is properly inserted NOTE One wireless unit can register up to 10 links with other wireless units If more than 10 other wire less units are registered to one wireless unit the one registered earliest will be cancelled automatically NOTE The position of the wireless activation button varies depending on the tool NOTE The cleaner also starts by pressing button when the ...

Page 15: ... the switch operation of the tool finish the tool registration beforehand 1 Install the wireless units to the cleaner and the tool respectively 2 Install the batteries to the cleaner and the tool 3 Set the stand by switch on the cleaner to I ON 1 1 Stand by switch 4 Press the wireless activation button on the cleaner for 3 seconds until the wireless activation lamp blinks in green And then press t...

Page 16: ...rigger on the tool is being pulled CAUTION Always check if the wireless acti vation function works before starting a work with the tool To stop the wireless activation push the wireless activa tion button on the tool or set the stand by switch on the cleaner to O OFF NOTE The wireless activation lamp on the tool will stop blinking in blue when there is no operation for 2 hours In this case press t...

Page 17: ...n again Erasing all tool registrations You can erase all tool registrations from the cleaner as follows 3 1 2 1 Stand by switch 2 Wireless activation button 3 Wireless activation lamp 1 Install the wireless unit to the cleaner 2 Install the batteries to the cleaner 3 Set the stand by switch to I ON 4 Hold down the wireless activation button for about 6 seconds until the wireless activation lamp bl...

Page 18: ...eration is performed for 2 hours When the tool is running The wireless activation of the cleaner is available and the tool is running Tool registration Green 20 seconds Ready for the tool registration Searching the tool to be registered 2 seconds The tool registration has been finished The wireless activation lamp will start blinking in blue Cancelling erasing tool registration Red slow 2 times se...

Page 19: ...rigger on the tool is pulled or the cleaner s switch to start vacuuming is pushed Push the wireless activation button briefly and perform the tool registration cancellation procedures again The tool registration procedures for the tool or the cleaner has not been finished Perform the tool registration procedures for the tool and the cleaner at the same timing Radio disturbance by other appliances ...

Page 20: ...d by Makita Authorized or Factory Service Centers always using Makita replacement parts Cleaning the HEPA filter CAUTION Do not use the vacuum cleaner without a filter or continue to use dirty or damaged filter Vacuumed dust or particles may be exhausted from the cleaner and they may cause respiratory disease to the operator NOTICE To keep optimum suction power and clean exhaust clean the filter p...

Page 21: ...y assistance for more details regard ing these accessories ask your local Makita Service Center Hose for dust extraction type Hose for vacuum cleaner type Extension wand Free nozzle T shape nozzle Seat nozzle Corner nozzle Shelf brush Round brush Filter bag Dust bag Front cuff HEPA filter Wireless unit Makita genuine battery and charger NOTE Some items in the list may be included in the tool packa...

Page 22: ...ba podrían no estar disponibles depen diendo de su área de residencia ADVERTENCIA Use únicamente los cartuchos de batería y los cargadores indicados arriba El uso de cualquier otro cartucho de batería y cargador podría ocasionar una lesión y o un incendio ADVERTENCIAS DE SEGURIDAD INSTRUCCIONES IMPORTANTES DE SEGURIDAD Al usar cualquier aparato eléctrico siempre deben seguirse las precaucio nes bá...

Page 23: ...os específicamente para ellos El uso de otros paquetes de baterías puede generar riesgo de lesiones e incendio 19 Cuando no se esté usando el paquete de baterías guárdelo lejos de otros objetos metálicos tales como sujetapapeles clips monedas llaves clavos torni llos u otros objetos metálicos pequeños que puedan crear una conexión entre una terminal y otra Ocasionar un cortocir cuito en las termin...

Page 24: ...idos lixiviados etc Basura líquida o húmeda inclu yendo vómitos y heces Asbesto Pesticidas Tal acción podría ocasionar un incendio lesiones y o daños materiales Para reducir la exposición a estas sustancias químicas utilice un equipo de protección respiratoria aprobado tal como las máscaras contra polvo que están especial mente diseñadas para filtrar partí culas microscópicas No apunte la salida d...

Page 25: ...sporte comercial por ej mediante terceros o agentes de transporte se deben tomar en cuenta los requisitos especiales relativos al empaque y el etiquetado Para efectuar los preparativos del artículo que se va a enviar se requiere consultar a un experto en materiales peligrosos Si es posible consulte además otras regulaciones nacionales más detalladas Pegue o cubra con cinta adhesiva los contactos a...

Page 26: ...rica 18 No retire la etiqueta en la unidad inalámbrica 19 No coloque ninguna etiqueta en la unidad inalámbrica 20 No deje la unidad inalámbrica en un lugar donde pueda generarse electricidad estática o ruido eléctrico 21 No deje la unidad inalámbrica en un lugar sujeto a temperaturas altas tal como un vehí culo estacionado bajo el sol 22 No deje la unidad inalámbrica en un lugar donde haya polvo o...

Page 27: ...n algunas condicio nes los indicadores pueden encenderse Protección contra sobrecarga Cuando la herramienta se está utilizando de manera que causa que consuma una cantidad de corriente inusualmente alta la herramienta se detiene auto máticamente sin que haya indicación alguna En este caso apague la herramienta y detenga la aplicación que causó que la herramienta se sobrecargara Luego encienda la h...

Page 28: ... Lo apretado de las correas para hombro y las correas superior e inferior puede ser ajustado Introduzca sus brazos a través de las correas para hombro primero y luego fije las correas inferior y superior Para apretar jale el extremo de la correa tal como se ilustra Para aflojar jale el extremo del sujetador Correa inferior 1 2 1 Correa 2 Sujetador Correas para hombro 2 1 1 Correa 2 Sujetador Corre...

Page 29: ...piradora con el interruptor de la herramienta conectada a la aspiradora función de activación inalámbrica ajuste el interruptor de modo en espera en I ON NOTA Para hacer uso de la función de activa ción inalámbrica termine primero el registro de la herramienta Consulte la sección FUNCIÓN DE ACTIVACIÓN INALÁMBRICA para más detalles NOTA Si usa la función de activación inalámbrica no podrá detener l...

Page 30: ...tera 24 acóplela a la boca delantera 22 que se encuentra conectada a la manguera 1 2 1 Boca delantera 22 2 Boca delantera 24 Uso como aspiradora Si desea usar este producto como aspiradora siga los procedimientos a continuación AVISO Si la boca delantera está acoplada a la manguera extráigala primero NOTA El conjunto de tubo curvo el tubo de exten sión y las boquillas se suministran como accesorio...

Page 31: ...de tubo curvo Para el tubo de extensión de tipo corredera Cárguese al hombro el cuerpo de la aspiradora y a continuación inserte el tubo de extensión en el conjunto de tubo curvo hasta escuchar un clic Para desconectar extraiga el tubo de extensión oprimiendo el botón 2 1 3 4 1 Conjunto de tubo curvo 2 Botón 3 Tubo de extensión de tipo corredera 4 Boquilla amplia La longitud del tubo puede ser aju...

Page 32: ...ontrario el polvo o las partículas aspiradas podrían esca par de la aspiradora y causar una enfermedad respiratoria al operador AVISO Cuando la bolsa del filtro ya esté llena reemplácela con una nueva Cuando la bolsa reco lectora de polvo ya esté llena vacíela El uso conti nuo de la bolsa del filtro bolsa recolectora de polvo cuando está llena ocasionará una reducción de la potencia de succión 1 D...

Page 33: ...a debe utili zarse en interiores únicamente PRECAUCIÓN Siempre inserte completa mente el cartucho de batería hasta que quede asegurado en su lugar Si puede ver el indicador rojo del lado superior del botón esto indica que no ha quedado completamente asegurado Insértelo por completo hasta que el indicador rojo no pueda verse De lo contrario podría salirse accidentalmente de la herramienta y ocasion...

Page 34: ... aspiradora Si desea utilizar la bolsa repetidamente utilice una bolsa recolectora de polvo FUNCIÓN DE ACTIVACIÓN INALÁMBRICA Lo que puede hacer con la función de activación inalámbrica La función de activación inalámbrica permite una ope ración limpia y cómoda Si conecta a la aspiradora una herramienta compatible podrá hacer que la aspiradora funcione automáticamente al activar el interruptor de ...

Page 35: ...n la aspi radora antes de instalar la unidad inalámbrica El polvo o la suciedad podrían causar una avería si llegan a introducirse en la ranura de la unidad inalámbrica AVISO Para evitar una avería a causa de la elec tricidad estática toque un material de descarga de electricidad estática tal como una pieza metá lica antes de levantar la unidad inalámbrica AVISO Cuando vaya a instalar la unidad in...

Page 36: ... Y luego oprima el botón de activación inalámbrica en la herramienta de la misma manera 2 1 1 2 1 Botón de activación inalámbrica 2 Luz indica dora de activación inalámbrica Si la aspiradora y la herramienta han sido conectadas exitosamente las luces indicadoras de activación ina lámbrica se encenderán en verde durante 2 segundos y comenzarán a parpadear en azul NOTA Las luces indicadoras de activ...

Page 37: ...botón de activación inalámbrica en la herramienta o ajuste el interruptor de modo en espera en la aspiradora en O OFF NOTA La luz indicadora de activación inalámbrica en la herramienta dejará de parpadear en azul cuando no haya operación durante 2 horas En este caso oprima de nuevo los botones de activación inalám brica en la herramienta NOTA La aspiradora se pondrá en marcha deten drá con un retr...

Page 38: ...s registros de herramientas de la aspiradora como se indica a continuación 3 1 2 1 Interruptor de modo en espera 2 Botón de acti vación inalámbrica 3 Luz indicadora de activación inalámbrica 1 Instale la unidad inalámbrica en la aspiradora 2 Instale las baterías en la aspiradora 3 Ajuste el interruptor de modo en espera en I ON 4 Mantenga oprimido el botón de activación inalám brica durante aproxi...

Page 39: ...aliza ninguna operación durante 2 horas Cuando la herra mienta está funcionando La activación inalámbrica de la aspiradora está disponible y la herramienta está funcionando Registro de la herramienta Verde 20 segundos Ya se puede realizar el registro de la herramienta Se está bus cando la herramienta que se va a registrar 2 segundos El registro de la herramienta ha terminado La luz indicadora de a...

Page 40: ...rramienta La unidad inalámbrica está instalada incorrectamente en la aspiradora y o la herramienta Instale la unidad inalámbrica correctamente La terminal de la unidad inalámbrica y o la ranura está sucia Retire con cuidado el polvo y la suciedad en la terminal de la unidad inalámbrica y limpie la ranura de la aspiradora y o de la herramienta El interruptor de modo en espera en la aspiradora no es...

Page 41: ...iradora funciona aun cuando el gatillo interruptor de la herra mienta no ha sido jalado Otros usuarios están usando la activa ción inalámbrica de la aspiradora con sus herramientas Realice una de las siguientes operaciones ajuste el interruptor de modo en espera en la aspiradora en la posición O o apague el botón de activación inalámbrica en las demás herramientas o cancele el registro de la herra...

Page 42: ...ctora de polvo Limpie regularmente la bolsa recolectora de polvo con agua y jabón Voltee al revés la bolsa recolectora de polvo y retire el polvo adherido Lávela ligeramente con la mano y enjuague bien con agua Séquela por com pleto antes de instalarla en la aspiradora AVISO Una bolsa recolectora de polvo húmeda reduce el desempeño del aspirado así como la vida del motor ACCESORIOS OPCIONALES PREC...

Page 43: ...s términos más vigentes de la garantía aplicable a este producto En caso de no disponer de esta hoja de garantía anexa consulte los detalles sobre la garantía descritos en el sitio web de su país respectivo indicado a continuación Estados Unidos de América www makitatools com Canadá www makita ca Otros países www makita com ...

Page 44: ...ados por el lijado aserrado esmerilado taladrado y otras actividades de la construcción contienen sustancias químicas reconocidas por el Estado de California como causantes de cáncer defectos de nacimiento y otros peligros de reproducción Algunos ejemplos de estos productos químicos son plomo de pinturas a base de plomo sílice cristalino de ladrillos y cemento y otros productos de albañilería y ar...

Reviews: