background image

9 ENGLISH

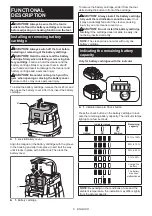
4.

  Mount the tank cover and lock it.

1

2

3

4

5

6

6

6

►    

1.

 Tank cover 

2.

 Powder filter (HEPA) 

3.

 Damper 

4.

 Prefilter 

5.

 Tank 

6.

 Mounting position marking

NOTICE:


Before using the powder filter, make 

sure that prefilter and damper are used together.

 It 

is not allowed to install powder filter alone.

Installing the water filter

Optional accessory

NOTICE:


Never pick up water or wet dust without 

the float and the cloth filter or the water filter.

NOTICE:


For picking up wet dust, make sure that the 

float cage and the float are installed on the cleaner.

NOTICE:


When installing the water filter on the tank, 

set it tight at the opening of the tank so that the hook 

of the water filter engages the tank opening firmly and 

there is no space between the water filter and the tank.

To pick up water or wet dust only, the water filter is more 

suitable than the cloth filter.

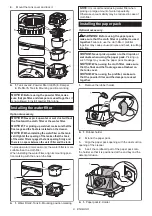
When installing the water filter, align its mounting posi-

tion marking with the one on the tank.

1

2

3

►    

1.

 Water filter 

2.

 Tank 

3.

 Mounting position marking

NOTE:

 It is recommended using water filter when 

picking up large amount of water repeatedly. 

Otherwise vacuum ability may be reduced in case of 

cloth filter.

Installing the paper pack

Optional accessory

WARNING:


Before using the paper pack, 

make sure that the cloth filter or prefilter is used 

together.

 Failure to use the cloth filter / prefilter 

together may cause unusual noise and heat, resulting 

in a fire.

NOTICE:


Never pick up water or other liquids or 

wet dusts when using the paper pack.

 Picking up 

such things may cause the paper pack breakage.

NOTICE:


When using the cloth filter, make sure 

that the float and the float cage are attached on 

the tank cover.

NOTICE:


When using the prefilter, make sure 

that the powder filter and the damper are used 

together.

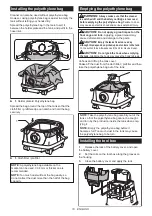
1.

  Remove the rubber holder.

1

►    

1.

 Rubber holder

2.

  Extend the paper pack.

3.

  Align the paper pack opening with the dust suction 

opening of the cleaner.

4.

  Insert the cardboard part of the paper pack onto 

the holder so that it is positioned at the end beyond the 

detent protrusion.

1

2

►    

1.

 Paper pack 

2.

 Holder

Summary of Contents for XCV20

Page 1: ...INSTRUCTION MANUAL MANUAL DE INSTRUCCIONES Cordless Vacuum Cleaner Aspiradora Inalámbrica XCV20 XCV23 IMPORTANT Read Before Using IMPORTANTE Lea antes de usar ...

Page 2: ...ired Applicable battery cartridge and charger Battery cartridge BL1815N BL1820B BL1830 BL1830B BL1840B BL1850B BL1860B Charger DC18RC DC18RD DC18RE DC18SD DC18SE DC18SF DC18SH Some of the battery cartridges and chargers listed above may not be available depending on your region of residence WARNING Only use the battery cartridges and chargers listed above Use of any other battery cartridges and ch...

Page 3: ...erin alumi num magnesium titanium zinc red phosphorus yellow phos phorus celluloid etc and their dust gas or steam Sharp objects glass cutlery wood splinter metal stone nail razor push pin etc Solidifying and conductive fine powder metal or carbon powder Dehumidifier Large amount of powder flour fire extinguisher powder etc Substances that cause toxic symptoms Aggressive chemicals acid leach etc L...

Page 4: ...structions Charging improperly or at temperatures outside of the specified range may damage the bat tery and increase the risk of fire 10 Have servicing performed by a quali fied repair person using only identical replacement parts This will ensure that the safety of the product is maintained 11 Do not modify or attempt to repair the appli ance or the battery pack except as indicated in the instru...

Page 5: ...e of it in a safe place 13 Use the batteries only with the prod ucts specified by Makita Installing the batteries to non compliant products may result in a fire excessive heat explosion or leak of electrolyte 14 If the tool is not used for a long period of time the battery must be removed from the tool SAVE THESE INSTRUCTIONS CAUTION Only use genuine Makita batteries Use of non genuine Makita batt...

Page 6: ...p it into place Insert it all the way until it locks in place with a little click Then lock the battery cover 1 1 Battery cartridge To remove the battery cartridge slide it from the tool while sliding the button in front of the cartridge CAUTION Always install the battery cartridge fully until the red indicator cannot be seen If not it may accidentally fall out of the cleaner causing injury to you...

Page 7: ...ation In this situation turn the tool off and stop the application that caused the tool to become overloaded Then turn the tool on to restart Overheat protection On Blinking When the tool is overheated the tool stops automati cally and the battery indicator blinks about 60 seconds In this situation let the tool cool down before turning the tool on again Overdischarge protection When the battery ca...

Page 8: ...ter is convenient when storing the cleaner stopping the work on the way and keeping the cleaner still To operate the stopper move it by hand To lock the caster with a stopper lower the stopper lever and the caster no longer will rotate To release the caster from the locked position raise the stopper lever NOTE When moving the cleaner make sure that the caster is unlocked Moving the cleaner with th...

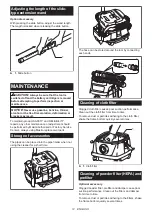
Page 9: ...th the one on the tank 1 2 3 1 Water filter 2 Tank 3 Mounting position marking NOTE It is recommended using water filter when picking up large amount of water repeatedly Otherwise vacuum ability may be reduced in case of cloth filter Installing the paper pack Optional accessory WARNING Before using the paper pack make sure that the cloth filter or prefilter is used together Failure to use the clot...

Page 10: ... may cause an electric shock and serious personal injury CAUTION Do not apply a great impact on the float cage and tank Applying a great impact may cause deformation and damage to the parts CAUTION Empty the tank at least once a day although this depends on picked up dust volume in the tank Or the suction force will weaken and the motor may be broken CAUTION Do not grab the hook when emptying the ...

Page 11: ...er diameter hose optional accessory may cause a hose stuffing and damage Insert the hose onto the mounting port of the tank and turn it clockwise until it locks Connecting the attachment with lock function Optional accessory Insert the attachment into the suction inlet until it clicks To remove pull the attachment while pushing the release button 1 3 2 1 Suction inlet with lock function 2 Release ...

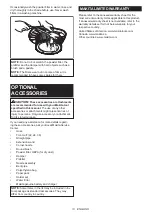
Page 12: ...Makita Authorized or Factory Service Centers always using Makita replacement parts Storage of accessories The pipes can be placed into the pipe holder when not using the cleaner for a short time The hose can be stored around the tool by connecting each ends Cleaning of cloth filter Clogged cloth filter causes poor suction performance Clean out the cloth filter from time to time To remove dust or p...

Page 13: ...e If you need any assistance for more details regard ing these accessories ask your local Makita Service Center Hose Front cuff 22 24 38 Straight pipe Extension wand Corner nozzle Round brush Powder filter HEPA for dry dust Damper Prefilter Nozzle assembly Bent pipe Polyethylene bag Paper pack Holder set Water Filter Makita genuine battery and charger NOTE Some items in the list may be included in...

Page 14: ... el flotador y el filtro de agua o de tela Cartucho de batería y cargador aplicables Cartucho de batería BL1815N BL1820B BL1830 BL1830B BL1840B BL1850B BL1860B Cargador DC18RC DC18RD DC18RE DC18SD DC18SE DC18SF DC18SH Algunos de los cartuchos de batería y cargadores enumerados arriba podrían no estar disponibles depen diendo de su área de residencia ADVERTENCIA Use únicamente los cartuchos de bate...

Page 15: ...ustancias calientes que están ardiendo o echando humo cigarrillos cerillas palitos de incienso velas cenizas calien tes chispas y polvo metálico generados por el corte o el lijado de metales etc Materiales inflamables tóner pinturas aerosoles etc Espumas como limpiadores de alfombras etc pueden causar explosiones o incendios Sustancias explosivas o pirofó ricas nitroglicerina aluminio magnesio tit...

Page 16: ... de otros objetos metálicos como sujeta papeles clips monedas llaves clavos tornillos u otros objetos pequeños de metal los cuales pue den actuar creando una conexión entre las terminales de la batería Originar un cortocircuito en las termi nales puede causar quemaduras o incendios 6 En condiciones abusivas podrá escapar líquido de la batería evite tocarlo Si lo toca accidentalmente enjuague con a...

Page 17: ... herramienta ni el car tucho de batería en lugares donde la temperatura pueda alcanzar o exce der los 50 C 122 F 7 Nunca incinere el cartucho de bate ría incluso en el caso de que esté dañado seriamente o ya no sirva en absoluto El cartucho de batería puede explotar si se tira al fuego 8 Tenga cuidado de no dejar caer ni golpear la batería 9 No use una batería dañada 10 Las baterías de ión de liti...

Page 18: ...e tela 5 Tanque DESCRIPCIÓN DEL FUNCIONAMIENTO PRECAUCIÓN Asegúrese siempre de que la herramienta esté apagada y el cartucho de batería haya sido extraído antes de realizar cualquier ajuste o comprobación en la herramienta Instalación o extracción del cartucho de batería PRECAUCIÓN Apague siempre la herramienta antes de colocar o quitar el cartucho de batería PRECAUCIÓN Sujete la aspiradora y el c...

Page 19: ...or 1 2 1 Luces indicadoras 2 Botón de verificación Oprima el botón de verificación en el cartucho de la batería para que indique la capacidad restante de la batería Las luces indicadoras se iluminarán por algu nos segundos Luces indicadoras Capacidad restante Iluminadas Apagadas Parpadeando 75 a 100 50 a 75 25 a 50 0 a 25 Cargar la batería La batería pudo haber funcionado mal NOTA Dependiendo de l...

Page 20: ...encendido apagado Para apagar la aspiradora ajuste el interruptor de modo en espera en el lado O La potencia de succión se puede ajustar según sus necesidades de trabajo La potencia de succión se puede incrementar girando la perilla de ajuste de la fuerza de succión del sím bolo al símbolo AVISO Ajuste siempre el interruptor de modo en espera en el lado O cuando no vaya a utilizar la aspiradora du...

Page 21: ...dor y el flotador retirando los pernos 2 1 1 Flotador 2 Caja del flotador 2 Coloque el prefiltro en el tanque alineando las marcas de posición de montaje 3 Instale el amortiguador en el filtro de polvo y luego colóquelos en el prefiltro alineando las marcas de posi ción de montaje 4 Instale la cubierta del tanque y asegúrela 1 2 3 4 5 6 6 6 1 Cubierta del tanque 2 Filtro de polvo HEPA 3 Amortiguad...

Page 22: ... tipo de objetos podría causar la avería de la bolsa de papel para polvo AVISO Cuando utiliza el filtro de tela asegúrese de que el flotador y la caja del flotador estén ins talados en la cubierta del tanque AVISO Cuando utilice el prefiltro asegúrese de que el filtro de polvo y el amortiguador se utilicen juntos 1 Retire el sujetador de goma 1 1 Sujetador de goma 2 Extienda la bolsa de papel para...

Page 23: ...ancho podría ocasionar que éste se rompa Desenganche y levante la cubierta del tanque Sacuda el polvo del filtro de tela prefiltro y luego retire la bolsa de polietileno del tanque NOTA Retire con cuidado la bolsa de polietileno del tanque de manera que ésta no pueda quedar engan chada y romperse por la protuberancia en el interior del tanque al vaciarla NOTA Vacíe la bolsa de polietileno antes de...

Page 24: ...n sin la función de bloqueo Ajuste de la longitud del tubo de extensión de tipo corredera Accesorio opcional Ajuste la longitud del tubo mientras presiona el botón deslizable La longitud se bloquea cuando se suelta el botón deslizable 1 1 Botón deslizable MANTENIMIENTO PRECAUCIÓN Asegúrese siempre de que la herramienta esté apagada y el cartucho de batería extraído antes de intentar realizar una i...

Page 25: ...ni raye el filtro de polvo el prefiltro o el amortiguador con objetos duros tales como un cepillo y una pala NOTA Los filtros se desgastan con el tiempo Se recomienda contar con piezas de repuesto ACCESORIOS OPCIONALES PRECAUCIÓN Estos accesorios o aditamen tos están recomendados para utilizarse con su herramienta Makita especificada en este manual El empleo de cualquier otro accesorio o aditament...

Page 26: ...s términos más vigentes de la garantía aplicable a este producto En caso de no disponer de esta hoja de garantía anexa consulte los detalles sobre la garantía descritos en el sitio web de su país respectivo indicado a continuación Estados Unidos de América www makitatools com Canadá www makita ca Otros países www makita com ...

Page 27: ...27 ...

Page 28: ...ados por el lijado aserrado esmerilado taladrado y otras actividades de la construcción contienen sustancias químicas reconocidas por el Estado de California como causantes de cáncer defectos de nacimiento y otros peligros de reproducción Algunos ejemplos de estos productos químicos son plomo de pinturas a base de plomo sílice cristalino de ladrillos y cemento y otros productos de albañilería y ar...

Reviews: