background image

1


003326 

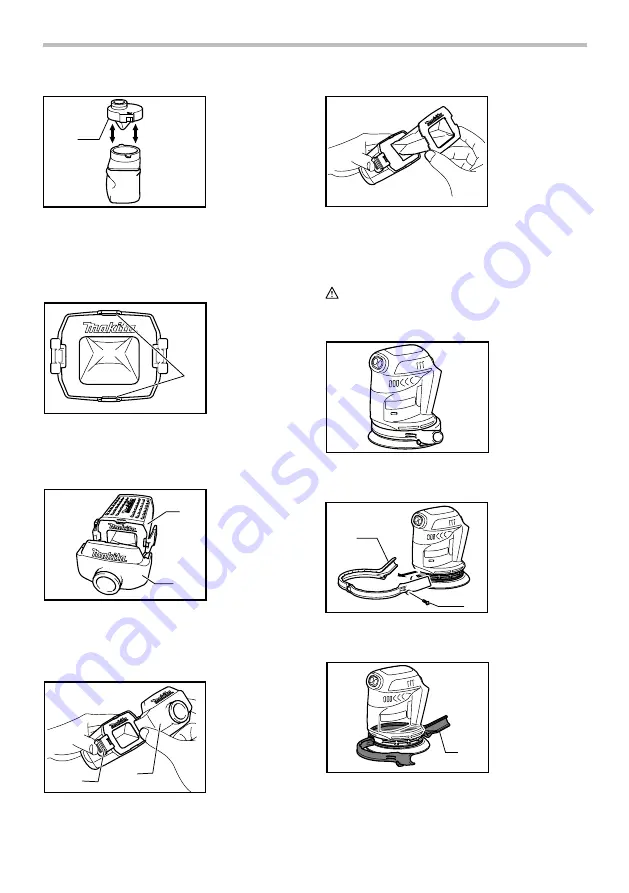
After emptying the dust bag, install the dust nozzle on 
the dust bag. Turn the dust nozzle slightly clockwise to 
lock it in place. Then install the dust bag on the tool as 
described in "Installing dust bag". 

Installing paper filter bag (Optional accessory) 

1


009094 

Make sure that the logo on the cardboard lip and the 
logo on the dust box are on the same side, then install 
the paper filter bag by fitting the cardboard lip in the 
groove of each holding tab. 

1

2


009095 

Make sure that the logo on the cardboard lip and the 
logo on the dust nozzle are on the same side, then 
install the dust nozzle on the dust box. 

Removing dust box and paper filter bag 

1

2


009092 

Remove the dust nozzle by pushing the two latches. 


009093 

Remove the paper filter bag first by pinching the logo side of 
its cardboard lip, then by pulling the cardboard lip downwards 
to move it out of the holding tab of the dust box. 

Removing and reinstalling the skirt 


CAUTION: 

Do not use the tool without the skirt. Otherwise dust is 
scattered all over. 


012881 

You can choose one of 12 directions of the skirt in 
accordance with your purpose. 

1

2


012885 

To remove the skirt, remove the screw and remove the 
skirt with slightly opening it for both sides. 

1


012945 

To reinstall the skirt, install it with slightly opening it for 
both sides. And fasten the screw. 


1. Skirt 

1. Skirt 
2. Screw 

1. Latch 
2. Dust nozzle 

1. Dust box 
2. Dust nozzle 

1. Holding tab 

1. Dust nozzle 

Summary of Contents for XOB01

Page 1: ...NSTRUCTION MANUAL DE INSTRUCCIONES IMPORTANT Read Before Using IMPORTANT Lire avant usage IMPORTANTE Leer antes de usar Cordless Random Orbit Sander Ponceuse Excentrique Sans Fil Lijadora Inalámbrica de Órbita Excéntrica XOB01 012946 ...

Page 2: ...ges and refrigerators There is an increased risk of electric shock if your body is earthed or grounded 6 Do not expose power tools to rain or wet conditions Water entering a power tool will increase the risk of electric shock 7 Do not abuse the cord Never use the cord for carrying pulling or unplugging the power tool Keep cord away from heat oil sharp edges or moving parts Damaged or entangled cor...

Page 3: ...ne type of battery pack may create a risk of fire when used with another battery pack 25 Use power tools only with specifically designated battery packs Use of any other battery packs may create a risk of injury and fire 26 When battery pack is not in use keep it away from other metal objects like paper clips coins keys nails screws or other small metal objects that can make a connection from one ...

Page 4: ...ing shortens the battery service life 3 Charge the battery cartridge with room temperature at 10 ゚ C 40 ゚ C 50 ゚ F 104 ゚ F Let a hot battery cartridge cool down before charging it 4 Charge the battery cartridge once in every six months if you do not use it for a long period of time FUNCTIONAL DESCRIPTION CAUTION Always be sure that the tool is switched off and the battery cartridge is removed befo...

Page 5: ...order of hi speed middle speed and low speed To stop the tool press the stop button Refer to the table for the relationship between the speed mode and the kind of work Speed mode Number of rotations Usage High Middle Low Regular sanding 11 000 9 500 7 000 Finish sanding Polishing 012897 NOTE The table shows standard applications They may differ under certain conditions ASSEMBLY CAUTION Always be s...

Page 6: ...ust box Removing dust box and paper filter bag 1 2 009092 Remove the dust nozzle by pushing the two latches 009093 Remove the paper filter bag first by pinching the logo side of its cardboard lip then by pulling the cardboard lip downwards to move it out of the holding tab of the dust box Removing and reinstalling the skirt CAUTION Do not use the tool without the skirt Otherwise dust is scattered ...

Page 7: ...e pad felt pad or wool pad optional accessories Always operate the tool at low speed to prevent work surfaces from heating abnormally Never force the tool Excessive pressure may decrease the polishing efficiency and cause motor overload resulting in tool malfunction 1 Applying wax 1 012882 Use an optional sponge pad Apply wax to the sponge pad or work surface Run the tool at low speed to smooth ou...

Page 8: ... is thoroughly inspected and tested before leaving the factory It is warranted to be free of defects from workmanship and materials for the period of ONE YEAR from the date of original purchase Should any trouble develop during this one year period return the COMPLETE tool freight prepaid to one of Makita s Factory or Authorized Service Centers If inspection shows the trouble is caused by defectiv...

Page 9: ... ne s approche pendant que vous utilisez un outil électrique Vous risquez de perdre la maîtrise de l outil si votre attention est détournée Sécurité en matière d électricité 4 Les fiches d outil électrique sont conçues pour s adapter parfaitement aux prises de courant Ne modifiez jamais la fiche de quelque façon que ce soit N utilisez aucun adaptateur de fiche sur les outils électriques avec mise ...

Page 10: ...que dont l interrupteur est défectueux représente un danger et doit être réparé 19 Débranchez la fiche de la source d alimentation et ou retirez le bloc piles de l outil électrique avant d effectuer tout réglage de changer un accessoire ou de ranger l outil électrique De telles mesures préventives réduisent les risques de démarrage accidentel de l outil électrique 20 Après l utilisation d un outil...

Page 11: ...poussières qui contiennent des substances dangereuses Utilisez une protection des voies respiratoires appropriée 8 Avant l utilisation assurez vous que le plateau n est ni fissuré ni cassé Il y a risque de blessure s il est fissuré ou cassé CONSERVEZ CE MODE D EMPLOI AVERTISSEMENT NE VOUS LAISSEZ PAS tromper au fil d une utilisation répétée par un sentiment d aisance ou de familiarité avec le prod...

Page 12: ... retirée avant de l ajuster ou de vérifier son fonctionnement Installation ou retrait de la batterie 1 2 3 012887 ATTENTION Mettez toujours l appareil hors tension avant d installer ou de retirer la batterie Tenez fermement l outil et la batterie lors de l installation ou du retrait de cette dernière Sinon l outil et la batterie pourraient vous glisser des mains ce qui risque d endommager l outil ...

Page 13: ...uyez sur le bouton de démarrage réglage de la vitesse L outil démarre en mode de vitesse élevée Chaque fois que vous appuyez sur le bouton de démarrage réglage de la vitesse le mode de vitesse change dans l ordre suivant vitesse élevée vitesse moyenne et vitesse lente Pour arrêter l outil appuyez sur le bouton d arrêt Pour connaître la relation entre le mode de vitesse et le type de travail report...

Page 14: ...go sur le bord en carton et le logo sur la boîte à poussières sont du même côté puis installez le sac filtre en papier en plaçant le bord en carton dans la rainure de chaque patte de fixation 1 2 009095 Assurez vous que le logo sur le bord en carton et le logo sur le bouchon du sac sont du même côté puis installez le bouchon du sac sur la boîte à poussières Retrait de la boîte à poussières et du s...

Page 15: ...çage tourne dans le sens des aiguilles d une montre en état chargé mais il peut tourner dans le sens inverse des aiguilles d une montre quand l outil fonctionne à vide Opération de polissage en option ATTENTION N utiliser qu un tampon éponge tampon feutre ou tampon en laine d origine Makita accessoires en option Toujours utiliser l outil à faible vitesse pour empêcher que les surfaces de travail n...

Page 16: ...e de service après vente Makita autorisé et utiliser des pièces de rechange Makita ACCESSOIRES EN OPTION ATTENTION Ces accessoires ou pièces complémentaires sont recommandés pour l utilisation avec l outil Makita spécifié dans ce mode d emploi L utilisation de tout autre accessoire ou pièce complémentaire peut comporter un risque de blessure N utilisez les accessoires ou pièces qu aux fins auxquel...

Page 17: ...IT CET AVIS DE NON RESPONSABILITÉ S APPLIQUE À LA FOIS PENDANT ET APRÈS LA PÉRIODE COUVERTE PAR CETTE GARANTIE MAKITA DÉCLINE TOUTE RESPONSABILITÉ QUANT À TOUTE GARANTIE TACITE INCLUANT LES GARANTIES TACITES DE QUALITÉ MARCHANDE ET ADÉQUATION À UN USAGE PARTICULIER APRÈS LA PÉRIODE D UN AN COUVERTE PAR CETTE GARANTIE Cette garantie vous donne des droits spécifiques reconnus par la loi et possiblem...

Page 18: ...chispas que pueden prender fuego al polvo o los humos 3 Mantenga a los niños y curiosos alejados mientras utiliza una herramienta eléctrica Las distracciones le pueden hacer perder el control Seguridad eléctrica 4 Las clavijas de conexión de las herramientas eléctricas deberán encajar perfectamente en la toma de corriente No modifique nunca la clavija de conexión de ninguna forma No utilice ningun...

Page 19: ... la enciende y apaga Cualquier herramienta eléctrica que no pueda ser controlada con el interruptor es peligrosa y debe ser reemplazada 19 Desconecte la clavija de la fuente de energía y o la batería de la herramienta eléctrica antes de realizar ajustes cambiar accesorios o guardar las herramientas eléctricas Dichas medidas de seguridad preventivas reducen el riesgo de que la herramienta se inicie...

Page 20: ...r la herramienta Las roturas y las grietas pueden causar heridas personales GUARDE ESTAS INSTRUCCIONES ADVERTENCIA NO DEJE que la comodidad o familiaridad con el producto a base de utilizarlo repetidamente sustituya la estricta observancia de las normas de seguridad para dicho producto El MAL USO o el no seguir las normas de seguridad establecidas en este manual de instrucciones puede ocasionar gr...

Page 21: ...nta Instalación o desmontaje del cartucho de batería 1 2 3 012887 PRECAUCIÓN Apague siempre la herramienta antes de colocar o quitar el cartucho de batería Sujete la herramienta y el cartucho de la batería con firmeza al colocar o quitar el cartucho Si no se sujeta con firmeza la herramienta y el cartucho de la batería puede ocasionar que se resbalen de sus manos resultando en daños a la herramien...

Page 22: ...enta presione el botón de arranque ajustador de velocidad La herramienta arranca con el modo de velocidad alta Cada vez que presiona el botón de arranque ajustador de velocidad el modo de velocidad cambia en una secuencia de velocidad alta velocidad media y velocidad baja Para parar la herramienta presione el botón de parada Refiérase a la tabla para la relación entre el modo de velocidad y el tip...

Page 23: ...logotipo sobre la caja de recolección de polvo queden en el mismo lado luego instale la bolsa de papel del filtro al encajar el borde de cartón en la ranura de cada lengüeta de sujeción 1 2 009095 Asegúrese que el logotipo en el borde de cartón y el logotipo en la boquilla pare el polvo queden en el mismo lado y luego instale la boquilla para el polvo en la caja de recolección de polvo Extracción ...

Page 24: ...erramienta Puede que la almohadilla se dañe si el borde de ésta hace contacto con la pieza de trabajo al usar la herramienta Sostenga firmemente la herramienta Encienda la herramienta y espere a que alcance su velocidad máxima Después apoye suavemente la herramienta sobre la superficie de la pieza Mantenga la almohadilla alineada con la pieza y aplique una suave presión sobre la herramienta PRECAU...

Page 25: ...spección o mantenimiento Nunca use gasolina bencina diluyente tíner alcohol o sustancias similares Puede que esto ocasione grietas o descoloramiento Para mantener la SEGURIDAD y FIABILIDAD del producto las reparaciones la inspección y sustitución de la escobilla de carbón y cualquier otro mantenimiento o ajuste deberán ser realizados en Centros o Servicios de fábrica Autorizados por Makita emplean...

Page 26: ...VENTA O USO DEL PRODUCTO ESTA RENUNCIA SERÁ APLICABLE TANTO DURANTE COMO DESPUÉS DEL TÉRMINO DE ESTA GARANTÍA MAKITA RENUNCIA LA RESPONSABILIDAD POR CUALQUIER GARANTÍA IMPLÍCITA INCLUYENDO GARANTÍAS IMPLÍCITAS DE COMERCIALIDAD E IDONEIDAD PARA UN FIN ESPECÍFICO DESPUÉS DEL TÉRMINO DE UN AÑO DE ESTA GARANTÍA Esta garantía le concede a usted derechos legales específicos y usted podrá tener también o...

Page 27: ...27 ...

Page 28: ...polvos creados por el lijado aserrado esmerilado taladrado y otras actividades de la construcción contienen sustancias químicas reconocidas por el Estado de California como causantes de cáncer defectos de nacimiento y otros peligros de reproducción Algunos ejemplos de estos productos químicos son plomo de pinturas a base de plomo sílice cristalino de ladrillos y cemento y otros productos de albañi...

Reviews: