background image

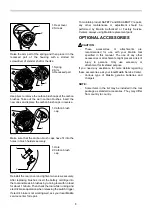
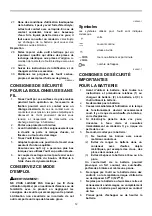
Pull the switch trigger to light up the lamp. The lamp 
keeps on lighting while the switch trigger is being pulled. 
The light automatically goes out 10 - 15 seconds after the 
switch trigger is released. 


NOTE: 

• 

Use a dry cloth to wipe the dirt off the lens of lamp. 
Be careful not to scratch the lens of lamp, or it may 
lower the illumination. 

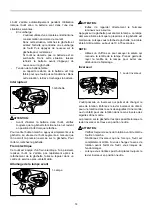
Reversing switch action 

A

B

1


008665 

This tool has a reversing switch to change the direction of 
rotation. Depress the reversing switch lever from the A 
side for clockwise rotation or from the B side for 
counterclockwise rotation. 
When the reversing switch lever is in the neutral position, 
the switch trigger cannot be pulled. 


CAUTION: 

• 

Always check the direction of rotation before 
operation. 

• 

Use the reversing switch only after the tool comes 
to a complete stop. Changing the direction of 
rotation before the tool stops may damage the tool. 

• 

When not operating the tool, always set the 
reversing switch lever to the neutral position. 

ASSEMBLY 


CAUTION: 

• 

Always be sure that the tool is switched off and the 
battery cartridge is removed before carrying out 
any work on the tool. 

Selecting correct socket 

Always use the correct size socket for bolts and nuts. An 
incorrect size socket will result in inaccurate and 
inconsistent fastening torque and/or damage to the bolt 
or nut. 


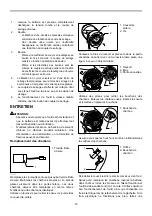
Installing or removing socket 

1

2


008667 

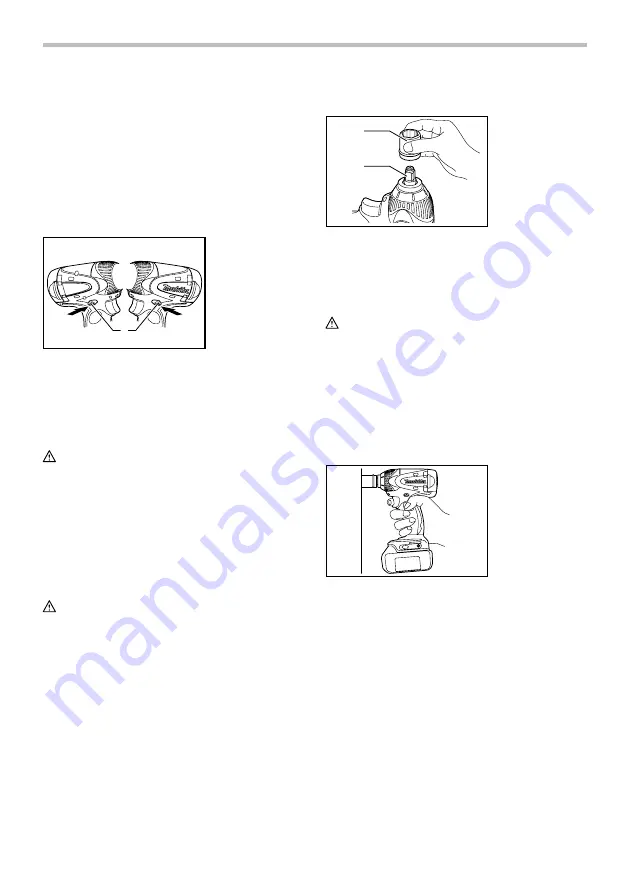
To install the socket, push it onto the anvil of the tool until 
it locks into place. 
To remove the socket, simply pull it off. 

OPERATION 


CAUTION: 

• 

Always insert the battery cartridge all the way until it 
locks in place. If you can see the red part on the 
upper side of the button, it is not locked completely. 
Insert it fully until the red part cannot be seen. If not, 
it may accidentally fall out of the tool, causing injury 
to you or someone around you. 

Hold the tool firmly and place the socket over the bolt or 
nut. Turn the tool on and fasten for the proper fastening 
time. 


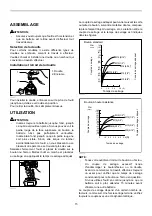
008666 

The proper fastening torque may differ depending upon 
the kind or size of the bolt, the material of the workpiece 
to be fastened, etc. The relation between fastening 
torque and fastening time is shown in the figures. 

1. Socket 
2. Anvil 

1. Reversing switch 

lever 

Summary of Contents for XWT06

Page 1: ...UAL MANUEL D INSTRUCTION MANUAL DE INSTRUCCIONES IMPORTANT Read Before Using IMPORTANT Lire avant usage IMPORTANTE Leer antes de usar Cordless Impact Wrench Boulonneuse sans Fil Llave de Impacto Inalámbrica XWT06 008663 ...

Page 2: ...th earthed grounded power tools Unmodified plugs and matching outlets will reduce risk of electric shock 5 Avoid body contact with earthed or grounded surfaces such as pipes radiators ranges and refrigerators There is an increased risk of electric shock if your body is earthed or grounded 6 Do not expose power tools to rain or wet conditions Water entering a power tool will increase the risk of el...

Page 3: ...re easier to control 23 Use the power tool accessories and tool bits etc in accordance with these instructions taking into account the working conditions and the work to be performed Use of the power tool for operations different from those intended could result in a hazardous situation Battery tool use and care 24 Recharge only with the charger specified by the manufacturer A charger that is suit...

Page 4: ...o not touch the terminals with any conductive material 2 Avoid storing battery cartridge in a container with other metal objects such as nails coins etc 3 Do not expose battery cartridge to water or rain A battery short can cause a large current flow overheating possible burns and even a breakdown 6 Do not store the tool and battery cartridge in locations where the temperature may reach or exceed ...

Page 5: ...xtend battery life The tool will automatically stop during operation if the tool and or battery are placed under one of the following conditions Overloaded The tool is operated in a manner that causes it to draw an abnormally high current In this situation release the trigger switch on the tool and stop the application that caused the tool to become overloaded Then pull the trigger switch again to...

Page 6: ...ys be sure that the tool is switched off and the battery cartridge is removed before carrying out any work on the tool Selecting correct socket Always use the correct size socket for bolts and nuts An incorrect size socket will result in inaccurate and inconsistent fastening torque and or damage to the bolt or nut Installing or removing socket 1 2 008667 To install the socket push it onto the anvi...

Page 7: ...n the fastening torque A worn socket wear on the hex end or square end will cause a reduction in the fastening torque 3 Bolt Even though the torque coefficient and the class of bolt are the same the proper fastening torque will differ according to the diameter of bolt Even though the diameters of bolts are the same the proper fastening torque will differ according to the torque coefficient the cla...

Page 8: ...ctric brake is not working well ask your local Makita service center for repair To maintain product SAFETY and RELIABILITY repairs any other maintenance or adjustment should be performed by Makita Authorized or Factory Service Centers always using Makita replacement parts OPTIONAL ACCESSORIES CAUTION These accessories or attachments are recommended for use with your Makita tool specified in this m...

Page 9: ...ES FROM THE SALE OR USE OF THE PRODUCT THIS DISCLAIMER APPLIES BOTH DURING AND AFTER THE TERM OF THIS WARRANTY MAKITA DISCLAIMS LIABILITY FOR ANY IMPLIED WARRANTIES INCLUDING IMPLIED WARRANTIES OF MERCHANTABILITY AND FITNESS FOR A SPECIFIC PURPOSE AFTER THE ONE YEAR TERM OF THIS WARRANTY This Warranty gives you specific legal rights and you may also have other rights which vary from state to state...

Page 10: ...ent des étincelles au contact desquelles la poussière ou les vapeurs peuvent s enflammer 3 Assurez vous qu aucun enfant ou curieux ne s approche pendant que vous utilisez un outil électrique Vous risquez de perdre la maîtrise de l outil si votre attention est détournée Sécurité en matière d électricité 4 Les fiches d outil électrique sont conçues pour s adapter parfaitement aux prises de courant N...

Page 11: ...on plus sécuritaire 18 N utilisez pas l outil électrique s il n est pas possible de mettre sa gâchette en position de marche et d arrêt Un outil électrique dont l interrupteur est défectueux représente un danger et doit être réparé 19 Débranchez la fiche de la source d alimentation et ou retirez le bloc piles de l outil électrique avant d effectuer tout réglage de changer un accessoire ou de range...

Page 12: ... l aide d une clé dynamométrique CONSERVEZ CE MODE D EMPLOI AVERTISSEMENT NE VOUS LAISSEZ PAS tromper au fil d une utilisation répétée par un sentiment d aisance ou de familiarité avec le produit en négligeant les consignes de sécurité qui accompagnent le produit L utilisation non sécuritaire ou incorrecte de cet outil comporte un risque de blessure grave USD302 1 Symboles Les symboles utilisés po...

Page 13: ... 3 012090 Mettez toujours l appareil hors tension avant d installer ou de retirer la batterie Pour retirer la batterie faites la glisser de l outil tout en faisant glisser le bouton se trouvant à l avant Pour installer la batterie alignez sa languette sur la rainure pratiquée dans le boîtier et glissez la batterie en place Insérez la toujours à fond jusqu à ce que vous entendiez un clic Si vous po...

Page 14: ...arrête pas rapidement après le relâchement de la gâchette faites le réparer dans un centre de service après vente Makita Allumage de la lampe avant 1 008668 ATTENTION Evitez de regarder directement le faisceau lumineux ou sa source Appuyez sur la gâchette pour allumer la lampe La lampe demeure allumée tant que la pression sur la gâchette est maintenue Lorsque vous relâchez la gâchette la lumière s...

Page 15: ...liquant le temps de serrage adéquat 008666 Le couple de serrage adéquat peut varier suivant la sorte ou taille de boulon suivant le matériau dont se compose la pièce faisant l objet du serrage etc La relation entre le couple de serrage et le temps de serrage est indiquée dans les figures N m 80 100 60 0 1 0 2 0 3 0 S M14 9 16 M12 1 2 M10 3 8 M10 3 8 M12 1 2 M14 9 16 Couple de serrage Temps de serr...

Page 16: ...alcool ou d autres produits similaires Une décoloration une déformation ou la formation de fissures peuvent en découler Remplacement des charbons 1 006258 Remplacez les lorsqu ils sont usés jusqu au trait de limite d usure Maintenez les charbons propres et en état de glisser aisément dans les porte charbon Les deux charbons doivent être remplacés en même temps N utilisez que des charbons identique...

Page 17: ... initial Si un problème quelconque devait survenir au cours de cette période d un an veuillez retourner l outil COMPLET port payé à une usine ou à un centre de service après vente Makita Makita réparera l outil gratuitement ou le remplacera à sa discrétion si un défaut de fabrication ou un vice de matériau est découvert lors de l inspection Cette garantie ne s applique pas dans les cas où MAKITA D...

Page 18: ...e las herramientas eléctricas en atmósferas explosivas tal como en la presencia de líquidos gases o polvo inflamables Las herramientas eléctricas crean chispas que pueden prender fuego al polvo o los humos 3 Mantenga a los niños y curiosos alejados mientras utiliza una herramienta eléctrica Las distracciones le pueden hacer perder el control Seguridad eléctrica 4 Las clavijas de conexión de las he...

Page 19: ...o de la herramienta eléctrica 17 No fuerce la herramienta eléctrica Utilice la herramienta eléctrica correcta para su aplicación La herramienta eléctrica adecuada hará un trabajo mejor a la velocidad para la que ha sido fabricada 18 No utilice la herramienta eléctrica si el interruptor no la enciende y apaga Cualquier herramienta eléctrica que no pueda ser controlada con el interruptor es peligros...

Page 20: ... que no haya nadie debajo cuando utilice la herramienta en lugares altos 6 El par de apriete de torsión apropiado podrá variar en función del tipo o tamaño del perno Compruebe el par de apriete con una llave de torsión GUARDE ESTAS INSTRUCCIONES ADVERTENCIA NO DEJE que la comodidad o familiaridad con el producto a base de utilizarlo repetidamente sustituya la estricta observancia de las normas de ...

Page 21: ...DEL FUNCIONAMIENTO PRECAUCIÓN Asegúrese siempre de que la herramienta esté apagada y el cartucho de batería extraído antes de realizar cualquier ajuste o comprobación en la herramienta Instalación o desmontaje del cartucho de batería 1 2 3 012090 Apague siempre la herramienta antes de colocar o quitar el cartucho de batería Para quitar el cartucho de batería deslícelo de la herramienta mientras de...

Page 22: ...en el gatillo Suelte el gatillo interruptor para parar Freno eléctrico Esta herramienta está equipada con un freno eléctrico Si la herramienta dejase de parar enseguida repetidamente después de soltar el gatillo interruptor pida a un centro de servicio Makita que le hagan el mantenimiento Iluminación de la lámpara delantera 1 008668 PRECAUCIÓN No mire a la luz ni vea la fuente de luz directamente ...

Page 23: ...iempo de apriete apropiado 008666 El par de fuerza de apriete adecuado puede diferir dependiendo del tipo y tamaño del tornillo el material de la pieza de trabajo que se va a apretar etc La relación entre el par de fuerza de apriete y el tiempo de apretar se muestra en las figuras N m 80 100 60 0 1s 2s 3s S M14 9 16 M12 1 2 M10 3 8 M10 3 8 M12 1 2 M14 9 16 Torsión de fijación Tiempo de fijación To...

Page 24: ...ocidad ocasionará una reducción de la torsión de apriete MANTENIMIENTO PRECAUCIÓN Asegúrese siempre de que la herramienta esté apagada y el cartucho de batería extraído antes de intentar realizar una inspección o mantenimiento Nunca use gasolina bencina diluyente tíner alcohol o sustancias similares Puede que esto ocasione grietas o descoloramiento Reemplazamiento de las escobillas de carbón 1 006...

Page 25: ...nspeccionada y probada exhaustivamente antes de salir de fábrica Se garantiza que va a estar libre de defectos de mano de obra y materiales por el periodo de UN AÑO a partir de la fecha de adquisición original Si durante este periodo de un año se desarrollase algún problema retorne la herramienta COMPLETA porte pagado con antelación a una de las fábricas o centros de servicio autorizados Makita Si...

Page 26: ...26 ...

Page 27: ...27 ...

Page 28: ...polvos creados por el lijado aserrado esmerilado taladrado y otras actividades de la construcción contienen sustancias químicas reconocidas por el Estado de California como causantes de cáncer defectos de nacimiento y otros peligros de reproducción Algunos ejemplos de estos productos químicos son plomo de pinturas a base de plomo sílice cristalino de ladrillos y cemento y otros productos de albañi...

Reviews: