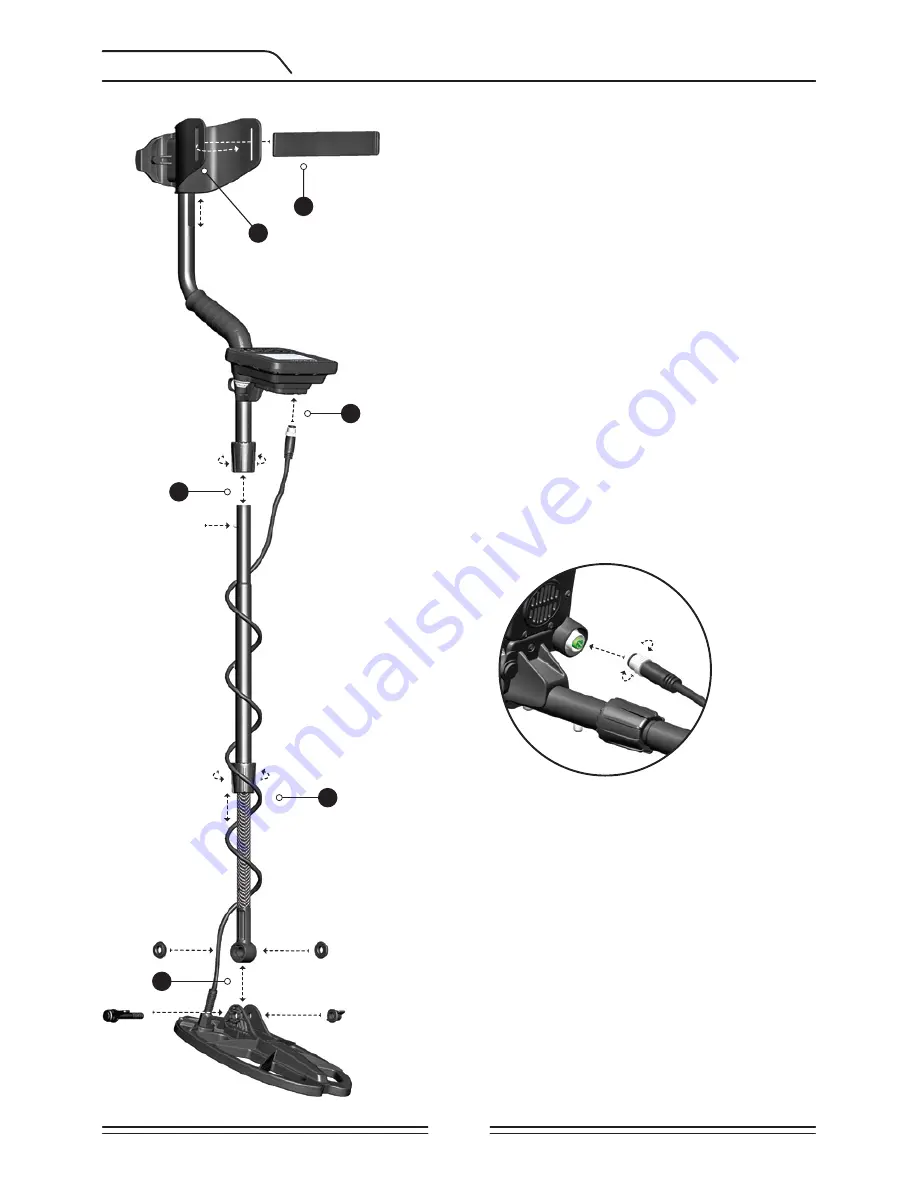
(1)
To attach the middle rod with the upper S-rod,
loosen the twistlock. Press down the pin and engage
the pieces together and tighten the twist lock after
the pin is clicked into the hole.
(2)
After inserting the washers on the lower shaft,
place the lower shaft in its location on the search
coil. Secure by tightening the screw and nut. Do not
overtighten.
(3)
Loosen the twist lock to adjust the length of the
device to your height. Adjust the length of the shaft
by keeping the pin located on the rear pressed down
and clicking the pin in any of the holes. Secure by
tightening the twist lock.
(4)
Wind the search coil cable on the shaft without
stretching too much. Then, plug the connector to the
search coil input socket on the system box and secure
by tightening the nut. While tightening, you may hear
clicks indicating that the connector is secured.
(5)
Loosen the screw inside the armrest to adjust it to
your comfort. Slide the armrest up or down to align
the screw to one of the three holes on the S-rod.
Secure by tightening the screw.
(6)
Insert the armrest strap as shown in the picture and
adjust it to your arm size and tighten.
Ground balance can be performed in three ways with the
Kruzer
: Automatic, Manual and
Tracking.
When the GB button is pushed while performing automatic or manual ground balance,
the device will switch to the General Search (GEN) mode automatically on the background
without any indication to the user, regardless of the selected search mode.
Upon completion of ground balance, current ground balance value is shown in the Ground
Balance (GB) box on the right side of the display.
Automatic Ground Balance
Automatic ground balance is performed as follows in all search modes:
1)
Find a spot where there is no metal.
2)
Push and hold the GB button down (GROUND BALANCE value and “Pump Coil” warning
message will be shown on display) and start pumping the search coil up and down from
about 15-20 cm (~6''- 8'') above the ground down to 3 cm (~1'') off the ground with smooth
movements and keeping it parallel to the ground.
3)
Continue until a beep, indicating the completion of ground balance, is heard. Based on
ground conditions, it usually takes about 2-4 pumps for the ground balance to be completed.
4)
Upon completion of the ground balance, ground balance value is shown on the display
(GB). The device continues to ground balance and produce a beep sound as long as you keep
the GB button pushed down and pump the coil. In order to ensure that the ground balance is
proper, ground balance at least 2-3 times and check the ground balance values on the display.
In general, the difference between the values shall not be higher than 1-2 numbers.
5)
If you cannot ground balance, in other words, if no beep sound is produced, it means that
either the ground is too conductive or not mineralized or there is a target right below the
search coil. In such a case, retry ground balance at a different spot. If you still cannot ground
balance, read the section titled
''Important Details Concerning Ground Balance''
.
When the ground balance button is released, the device continues to operate in the GEN
mode for a short period of time and the ground balance value stays on display. This makes
it possible to manually fine tune the automatic ground balance value. Refer to the following
"Manual Ground Balance"
section for further information regarding this feature. If this is
not desired, press the PP button once to return to the main screen.
NOTE:
If the iSAT value is set high, the device may not auto ground balance. In such a case,
lower the iSAT value first. After ground balancing, set the iSAT back to its original position.
1
2
3
4
5
6
Page 1
ASSEMBLY
Manual Ground Balance
Allows you to manually modify the ground balance value. It is not preferred mostly because
it takes time. However, it is the preferred option in cases where a successful ground balance
cannot be performed using other methods or minor corrections are required to the
automatic balance.
Kruzer
is designed to allow for automatic ground balancing conveniently on any type of
ground. Therefore, it is recommended to perform automatic ground balance upon start up.
However, the ground may not be suitable for automatic ground balancing in some cases
and the device cannot ground balance on such grounds (Except for the BEACH mode). For
instance, wet beach sand, soils containing alkali or salty water, trashy sites, ploughed fields,
highly mineralized grounds and grounds with very low mineralization are not suitable for
automatic ground balance. In such terrains, you can auto ground balance in the BEACH
mode and then switch to other modes or try manual ground balancing. However, manual
ground balance requires a skill which develops over time through practice.
To perform manual ground balance:
1)
Find a clear spot without metals and switch the device to the GEN mode.
2)
You need to listen to the sounds coming from the ground in order to perform manual
ground balance. Pump the search coil up and down from about 15-20 cm (~6''- 8'') above
the ground down to 3 cm (~1'') off the ground with smooth movements and keeping it
parallel to the ground.
If the sound gets higher when lifting off the search coil above the ground, the ground
balance value is too low, in other words, the effect from the ground is negative and the
ground balance value needs to be increased by using the ( + ) button. On the other hand,
if the sound gets higher when lowering the search coil to the ground, the ground balance
value is too high, in other words, the effect from the ground is positive and the ground
balance value needs to decreased by using the ( - ) button.
3)
Push the ground balance button once and release it. The ground balance value will be
shown on the display and remain there for a moment. You can return to the ground balance
screen by pushing the ground balance button if the screen switches.
Manual ground balance functions within the
range of 0-99.80 However, each value covers
5 steps used for fine tuning within itself and
these steps are indicated as multiples of 20 in
the Ground Balance window (GB). For example,
ground balance value shown on the side is 70.80.
Press ( + ) or ( - ) to increase or decrease the ground
balance value, respectively. If the key is pressed
once at a time, the values count one by one and if
it is held down, the values will change quickly.
4)
Repeat the above procedure until the sound heard from the ground is eliminated.
The sound may not be eliminated completely in some areas. In these cases, listen to the
sounds produced when moving the search coil towards and away from the ground to check
if the ground balance is correct. If there is no difference between the two sounds then the
ground balance is set properly.
The device will return to the main screen automatically after a short period of time upon
completion of ground balance. To return to the main screen instantly, just press the PP
button once.
IMPORTANT!
Experienced detectorists adjust the ground balance setting to a slightly posi-
tive response (weak but audible sound is produced when moving the search coil closer to
ground). This method may produce favorable results for experienced users in certain fields
where small targets are searched for.
Ground Tracking (TRACKING)
In this option, the user does not need to make any adjustments. TRACKING feature is
activated from the OPTIONS menu by switching it to 01 position. The word ''Tracking''
is displayed at the bottom of the GB window. The device updates the ground balance
automatically as long as the search coil is swung over the ground and shows the ground
balance value in the GB window. It does not provide any feedback to the user (like the
beep sound in automatic ground balance).
While tracking is active, the device can initially produce a loud signal when it detects a
different ground structure (for instance a mineral rock) or a target. In this case, swing the
search coil over the spot where the device produces the signal . If the sound remains the
same and the device shows an ID, it is possibly a target. If the sound attenuates too much
or is lost after a few swings, it means that the device has produced a signal for the different
ground structure or a stone.
NOTE:
It is recommended that you use tracking in the General Search mode (GEN) and not
in the discrimination modes.
Tracking is suitable for use in areas where different soil structures are present within the
same land or in fields where mineralized rocks are scattered widely apart. If you use ground
tracking in areas where hot rocks are intensely present, the device may not be able to elimi-
nate these highly mineralized rocks or you may miss the smaller or deeper metals.
IMPORTANT!
Ensure that tracking is off during air tests. Otherwise, the device will attempt
to perform ground balance on the target and the depth will be reduced.
Ground Balance Value
Ground balance value provides information about the ground you are searching on. Some
typical ground types are as follows:
0-25
Wet salt water or wet alkali soils
25-50 Wet salt water and wet alkali soils covered with dry layers
50-70 Regular, low-quality soils
70-90 Highly magnetic soils, magnetite or maghemite and similar highly mineralized soils,
black sand.
Important Details Concerning Ground Balance
1)
Upon start up, the ground balance value is set to 90. The device can perform ground
balance automatically within the range of 20-99.80 in all modes and 00-99.80 in the BEACH
mode.
2)
If the ground mineralization is too low, automatic ground balance may fail to work in
other modes except for the BEACH mode. In such a case, you can auto ground balance in
the BEACH mode and then switch to other modes or try manual ground balancing.
3)
You can test the accuracy of the ground balance with the pinpoint mode. After ground
balancing, if you receive no sound or a weak one when you move the search coil closer to
the ground in the pinpoint mode, then the ground balance is successful. If the sound gets
louder when you move the search coil closer to the ground, then the ground balance is not
successful. In this case, simply change your location. If ground balance is not possible despite
these efforts, you should continue your search without performing ground balance.
You cannot search in the General Search (GEN) mode without ground balancing. You need to
use one of the discrimination modes and increase the DISC. value until the noise is eliminated.
4)
Once the ground balance is set, it will remain satisfactory for a long time in most areas.
However, if you encounter an excavated, backfilled or geologically composite soil structure,
a ground balance should be performed again to adapt to the varying soil structure. In
addition, re-ground balancing is recommended for the multi Kruzer model if you change
the operating frequency of the device (5kHz/14kHz/19kHz) in certain ground conditions.
5)
When using the optional large coil, pump the coil more slowly and do not keep it very
close to the ground.
6)
In some cases where the iSAT value is set high, the device may not be able to ground
balance automatically. In such a case, first lower the iSAT and after ground balancing switch
it back to its previous position.
TARGET ID is the number produced by the metal detector based on the conductivity of the
metals and gives an idea to the user about what the target may be. Target ID is shown with
two digits on the display and ranges between 00-99.
NOTE:
Keep in mind, large targets will ID higher than expected, even though they may be
of lower conductance.
In some cases, the device may produce multiple IDs for the same target. In other words, the
IDs may be jumpy. This may result from several factors. Target orientation, depth, purity of
the metal, corrosion, mineralization level of the soil etc. Even the direction of the search coil
swing may cause the device to generate multiple IDs.
In some cases, the device may fail to provide any ID. The device needs to receive a strong
and a clear signal from the target in order to provide an ID. Therefore, it may not be able to
provide an ID for targets at fringe depths or smaller targets even if the device detects them.
Keep in mind that target IDs are “probable”, in other words, estimated values and it would
not be possible to know the properties of a buried object exactly until it is dug out.
IDs of non-ferrous metals such as copper, silver, aluminum and lead are high. Target ID range
of gold is wide and may fall within the same range of metal wastes such as iron, foil, screw
caps, and pull tabs. Therefore, if you are looking for gold targets, digging out some trash
metals is expected.
On the
multi Kruzer
, when the operating frequency is changed (5kHz/14kHz/19kHz), the
Target ID will change as well. This represents the ''Standard'' ID scaling of the device.
IMPORTANT! At start up, multi Kruzer will utilize the ''Normalized'' ID scale and not the
Standard ID scale.
In other words, the IDs will not change upon frequency change and the
device will generate the 14kHz IDs in each frequency. However, based on ground conditions
IDs may vary for certain metals.
If you prefer to see the different IDs produced by each frequency, you need use the
''Standard'' ID scale. To switch to the standard IDs,
while the device is on
, push the plus
(+) and minus (-) buttons at the same time. Letters ''Sd'' will appear on the screen. If you
wish to revert back to the normalized IDs, repeat the same process and letters ''no'' will
appear on the screen.
The table showing the probable IDs for the Kruzer and the multi Kruzer models is placed
at the back of this manual. You can easily detach the page and carry it with you during
your searches.
Coins searched throughout the world are made of different metals and in different sizes in
different geographical locations and historical eras. Therefore, in order to learn the Target
IDs of the coins in a specific region, it is suggested to perform a test with the samples of
such coins, if possible.
It may take some time and experience to make best use of the Target ID feature in your
search area. Different brands and models of detectors produce different target ID numbers.
The numbers vary even more depending on target depth, ground mineralization, and
adjacent metals. But after some practice, you will quickly become comfortable with the
meanings of the
Kruzer
's Target IDs.
Target ID Depth
This setting is not present in the menu.
Adjusts the depth level that the device displays an ID for a detected target. It consists of 3
levels: Hi (High), In (Intermediate), Lo (Low). Factory default is set to ''In''.
The lower the ID depth level is, the higher the ID accuracy and vice versa. At the high level,
the IDs may become jumpy.
To change the ID depth level, press the PP button and the up button simultaneously. Each
time you press the up button, the ID depth level will change.


