background image

Monitor Software Upgrade

The monitor software can be upgraded by downloading the latest software from the

MALÅ Easy Locator HDR Web Page

and installing onto a thumb drive.

Note:

If you are unsure of the procedure or experience difficulties upgrading the software,

please contact

MALÅ Geoscience support

or your local authorized dealer.

1

Download software

Download the latest version of the MALÅ Easy Locator HDR
software from the

MALÅ Easy Locator HDR Web Page

and

unzip the contents onto the root directory of a thumb drive.

2

Insert thumb drive

Insert the thumb drive into the MALÅ Easy Locator HDR
monitor USB port.

3

Run upgrade

Select

Software Upgrade

option from the

System Menu

screen.

Note:

If a confirmation request is displayed, accept the request

by selecting

YES

.

The upgrade can take several minute to install and the mon-
itor will re-boot after installation.

Warning:

Make sure the batteries are fully charged before start-

ing the software upgrade and

DO NOT

turn off the monitor while

the upgrade is in progress.

Summary of Contents for Easy Locator HDR

Page 1: ......

Page 2: ...MAL Easy Locator HDR User Manual Guide for Operating MAL Easy Locator HDR...

Page 3: ...r efficiency and productivity now and into the future Whether this is your first MAL Geoscience product or addition to the MAL collection we believe that small investment of your time to familiarize y...

Page 4: ...MAL Easy Locator HDR User Manual by MAL Geoscience MAL Geoscience Press...

Page 5: ...ded only to assist the reader in the use of the product and every effort has been made to ensure that the information in this manual is accurate MAL Geoscience shall not be liable for any loss or dama...

Page 6: ...g it all up 25 Height adjustment 28 Safety and Compliance 29 Technical Specification 30 Operating Instructions 31 Data Acquisition 32 Data Interpretation 35 Hyperbolic Signatures 35 Detecting differin...

Page 7: ...Service and Repairs 60 Technical Support 61 User Interface 62 Main Display Window 63 Main Menu 64 Settings Menu 68 System Menu 71 Glossary 81 Index 84...

Page 8: ...Preface The following sections contain information about this manual About this Manual 9 Conventions 10 Additional Resources 12 Feedback 13...

Page 9: ...its use Basic theory for Ground Penetration Radar is outlined to help the operator understand the underlining technology References for thorough discussions of this topic and applications for the tech...

Page 10: ...ing this cable Tip Tips and best practices Tip Higher data pre cision can be obtained if vehicle speeds are keep below 60 mph Note Additional information regarding the current topic Note The velocity...

Page 11: ...the only technology available that does not require a physical con nection to the utility nor does it rely on radiating elec tromagnetic EM fields that may or may not be present or detectable Gold un...

Page 12: ...nes including civil engineering geoscience arche ology law enforce ment and education GPR Case Studies www malags com Resources Case Studies Database of case studies using Ground Penetrating Radar in...

Page 13: ...this manual or the product may be sent using any of the following channels Phone Sweden 46 953 34550 Phone USA 1 843 852 5021 Phone China 86 108 225 0728 Phone Malaysia 60 0 3 6250 7351 Phone Australi...

Page 14: ...may have been damaged during shipment Note If a defect in the equipment is discovered make sure to contact MAL Geoscience prior to use and follow the instructions for Repacking and Shipping in this se...

Page 15: ...difficulties associated with non metallic utilities and that conventional locating tools leave you a few pieces short Let the MAL Easy Locator help you fill in the missing pieces GPR is the only tech...

Page 16: ...use entry level Ground Penetrating Radar GPR system designed to meet your utility locating needs The MAL Easy Locator HDR is the tool of choice for those who need to quickly and easily identify the pr...

Page 17: ...nd turning the knob activates the various menus after they are highlighted it s that simple 1The push turn knob is fitted to MAL monitors and acts in a similar way to a computer mouse allowing the use...

Page 18: ...bout the MALA RTC Screenshot Option The Screenshot Option add on is available for the MAL Easy Locator HDR monitor With the Screenshot Option activated it is possible to save GPR profiles that are dis...

Page 19: ...itional Battery Charger Additional Li ion Battery charger for the MAL Easy Locator HDR Contact MAL Geoscience for more information Shipping case Robust shipping case for the MAL Easy Locator HDR Conta...

Page 20: ...t is included with the shipment should be read careful and any dis crepancy should be reported to our sales department at www malags com corporate contact Note All packing material should be kept in t...

Page 21: ...ver use shredded fibers paper or wood wool as these materials tend to pack down and permit the instrument to move inside its packing box Please read our shipping instructions before returning instrume...

Page 22: ...se ratio SNR The MAL Easy Locator HDR monitor is mounted on the handle of the cart and connects to the wheeled HDR antenna through a single data power combination cable and dis plays the data as the i...

Page 23: ...ws Mounting MAL Easy Locator HDR on the optional MALA RTC Rough Terrain Cart The MAL Easy Locator HDR antenna control unit and monitor can also be used together with the MALA Rough Terrain Cart RTC wh...

Page 24: ...om the rear of the antenna before attempting to dismount the shafts Failing to do so may result in damage to the power cable and connections 2 Locate the antenna in the cradle of the RTC Transfer the...

Page 25: ...ger combined power data cable supplied with the RTC to the monitor Note Look for the countersink in the power cable and place it towards the mark on the connection Push lightly If you have it in the c...

Page 26: ...rs such as the condition of measurement surface the pressure applied on the wheel and possible wear Warning When using MAL Easy Locator HDR with a RTC the wheel calibration must be changed from the in...

Page 27: ...wer button on the monitor and release quickly The red light will then stop blinking and the unit will also emit a click when turning off Note The antenna will automatically turn off when the monitor i...

Page 28: ...ront wheel height Pull the Spring release lever to release the wheel spring and then rotate the wheel lever to adjust the antenna to the desired height 2 Adjust the rear wheel height Repeat the proced...

Page 29: ...Institute n The control unit should not be left ON when leaving the system unin tended It should always be turned OFF when not in use n The antennas should point towards the ground walls etc during me...

Page 30: ...Environmental IP 66 Monitor 10 4 Color TFT Transmissive screen Input device Single push turn knob1 On Off ON by start buttons OFF by menu and buttons Accessories MAL Rough Terrain Cart RTC 1The push t...

Page 31: ...operation of the equip ment giving best practices and detailed information regarding specific applications Data Acquisition 32 Data Interpretation 35 Screenshot Option 41 GPS Option 43 Setting GPS Ma...

Page 32: ...ently selected menu option or sets the value of the selected parameter 2A representation of the reflected radar signal in a GPR profile Reflected signals are caused by changes in the dielectric proper...

Page 33: ...signal in a GPR profile Reflected signals are caused by changes in the dielectric properties of the target medium These dielectric differences are usual caused by differences in materials e g a buried...

Page 34: ...row on the antenna to mark the utility location Tip The last signatures can be retained on the screen by lifting the back wheels when moving theMAL Easy Locator HDR in position for the next scan In th...

Page 35: ...buried utilities 1A representation of the reflected radar signal in a GPR profile Reflected signals are caused by changes in the dielectric properties of the target medium These dielectric difference...

Page 36: ...ct MAL Geoscience for more information DISCLAIMER MAL Geoscience takes no responsibility for incorrect estimations of material properties or the size of buried objects using MAL Easy Locator HDR The s...

Page 37: ...t exactly the same depth and scanned at exactly 90 degrees there is likely to be a clear difference in their respective signatures Note Within these limits it is possible to determine that one object...

Page 38: ...the sides of the trench can also be seen When a trench is backfilled changes the properties in the ground even if the same ori ginal material is used cause GPR wave reflections off the interface betwe...

Page 39: ...so illustrates the effect of flattening the hyperbolas with an increase in the size of the feature In this case the radius of the hyper bola from the 4 gas line is observed to be considerably smaller...

Page 40: ...states the signatures caused by a void under the road A dip in the road was the first indication that there was something wrong and the GPR survey and the resulting GPR profile reveals the existance o...

Page 41: ...a by applying filters until you are satisfied with the result 3 Take a screenshot Use the push turn knob1 to select and press the Screen shot button A full screen capture of the GPR profile is saved t...

Page 42: ...4 Upload the screenshot image Connect a USB thumb drive to the back of the monitor Using the push turn knob select and press the Upload Screenshot button located under the Settings menu...

Page 43: ...he built in DGPS1 antenna or an external GPS that is mounted and connected to the MAL Easy Locator HDR This data can then be exported and then imported into Google Earth to display the position of the...

Page 44: ...a GPR profile Reflected signals are caused by changes in the dielectric properties of the target medium These dielectric differences are usual caused by differences in materials e g a buried object or...

Page 45: ...ion is available when the GPS precision indicator is either gray or red and the coordinates are set to zero E X A M P L E In this example a feature signature has been detec ted and a marker with a Mar...

Page 46: ...S soft ware Warning Depending on the coordinate system adopted in your country it may be necessary to apply a transformation to the x y values when extracting the coordinate data from the gpm file In...

Page 47: ...ots from the MAL Easy Locator HDR monitor the markers are shown above the GPR profile with a corresponding ID allowing the cross ref erencing and viewing of marker data to be made between the screensh...

Page 48: ...section set the parameters for the GPS and select and press the Save and Exit button to save the setting and return to the Systems Menu Note When using the COM port to connect to an external GPS anten...

Page 49: ...See the GPS Parameter Menu section for more information about setting these parameters...

Page 50: ...els voids and pipes crossed at right angles to the GPR scan 2A representation of the reflected radar signal in a GPR profile Reflected signals are caused by changes in the dielectric properties of the...

Page 51: ...to MAL monitors and acts in a similar way to a computer mouse allowing the user to navigate menus and update data Rotating the knob either allows sequential scrolling through menu options to make a m...

Page 52: ...ter 2A representation of the reflected radar signal in a GPR profile Reflected signals are caused by changes in the dielectric properties of the target medium These dielectric differences are usual ca...

Page 53: ...l appear in the bottom left of the monitor display 1The push turn knob is fitted to MAL monitors and acts in a similar way to a computer mouse allowing the user to navigate menus and update data Rotat...

Page 54: ...ctions cover proactive maintenance that will help protect your investment and ensure maximize your ROI Equipment Maintenance 55 Monitor Software Upgrade 57 Troubleshooting Frequently Answered Question...

Page 55: ...h Li ion battery are not com patible with the power meter and the status of the battery will not be indicated accurately The battery can either be left in the battery box while charging or removed but...

Page 56: ...d with care at all times All connectors should be kept clean and protected from dust and moisture When fin ishing a survey the equipment should be checked and packed properly Batteries should be kept...

Page 57: ...software from the MAL Easy Locator HDR Web Page and unzip the contents onto the root directory of a thumb drive 2 Insert thumb drive Insert the thumb drive into the MAL Easy Locator HDR monitor USB p...

Page 58: ...turns green 2 Check connectors l Disconnect and reconnect the battery connector in the MAL Easy Locator HDR battery box or RTC battery bag l Disconnect and reconnect the power cable con nectors on th...

Page 59: ...quisition Mode parameter settings stop the development and display of the GPR profile on the monitor when a scan is started giving the impression that the screen is frozen and not reacting to the move...

Page 60: ...ntact MAL Geoscience or your MAL Geoscience representative for more information on how to service MAL Easy Locator HDR If MAL Easy Locator HDR is damaged or malfunctioning make a service request on ou...

Page 61: ...to even the most challenging technical support issues Our experienced support team works very closely with the development teams to ensure that every client receives the best possible sup port Techni...

Page 62: ...description of the user interface and give tips and warning designed to help the user achieve the highest possible level of productivity and safety while operating the MAL Easy Locator HDR Main Displa...

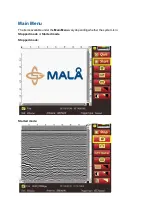
Page 63: ...tating the knob clockwise or anti clockwise The selected item is then executed by pushing the button Note The monitor Main Display Window appears about 20 seconds after turning on the mon itor and HDR...

Page 64: ...Main Menu The items available under the Main Menu vary depending whether the system is in Stopped mode or Started mode Stopped mode Started mode...

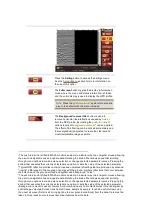
Page 65: ...ut the vertical scroll bar will be blue with arrows Quit and shutdown the system after completing the radar measurements Note If the QUIT option is executed but the monitor is not turned off immediate...

Page 66: ...tion or changes selected parameter values Pressing the knob either executes the currently selected menu option or sets the value of the selected parameter 2Typical GPR reflection profiles contain nois...

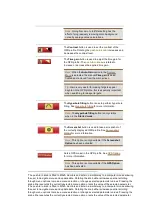
Page 67: ...to take a screenshot of the currectly displayed GPR profile See Screenshot Option for more information Note This option is only available if the Screenshot Option has been activated Sets a GPS maker i...

Page 68: ...be adjusted within and range of 0 100 Tip Reducing the backlight will extend the bat tery life between charges Soil Type Set wave velocity based on soil type Setting the wave velocity allows the adju...

Page 69: ...ds l RTC Forward Uses an external encoder as in the case when using the encoder wheel on rough terrain cart RTC is pushed in the forward direction l RTC Backward Uses an external encoder as in the cas...

Page 70: ...Note This option is only available if the GPS Option is activated Save Saves changes to the Setting Menu Cancel Closes the Setting Menu without applying changes...

Page 71: ...essing the System Parameters but ton in the Settings Menu Note The System Menu is divided between two screens The first screen is displayed as the default and the second screen is accessed by selectin...

Page 72: ...n erroneous reading in the Battery level indicator Power Save Mode Used to activate power saving for the MAL Easy Loc ator HDR monitor Select the On option to activate the Power Save Mode When this mo...

Page 73: ...ter mouse allowing the user to navigate menus and update data Rotating the knob either allows sequential scrolling through menu options to make a menu selection or changes selected parameter values Pr...

Page 74: ...erformance for data management Rotate the push turn knob2 to select the Data Disk Format option and press to initiate reformatting A con firmation dialog is displayed before commencing the operation U...

Page 75: ...h turn knob to select the Restore Fact ory Settings option and press to perform a reset when experiencing problems or if you would like to reset the settings to the default factory settings A confirma...

Page 76: ...nts when Time Triggering is selected for the Acquisition Mode in the Settings Menu Rotate the push turn knob to select the Time Interval option press to enter editing mode rotate to select a value and...

Page 77: ...rface Unit Used to set the interface type for the GPS unit connected to the MAL Easy Locator HDR Currently the three types of supported GPS units are Built in DGPS When the Built in option is selected...

Page 78: ...knob to select the Select accur acy for green option press to enter editing mode rotate to select a value and press again to set the selection and exit editing mode Legend for the GPS precision indic...

Page 79: ...n Com port Baud rate communication speed and Check Sum validation must be set to correspond to the output values of the attached antenna Rotate the push turn knob to select the either the Com port Bau...

Page 80: ...tions are identified with Active displayed to the right of the option Contact MAL Geoscience to pur chase and activate these features Note The Serial number of Antenna Unit and Firm ware version infor...

Page 81: ...e data Care must be taken in this process not to remove real linear features from the data D DGPS Differential GPS uses satellites and a correction from a reference station satellite accuracy around 0...

Page 82: ...ouse floors as well as pipelines that are parallel to the GPR scan point source reflections Reflections which often appear as hyperbolas in GPR profiles They are commonly gen erated from distinct spat...

Page 83: ...the signature is also affected by many other factors including the size of the object the signal velocity and the object material SSD SSD is an abbreviation for Solid State Drive which the a randon a...

Page 84: ...Index F Filtering Migration 10 G Ground Penetrating Radar 3 11 12 15 34 35 41 43 50 59 65 68 76 H Hyperbola fitting 37 50 67 69 T typographical 10...

Reviews: