background image

4

AS 920L

           Description of the appliance........................................................36

AS 930L

           Description of the appliance........................................................38

AS 9202

           Description of the appliance........................................................40

AS 9203

Description of the appliance........................................................42

AS 9102B NEW - AS 9102G NEW

           Description of the appliance........................................................44

AS 9103B

           Description of the appliance.........................................................46

DG 01 

           Description of the appliance.........................................................

52

DG 02

           Description of the appliance.........................................................5

4

Installation...............................................................................................5

6

Warning and Safety instructions..............................................................5

8

Before using for the first time...................................................................6

6

Using the appliance.................................................................................6

7

Cleaning and care...................................................................................

73

Problem solving guide.............................................................................7

7

After sales service...................................................................................7

8

Contents

MDG 301


           Description of the appliance.........................................................

50

AS 9602B - AS 9602DG - AS 9603B - AS 9603DG

           Description of the appliance.........................................................48

Summary of Contents for AS 9102B NEW

Page 1: ...AS 9403R EG 201I EG 201C EG 201H EG 201T GHG 732A NEW GHG 733B NEW GHG 733C NEW AS 920 AS 930 AS 920L AS 930L AS 9202 AS 9203 AS 9102B NEW AS 9102G NEW AS 9103B AS 9602B AS 9602DG AS 9603B AS 9603DG...

Page 2: ......

Page 3: ...iption of the appliance 14 AS 9403B AS 9403G AS 9403R Description of the appliance 16 GHG 732A NEW Description of the appliance 18 GHG 733B NEW Description of the appliance 20 GHG 733C NEW Description...

Page 4: ...44 AS 9103B Description of the appliance 46 DG 01 Description of the appliance 52 DG 02 Description of the appliance 54 Installation 56 Warning and Safety instructions 58 Before using for the first ti...

Page 5: ...5...

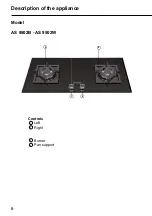
Page 6: ...6 Description of the appliance Model AS 9502B AS 9502W 1 3 4 2 Controls Left Right Burner Pan support 1 2 3 4...

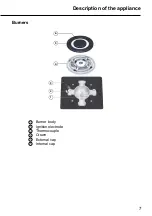
Page 7: ...7 Burners 4 5 6 1 2 3 1 2 3 4 5 6 Burner body Ignition electrode Thermocouple Crown External cap Internal cap Description of the appliance...

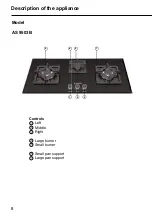
Page 8: ...8 Description of the appliance Model AS 9503B 1 4 5 6 7 2 3 Controls Left Middle Right Large burner Small burner Small pan support Large pan support 1 2 3 4 5 6 7...

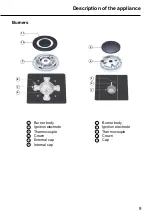
Page 9: ...ption of the appliance Burners 4 5 9 10 11 1 2 3 6 7 8 1 2 3 Burner body Ignition electrode Thermocouple Crown Cap 4 5 Burner body Ignition electrode Thermocouple Crown External cap Internal cap 6 7 8...

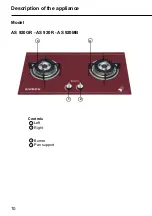
Page 10: ...10 Model AS 920GR AS 920R AS 920MB 1 3 4 2 Controls Left Right Burner Pan support 1 2 3 4 Description of the appliance...

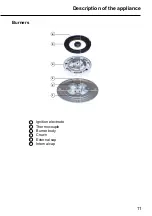
Page 11: ...11 Description of the appliance Burners 1 2 3 4 5 6 1 2 3 4 5 6 Ignition electrode Thermocouple Burner body Crown External cap Internal cap...

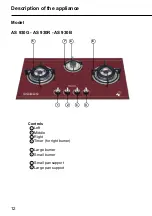
Page 12: ...Model AS 930G AS 930R AS 930B 1 5 6 8 7 2 3 4 Controls Left Middle Right Timer for right burner Large burner Small burner Small pan support Large pan support Description of the appliance 1 2 3 4 5 6 7...

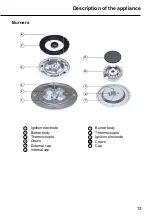
Page 13: ...ption of the appliance Burners 1 2 3 4 7 8 9 10 5 11 6 1 2 3 4 5 6 Ignition electrode Burner body Thermocouple Crown External cap Internal cap 7 8 9 10 Burner body Thermocouple Ignition electrode Crow...

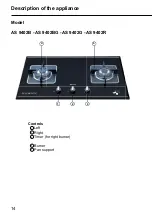
Page 14: ...14 Model AS 9402B AS 9402BG AS 9402G AS 9402R 1 4 5 2 3 Controls Left Right Timer for right burner Burner Pan support 1 2 3 4 5 Description of the appliance...

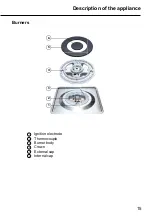
Page 15: ...15 Description of the appliance Burners 1 2 3 4 5 6 1 2 3 4 5 6 Ignition electrode Thermocouple Burner body Crown External cap Internal cap...

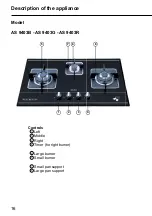
Page 16: ...escription of the appliance Model AS 9403B AS 9403G AS 9403R 1 5 6 7 8 2 3 4 Controls Left Middle Right Timer for right burner Large burner Small burner Small pan support Large pan support 1 2 3 4 5 6...

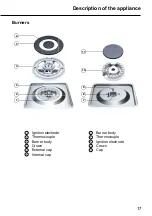
Page 17: ...s Description of the appliance 1 2 3 4 5 7 8 9 10 11 6 1 2 3 4 5 6 Ignition electrode Thermocouple Burner body Crown External cap Internal cap 7 8 9 Burner body Thermocouple Ignition electrode Crown C...

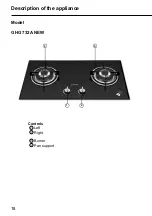
Page 18: ...18 Description of the appliance Model GHG 732A NEW 1 3 4 2 Controls Left Right Burner Pan support 1 2 3 4...

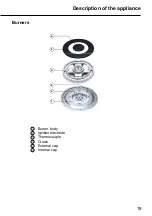
Page 19: ...19 Description of the appliance Burners 1 2 3 4 5 6 1 2 3 4 5 6 Burner body Ignition electrode Thermocouple Crown External cap Internal cap...

Page 20: ...20 Description of the appliance Model GHG 733B NEW 1 4 5 8 7 6 3 2 Controls Left Middle Right Large burner Small burner Medium burner Small pan support Large pan support 1 2 3 4 5 6 7 8...

Page 21: ...15 16 7 8 9 10 11 2 3 4 5 6 1 2 3 4 5 6 Burner body Ignition electrode Thermocouple Crown External cap Internal cap 7 8 9 Thermocouple Burner body Ignition electrode Crown Cap 10 11 Ignition electrode...

Page 22: ...22 Model GHG 733C NEW 1 2 3 4 5 8 7 6 Controls Left Middle Right Large burner Small burner Medium burner Small pan support Large pan support 1 2 3 4 5 6 7 8 Description of the appliance...

Page 23: ...15 16 7 8 9 10 11 2 3 4 5 6 1 2 3 4 5 6 Burner body Ignition electrode Thermocouple Crown External cap Internal cap 7 8 9 Thermocouple Burner body Ignition electrode Crown Cap 10 11 Ignition electrode...

Page 24: ...24 Description of the appliance Model EG 201I 1 4 5 6 3 2 Controls Left Middle Right Burner Induction heater Pan support 1 2 3 4 5 6...

Page 25: ...25 Description of the appliance Burners 1 2 3 4 5 6 1 2 3 4 5 6 Ignition electrode Thermocouple Burner body Crown External cap Internal cap...

Page 26: ...26 Description of the appliance Model EG 201C 1 4 5 6 3 2 Controls Left Middle Right Burner Radiant heater Pan support 1 2 3 4 5 6...

Page 27: ...27 Description of the appliance Burners 1 2 3 4 5 6 1 2 3 4 5 6 Ignition electrode Thermocouple Burner body Crown External cap Internal cap...

Page 28: ...28 Description of the appliance Model EG 201H 1 2 3 5 6 7 4 Controls Left Middle Right Timer for right burner Burner Hot plate Pan support 1 2 3 4 5 6 7...

Page 29: ...29 Description of the appliance Burners 1 2 3 4 5 6 1 2 3 4 5 6 Ignition electrode Thermocouple Burner body Crown External cap Internal cap...

Page 30: ...30 Description of the appliance Model EG 201T 1 2 3 5 6 7 4 Controls Left Middle Right Timer for right burner Burner Hot plate Pan support 1 2 3 4 5 6 7...

Page 31: ...31 Description of the appliance Burners 1 2 3 4 5 6 1 2 3 4 5 6 Ignition electrode Thermocouple Burner body Crown External cap Internal cap...

Page 32: ...32 Description of the appliance Model AS 920 1 3 4 5 2 Controls Left Right Medium burner Large burner Pan support 1 2 3 4 5...

Page 33: ...ppliance Burners 7 8 9 10 11 12 1 2 3 4 5 6 7 8 9 Burner body Thermocouple Ignition electrode Crown External cap Internal cap 1 2 3 4 5 6 Ignition electrode Thermocouple Burner body Crown External cap...

Page 34: ...34 Description of the appliance Model AS 930 1 4 6 7 8 5 2 3 Controls Left Middle Right Medium burner Small burner Large burner Small pan support Large pan support 1 2 3 4 5 6 7 8...

Page 35: ...16 17 1 2 3 4 5 6 1 2 3 4 5 6 Ignition electrode Thermocouple Burner bod Crown External cap Internal cap 7 8 9 Burner body Ignition electrode Thermocouple Crown Cap 10 11 Burner body Thermocouple Igni...

Page 36: ...36 Description of the appliance Model AS 920L 1 5 7 2 3 Controls Left Right Timer for right burner Burner Pan support 1 2 3 4 5...

Page 37: ...37 Description of the appliance Burners 1 2 3 4 5 6 1 2 3 4 5 6 Ignition electrode Thermocouple Burner body Crown External cap Internal cap...

Page 38: ...38 Description of the appliance Model AS 930L 1 5 8 6 7 2 3 4 Controls Left Middle Right Timer for right burner Large burner Small burner Small pan support Large pan support 1 2 3 4 5 6 7 8...

Page 39: ...ption of the appliance Burners 1 2 3 4 5 7 8 9 10 11 6 1 2 3 4 5 6 Ignition electrode Thermocouple Burner body Crown External cap Internal cap 7 8 9 Burner body Thermocouple Ignition electrode Crown C...

Page 40: ...40 Description of the appliance Model AS 9202 1 3 5 4 2 Controls Left Right Large burner Medium burner Pan support 1 2 3 4 5...

Page 41: ...ppliance Burners 1 2 3 4 5 6 7 8 9 10 11 12 1 2 3 4 5 6 Burner body Ignition electrode Thermocouple Crown External cap Internal cap 7 8 9 Thermocouple Ignition electrode Burner body Crown External cap...

Page 42: ...escription of the appliance Model AS 9203 1 5 6 8 9 7 2 3 4 Controls Left Middle Right Timer for right burner Medium burner Small burner Large burner Small pan support Large pan support 1 2 3 4 5 6 7...

Page 43: ...17 18 1 2 3 4 5 6 Thermocouple Ignition electrode Burner body Crown External cap Internal cap 7 8 9 Burner body Thermocouple Ignition electrode Crown External cap Internal cap 10 11 12 Ignition electr...

Page 44: ...44 Model AS 9102B NEW AS 9102G NEW 1 3 4 5 2 Controls Left Right Medium burner Large burner Pan support 1 2 3 4 5 Description of the appliance...

Page 45: ...ppliance Burners 7 8 9 10 11 12 1 2 3 4 5 6 1 2 3 4 5 6 Ignition electrode Thermocouple Burner body Crown External cap Internal cap 7 8 9 Burner body Thermocouple Ignition electrode Crown External cap...

Page 46: ...46 Description of the appliance Model AS 9103B 1 4 6 7 8 5 2 3 Controls Left Middle Right Medium burner Small burner Large burner Small pan support Large pan support 1 2 3 4 5 6 7 8...

Page 47: ...16 17 1 2 3 4 5 6 1 2 3 4 5 6 Ignition electrode Thermocouple Burner bod Crown External cap Internal cap 7 8 9 Burner body Ignition electrode Thermocouple Crown Cap 10 11 Burner body Thermocouple Igni...

Page 48: ...48 Model AS 9602B AS 9602DG AS 9603B AS 9603DG 1 5 6 2 3 Controls Left Middle Right Burner Pan support 1 2 3 5 6 Description of the appliance 4 Timer for right burner 4...

Page 49: ...gnition electrode Thermocouple Burner body Crown External cap Internal cap 7 8 9 10 11 Thermocouple Ignition electrode Burner body Crown Cap 7 8 9 10 11 15 16 17 12 13 14 12 13 14 15 16 17 Ignition el...

Page 50: ...50 Description of the appliance Model MDG 01 1 2 3 1 Control 2 Burner Pan support 3...

Page 51: ...51 Burners Description of the appliance 1 2 3 4 5 6 1 2 3 4 5 6 Ignition electrode Thermocouple Burner body Crown External cap Internal cap...

Page 52: ...52 Description of the appliance Model DG 01 1 2 3 Control Burner Pan support 1 2 3...

Page 53: ...53 Burners Description of the appliance 1 2 3 4 5 6 1 2 3 4 5 6 Burner body Thermocouple Ignition electrode Crown External cap Internal cap...

Page 54: ...54 Description of the appliance Model DG 02 1 2 3 5 4 6 Controls Front Back Small burner Large burner Small pan support Large pan support 1 2 3 4 5 6...

Page 55: ...ption of the appliance Burners 7 8 9 10 11 1 2 3 4 5 6 1 2 3 4 5 6 Ignition electrode Thermocouple Burner body Crown External cap Internal cap 7 8 9 Burner body Ignition electrode Thermocouple Crown C...

Page 56: ...alorific value and compare this information with the type of gas quoted on the hob data plate The installer is responsible for ensuring that the appliance functions correctly when installed The gas in...

Page 57: ...AS9403G AS 9403R 850 490 75 mm 790 440 mm GHG 732A NEW 730 420 73 mm 660 360 mm GHG 733B NEW GHG 733C NEW AS 9103B 730 420 75 mm 660 360 mm AS 9102B NEW AS 9102G NEW AS 9202 720 420 73 mm 660 360 mm...

Page 58: ...located near the gas meter Eliminate all sources of ignition in a safe manner Do not smoke light cigarette lighters or matches Do not operate electrical lights or switches i e do not switch them On or...

Page 59: ...mage caused by incorrect installation or con nection The electrical safety of this appliance can only be guaranteed when continuity is complete between it and an effective earthing system which compli...

Page 60: ...cal means of ventilation e g an cooker hood If the appliance is used for very long periods of time additional ventilation of the room may be necessary e g by opening windows or doors or running the co...

Page 61: ...ed off To safeguard against burning keep children well away from the ap pliance at all times Do not store anything which might arouse a child s interest in storage areas above or next to the appliance...

Page 62: ...infestation by cockroaches or other vermin pay particular attention to keeping the appliance and its surroundings in a clean condition at all times Any damage which may be caused by cockroaches or oth...

Page 63: ...place for anything else The article could melt or catch fire if residual heat is still present or if the appliance is switched on by mistake Do not cover the appliance e g with a cloth kitchen foil et...

Page 64: ...n repaired Appliance with a ceramic surface If there is any damage to the ceramic surface the appliance must be disconnected from the mains electricity and gas supplies immediately and not used until...

Page 65: ...gh temperatures and could catch fire Spray canisters aerosols and other inflammable substances must not be stored in a drawer under the hob Cutlery inserts must be heat resistant If the appliance has...

Page 66: ...ich may be difficult to remove Metal components have a protective coating which may give off a slight smell when heated up for the first time The smell and any vapours will dissipate after a short tim...

Page 67: ...urner without pressing in the control Switching on a burner by turning it clockwise or Switching off a burner by turning it anti clockwise can damage components in the appliance Malloca cannot be held...

Page 68: ...press in the control when adjusting the setting Control the flame so that it does not spread out beyond the sides of the pan As the outer part of the flame is much hotter than the centre the tips of t...

Page 69: ...8 2 1 0 1 14 10 26 20 AS 920R AS 920GR AS 920MB Wok 4 5 2 14 30 AS 930R AS 930G AS 930B Wok Small 4 5 2 1 0 2 14 10 30 20 GHG 733BNew GHG 733CNew Large Medium Small 3 8 1 3 0 1 1 0 1 14 14 10 26 24 2...

Page 70: ...be used on a gas burner Remember when purchasing new pans that manufacturers usually refer to the diameter at the top of the pan in their documentation Refer to the chart above and ensure that the pa...

Page 71: ...eramic surface These marks can be removed using a ceramic hob cleaner Do not use pots and pans on the hob with bases with pronounced edges or ridges These could scratch or scour the hob surface perman...

Page 72: ...normal The safety cut out operates independently from the battery supply This means that it will still work if the battey run out Using your hob during a battery run out If there is an interruption t...

Page 73: ...h Malloca cannot accept liability Do not use any sharp pointed objects which could damage the seal between the glass surface and the worktop Do not let the ignitor in the burner get wet If it gets wet...

Page 74: ...ective additive designed to prevent water marks and smears adhering to the surface After cleaning wipe the hob surface with a damp cloth and then dry it with a clean soft cloth Burners The burners can...

Page 75: ...wn onto the burner body so that the thermocouple and the ignition electrode extend through their respective holes in the crown The crown must click into place correctly Place the external cap and inte...

Page 76: ...gnition electrode extend through their respective holes in the crown The burner head must click into place correctly Place the cap flat over the crown When correctly positioned it will not slide about...

Page 77: ...f the burner does not ignite after several attempts Check whether The burner is correctly assembled The gas supply tap is turned on The burner is dry and clean The flame slits are dry and unblocked th...

Page 78: ...or if the appliance is under guarantee please contact Malloca dealer or Malloca Technical Service Department see back cover for address When contacting Malloca Technical Service Department please quot...

Page 79: ......

Page 80: ...E DISTRIBUTOR IN VIETNAM MALLOCA VIETNAM CO LTD Office and Showroom 279 Nguyen Van Troi St Ward 10 Phu Nhuan Dist HCM City Tel 84 28 39975 893 94 Hotline 1800 12 12 Fax 84 28 39970 135 Email info mall...

Reviews: