background image


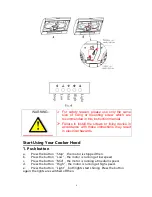
3. To install onto the wall, drill 4 holes of Ø 8mm on a suitable place according 
with the centre distance of  hole in the back of the cooker hood.See Pic 2 
4. Insert the nut into the holes. 
5. Insert the screws into the nuts and tight. 
6. Put up the cooker hood onto the fixed screws. 
7. Then use the attached accessories enclosed to turn the screws into the two 
holes of inside the hood, and then fix the screws to tighten the hood onto the 
wall. 
8. Put the one way valve onto the cooker hood. 


 Pic 2


Method B See Pic3: 
1.


Drill 4 holes of Ø 6mm at the bottom of the hanging cupboard. 

2.


Put the one way valve on the air outlet of cooker hood, then install the 
cooker hood on the bottom of the cupboard, tighten the cooker hood with 
enclosed 4 screws. 

3.


Install the adjusted board on the bottom of the hood in order to keep out 
the gap between hood back and cupboard. 

Summary of Contents for H342.6 TC

Page 1: ...1 Range Hood User Manual Model H342 6 TC H342 7 TC H342 9 TC H365 7 H365 7B...

Page 2: ...2 Content 1 Safety instructions 2 Installation 3 Start using your cooker hood 4 Troubleshooting 5 Maintenance and cleaning 6 Environment protection...

Page 3: ...with cooking appliances The minimum distance between the supporting surface for the cooking vessels on the hob and the lowest part of the cooker hood When the cooker hood is located above a gas appli...

Page 4: ...ck of experience and knowledge if they have been given supervision or instruction concerning use of the appliance in a safe way and understand the hazards involved Children shall not play with the app...

Page 5: ...be used NEVER try to extinguish a fire with water but switch off the appliance and then cover flame e g with a lid or a fire blanket INSTALLATION VENT OUTSIDE If you have an outlet to the outside you...

Page 6: ...to turn the screws into the two holes of inside the hood and then fix the screws to tighten the hood onto the wall 8 Put the one way valve onto the cooker hood Pic 2 Method B See Pic3 1 Drill 4 holes...

Page 7: ...from back Vertical ventilation See Pic 4B please use the cover to seal the outlet on the back then the air can be vented from top Air ventilation setting Outdoor air ventilation Turn the adjuster to...

Page 8: ...tions may result in electrical hazards Start Using Your Cooker Hood 1 Push button a Press the button Stop the motor is stopped then b Press the button Low the motor is running at low speed c Press the...

Page 9: ...ut motor does not work Fan switch turned off Select a fan switch position Fan switch failed Contact service center Motor failed Contact service center Light does not work motor does not work House fus...

Page 10: ...teel to prevent any unsightly crisscross scratching patterns from appearing CONTROL PANEL SURFACE The inlay control panel can be cleaned using warm soapy water Ensure the cloth is clean and well wrung...

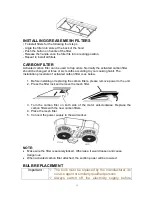
Page 11: ...arbon filter is as below 1 Before installing or replacing the carbon filters please remove power to the unit 2 Press the filter lock and remove the mesh filter 3 Turn the carbon filter on both side of...

Page 12: ...CTION This product is marked with the symbol on the selective sorting of waste electronic equipment This means that this product must not be disposed of with household waste but must be supported by a...

Page 13: ...he appliance in a way which is not shown in the user manual The appliance could not be dismantled by user At the end of life the appliance should not be disposed of with household waste Check with you...

Page 14: ...Y LIMITED Showroom 279 Nguyen Van Troi Street Ward 10 Phu Nhuan District HCM City Tel 84 28 39975 893 94 Fax 84 28 38447 102 84 28 38633 882 Email info malloca com Customer Care Hotline 1800 12 12 Ema...

Reviews: