background image

17


9 REPLACEMENT OF LAMPS


            DANGER 


Disconnect the electrical supply of the cooker 
hood.  Leave  the  lamps  to  cool  down  first  be- 
cause  they  could  burn  your  hands  when  they 
are hot.


9.1 Replacement of Halogen Lamp


Fig. 13: Replacement of LED Lamp


Remove the aluminium cartridge filter. Remove 
the faulty bulb and replace with a new one with 
the same rating.Fig. 13


9.2 Replacement of Spark Plug 
Lamp


Fig. 14: Replacement of Spark Plug Lamp


Remove the aluminium cartridge filter. Remove 
the faulty bulb and replace with a new one with 
the same rating.Fig. 14


9.3 1W Replacement of LED Lamp


Disconnect  the  electrical  connection  of 
LED lamp.


Push  on  the  lamp  with  your  hand,  to  re- 
move it.


Separate the self adhesive tape around the 
lamps and the body plate from each other.


Before placing the new LED lamp, remove 
the  protective  folio  from  the  frame,  and 
then stick it on its place on the body of the 
product.


Summary of Contents for K1506

Page 1: ...1 K1506 K1509 BUILT IN HOOD Please Read The User Manual Carefully USER S MANUAL INSTRUCTIONS FOR INSTALLATION AND USE K1506 TC K1507...

Page 2: ...VENTIVE MAINTENANCE 10 4 1 Washing in Dishwasher 10 4 2 Hand Wash 10 4 3 Removal Installation of Aluminium Filter 10 5 INSTALLATION OF APPLIANCE 11 5 1 Installation and Unpacking of the Appliance 11 5...

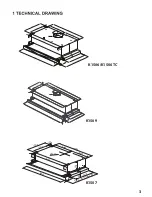
Page 3: ...562 600 25 223 134 284 700 20 284 50 300 300 19 19 Max425 M n305 40 118 K1507 K1509 K1506 K1506 TC 3...

Page 4: ...e ap pliance becomes out ofwarranty Comply with the rules and instructions re garding discharge of outgoing air stipulated by the relevant authorities This warning does not apply to uses without flue...

Page 5: ...erience and knowledge regarding its use unless they are under thesu pervision of a person responsible for the safety of the appliance After the installation of the cooker hood the minimum distance mus...

Page 6: ...d waste gas channel and are taken into to door again Fig 2 Therefore adequate fresh air ingress must al ways be ensured Fig 3 DANGER Fire danger Due to sparkling Installation of appliance over a heati...

Page 7: ...iring that is not performed accord ing to the rules or as required turn off the fuse or unplug the feeder cable of your appliance Repairing must be performed only by the autho rized technical service...

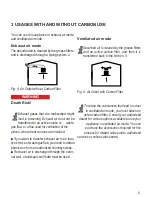
Page 8: ...t air to an inac tive smoke or waste gas flue you need to obtain permission from an authorized chimneysweep If exhaust air is discharged through the exter nal wall a telescopic wall safe must be used...

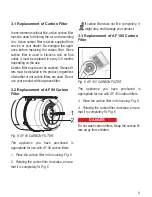
Page 9: ...ur product without grease filter 3 2 Replacement of AF 90 Carbon Filter If carbon filter does not fit in completely it might drop and damage your product 3 3 Replacement of AF 100 Carbon Filter Fig 6...

Page 10: ...the met al grease filters about every three months un der normal use conditions 1 to 2 hours a day Do not use excessively effective acidic or al kaline cleaning agents For cleaning the metal grease fi...

Page 11: ...med Report the transport issues immediately to transport operator Any faults encountered shall be reported to the dealer too Do not allow children to play the with packag ing materials 5 2 Installatio...

Page 12: ...173 cm Flat channels shouldn t have sharpelbows Use sealing strips for different pipediameters 5 5 Checking the Wall Wall must be flat straight and have the suffi cient bearing capacity Depth of dril...

Page 13: ...13 6 OVERVIEW OF APPLIANCE 1 2 3 4 Fig 9 OVERVIEW OF COOKER HOOD 1 Front Panel 2 Key 3 Filter 4 Lighting...

Page 14: ...ad to reduction in the air suction power A B avoid using twists and bends as much as pos C sible D A Functions of Device B Cooker hood is used in kitchens with or without flue In case of use with flue...

Page 15: ...the motor control buttons on the front panel Electronic controlled models have automatictimer Timer If you press any of the motor starting buttons for longer than 2 seconds a timer function shall act...

Page 16: ...mounted in their places press but ton for more than 3 seconds in order to delete signal when the product is inactive Letter E will appear on the display and the prod uct will switch to normal operatio...

Page 17: ...ing Fig 13 9 2 Replacement of Spark Plug Lamp Fig 14 Replacement of Spark Plug Lamp Remove the aluminium cartridge filter Remove the faulty bulb and replace with a new one with the same rating Fig 14...

Page 18: ...hood is plugged in or if the plug is fit properly into the socket Check the fuse to which the appliance is connected as well as the main fuse of yourhouse If the performance of appliance is insufficie...

Page 19: ...minium cartridge filter should be washed once a month under normal conditions Product s Air Intake is Weak Check the air outlet flue Air Outlet Flue Must Be Open Product s Air Intake is Weak Check the...

Page 20: ...M COMPANY LIMITED Showroom 279 Nguyen Van Troi Street Ward 10 Phu Nhuan District HCM City Tel 84 28 39975 893 94 Fax 84 28 38447 102 Email info malloca com Customer Care Hotline 1800 12 12 Email chams...

Reviews: