background image

3

1.5 Warnings for placement 

1

.

4


Warnings for using

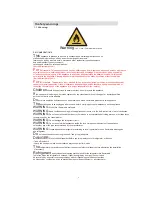
Do not put flammable, explosive, volatile and highly corrosive items 
in the refrigerator to prevent damages to the product or fire accidents.

Do not place flammable items near the refrigerator to avoid fires.

The refrigerator is intended for household use, such as storage of foods; 
it shall not be used for


other purposes, such as storage of blood, 

drugs or biological products, etc. 

Do not arbitrarily disassemble or reconstruct the refrigerator, 
nor damage


the refrigerant circuit; maintenance of the appliance

must be conducted by a specialist
Damaged power cord must be replaced by the manufacturer, its 
maintenance department or related professionals in order to avoid 
danger.

Do not allow any child to get into or climb the refrigerator; otherwise
suffocation or falling injury of the child may be caused.

Do not place heavy objects on the top of the refrigerator considering 
that objectives may fall when close


or


open the door, and accidental 

injuries might be caused.

Please pull


out the plug in case of power failure or cleaning. Do not 

connect the freezer to power supply within five minutes to prevent 
damages to the compressor due to successive starts.

The gaps between refrigerator doors and between doors and refrigerator 
body are small, be noted not to put your hand in these areas to prevent

 from


squeezing the finger. Please be gentle when close the refrigerator door to 
avoid falling articles.
Do not pick foods or containers 

with wet hands

 in the freezing chamber when the 

refrigerator is running, especially metal containers in order to avoid frostbite.

Summary of Contents for MF-241BCD

Page 1: ...Please read the Manual carefully before use The Manual shall be kept in good custody for later reference User Manual Model MF 241BCD ...

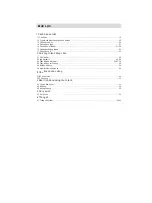
Page 2: ...eration 14 6 1 Technical parameters 16 17 1 1 Warning 1 1 2 Meanings of safety warning symbols 2 1 3 Electricity related warnings 2 1 4 Warnings for using 3 1 5 Warnings for placement 3 4 1 6 Warnings for energy 4 1 7 Warnings for disposal 4 2 Proper use of the refrigerator 3 Structure and functions 3 1 Key components 12 3 2 Functions 13 4 Maintenance and care of the refrigerator 5 1 Trouble shoot...

Page 3: ...d a hazard Donot store explosive substances such as aerosol cans with a flammable propellant in this appliance Theappliance has to be unplugged after use and before carrying out user maintenance on the appliance WARNING Risk of fire flammable materials WARNING Keep ventilation openings in the appliance enclosure or in the built in structure clear of obstruction WARNING Do not use mechanical device...

Page 4: ...pecial caution Insufficient caution may result in slight or moderate injury or damage to the product 2 1 3 Electricity related warnings Do not pull the power cord when pulling the power plug of the refrigerator Please firmly grasp the plug and pull out it from the socket directly To ensure safe use do not damage the power cord or use the power cord when it is damaged or worn Please use a dedicated...

Page 5: ...rder to avoid danger Do not allow any child to get into or climb the refrigerator otherwise suffocation or falling injury of the child may be caused Do not place heavy objects on the top of the refrigerator considering that objectives may fall when close or open the door and accidental injuries might be caused Please pull out the plug in case of power failure or cleaning Do not connect the freezer...

Page 6: ... temperature of the frozen food during manual defrosting maintenance or 5 cleaning could shorten the storage life 6 The necessity that for doors or lids fitted with locks and keys the keys be kept out of the reach of children and not in the vicinity of the refrigerating appliance in order to prevent children from being locked inside When the refrigerator is scraped disassemble the doors and remove...

Page 7: ...r off the protective film on the doors and the refrigerator body Keep away from heat and avoid direct sunlight Do not place the freezer in moist or watery places to prevent rust or reduction of insulating effect The refrigerator is placed in a well ventilated indoor place the ground shall be flat and sturdy Outer cabinet dimensions please refer to shown as the left picture Do not spray or wash the...

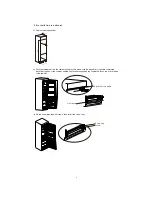
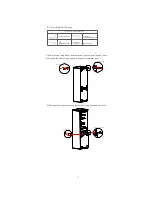
Page 8: ...ure the edgefold of top baffle completely touch the top edge of the cabinet and the limit hook of supporting leg completely touch the bottom edge of the cabinet Fix the supporting leg with screws then install the screw caps Min 50 mm Min 550 560 10 0 1776 0 10 Min 6 Edgefold of top baffle Limit hook Screw cap Screw ...

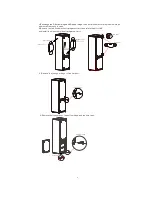
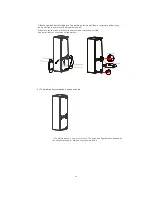
Page 9: ... door edge of refrigerator then fix the block to the door of cabinet with screw and install screw caps Fix the upper refrigerator door to the cabinet door in the same way Take out the sealing strip from accessory bag and press it in the gap between the cabinet and the refrigerator Installation is completed 7 Screw Screw cap Block Sealing strip The picture above is only for reference The actual con...

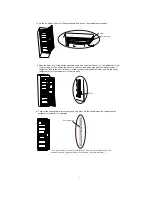
Page 10: ...ratchet Masking tape Putty knife thin blade screwdriver 1 Power off the refrigerator and remove all objects from the door trays 3 Remove the refrigerator door the bottom hinge and the hole cover 2 Remove the upper hinge and hole caps of refrigerator door hole caps upper hinge hole cover R bottom hinge 8 ...

Page 11: ...or and rotate them for 180 Remove the two fixed blocks and install them on other side of refrigerator door F upper hinge 6 Remove the freezer door the bottom hinge and the hole caps F bottom hinge hole caps 9 R bottom hinge hole caps fixed block R upper hinge 180 Step 1 install left bottom hinge Step2 put refrigerator door on left bottom hinge vertically Step 3 install left upper hinge ...

Page 12: ...hole cover and lower hole caps 8 Remove the two fixed blocks of freezer door and rotate them for 180 and install them on other side of freezer door The picture above is only for reference The actual configuration will depend on the physical product or statement by the distributor 10 hole caps Step 1 install left bottom hinge Step2 put refrigerator door on left bottom hinge vertically Step 3 instal...

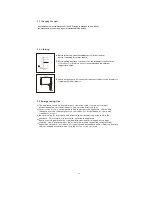
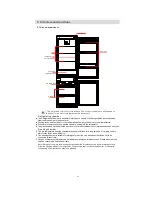
Page 13: ...or paper toweling Liners interfere with cold air circulation making the appliance less efficient Organize and label food to reduce door openings and extended searches Remove as many items as needed at one time and close the door as soon as possible Before initial start keep the refrigerator still for half an hour before connecting it to power supply Before putting any fresh or frozen foods the ref...

Page 14: ...The freezing chamber is suitable for storage of meat fish rice balls and other foods not to be consumed in short term Chunks of meat are preferably to be divided into small pieces for easy access Please be noted food shall be consumed within the shelf time Refrigerating chamber The Refrigerating Chamber is suitable for storage of a variety of fruits vegetables beverages and other food consumed in ...

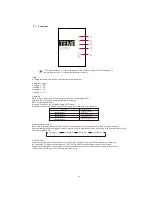
Page 15: ... is pressed once the temperature setting changes one time After the temperature setting has been completed the refrigerator will run according to the set value after 15s The shift regulation is 5 Lock Unlock When the temperature control panel is in lock state it needs to long press temperature setting key for 3 seconds for unlocking the panel all LEDs will blink for 2 second when panel is unlocked...

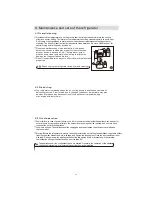
Page 16: ...is started Generally the operation of the appliance shall not be interrupted or otherwise the service life may be impaired 4 3 Out of operation Power failure In case of power failure even if it is in summer foods inside the appliance can be kept for several hours during the power failure the times of door opening shall be reduced and no more fresh food shall be put into the appliance Long time non...

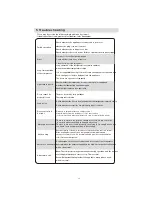
Page 17: ...toration or blow it with an electrical drier or use a hot towel for heating Hot housing Heat dissipation of the built in condenser via the housing which is normal When housing becomes hot due to high ambient temperature and storage of too much food it is recommended to provide sound ventilation to facilitate heat dissipation Abnormal noise Odorous foods shall be tightly wrapped Check whether there...

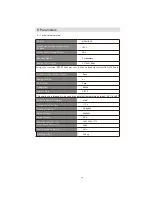
Page 18: ...y consumption 283 97 kWh per year based on standard test results for 24 hours 16 MF 241BCD 3 5 Kg 24h 220 240V 182 L 59 L Temperature Rise Time Freezing Capacity Rated Voltage Rated Current Dimension W x D x H Total Gross Volume L Total Storage Volume L Net Weight kg 0 8 A Household Appliances Category Energy Grading EU Ecolabel Refrigerant Climate Class 266 L 540 x 545 x 1770 241 L A 0 778 kW h 2...

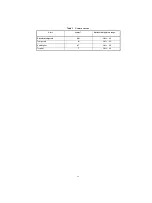
Page 19: ...Table 1 Climate classes Class Symbol Ambient temperature range Extended temperate SN 10 to 32 Temperate N 16 to 32 Subtropical ST 16 to 38 Tropical T 16 to 43 17 ...

Page 20: ...Rã đông 32 4 3 Không sử dụng 32 6 1 Thông số kỹ thuật 34 35 1 1 Cảnh báo 19 1 2 Ý nghĩa của biểu tượng cảnh báo an toàn 20 1 3 Cảnh báo về điện 20 1 4 Cảnh báo sử dụng 21 1 5 Cảnh báo vị trí lắp đặt 21 22 1 6 Cảnh báo về năng lượng 22 1 7 Cảnh báo xử lý 22 2 Sử dụng tủ lạnh đúng cách 3 Cấu trúc và chức năng 3 1 Bộ phận chính 30 3 2 Chức năng 31 4 Bảo trì và bảo dưỡng cho tủ lạnh 5 1 Xử lý sự cố 33...

Page 21: ...tự để tránh nguy hiểm Không lưu trữ các bình xịt dễ gây cháy nổ bên trong thiết bị Thiết bị phải được rút phích cắm khi không sử dụng và trước khi thực hiện việc bảo trì CẢNH BÁO Nguy cơ hỏa hoạn vật liệu dễ cháy CẢNH BÁO Giữ các lỗ thông gió mô hình độc lập hoặc âm tủ tránh vật cản CẢNH BÁO Không sử dụng các thiết bị cơ học hoặc các thiết bị khác để thúc đẩy quá trình rã đông trừ các thiết bị đượ...

Page 22: ...Đây là biểu tượng thận trọng Hướng dẫn được đánh dấu bằng biểu tượng này đòi hỏi sự thận trọng đặc biệt nếu không có thể gây thương tích nhẹ hoặc trung bình hoặc có thể ảnh hưởng đến sản phẩm 20 1 3 Cảnh báo về điện Không nắm dây điện khi rút phích cắm điện của tủ lạnh Hãy nắm phích cắm và rút ra khỏi ổ điện Để đảm bảo sử dụng an toàn không làm hỏng dây nguồn hoặc sử dụng dây nguồn khi nó bị hỏng ...

Page 23: ... nhân viên kỹ thuật bộ phận bảo trì hoặc những người có kiến thức tương tự để tránh gây nguy hiểm Không để trẻ em vào trong hoặc leo trèo lên tủ lạnh mặt khác có thể gây ngạt thở hoặc thương tích cho trẻ Không đặt các vật nặng lên trên tủ lạnh vì các vật này có thể bị rơi khi đóng mở cửa tủ lạnh và có thể gây thương tích cho người dùng Vui lòng rút phích cắm trong trường hợp mất điện hoặc vệ sinh ...

Page 24: ...ng khi rã đông tủ lạnh chẳng hạn như bọc thực phẩm trong nhiều lớp giấy báo 4 Việc tăng nhiệt độ của thực phẩm đông lạnh trong quá trình rã đông thủ công bảo trì hoặc vệ sinh có thể rút ngắn thời gian bảo quản 5 6 Điều cần thiết là cửa và các nắp đậy có khóa và chìa khóa để xa tầm tay của trẻ em để tránh chúng bị khóa bên trong Khi vứt bỏ tủ lạnh hãy tháo rời các cánh cửa đặt cửa và kệ ở một nơi a...

Page 25: ...ồm mút xốp và các dải băng bên trong tủ lạnh tháo lớp màng trên cửa và thân tủ lạnh Tránh xa nguồn nhiệt và ánh nắng trực tiếp Không đặt tủ ở những nơi ẩm ướt hoặc nhiều nước để tránh gỉ sét hoặc giảm hiệu quả cách điện Tủ lạnh được đặt ở nơi thông thoáng trong nhà mặt đất phải bằng phẳng và chắc chắn Kích thước bên ngoài khoang âm vui lòng tham khảo như hình bên trái Không xịt hoặc rửa tủ lạnh kh...

Page 26: ...ều chỉnh để đảm bảo phần trên của tủ chạm vào vách ngăn phía trên của khoang âm và móc của chân đỡ chạm hoàn toàn vào cạnh dưới của tủ Cố định chân đỡ bằng vít sau đó lắp nắp vít vào Min 50 mm Min 550 560 10 0 1776 0 10 Min 24 Edgefold of top baffle Limit hook Screw cap Screw ...

Page 27: ... tủ lạnh sau đó cố định cửa vào khoang âm rồi lắp nắp vít vào Ccố định cửa phía trên của tủ lạnh vào khoang âm bằng cách tương tự Tháo dải niêm phong từ túi phụ kiện và nhấn nó vào khoảng trống ở giữa tủ và tủ lạnh Lắp đặt hoàn tất 25 Screw Screw cap Block Sealing strip Hình ảnh trên chỉ mang tính chất tham khảo Cấu hình thực tế có thể thay đổi theo cấu trúc vật lý của sản phẩm hoặc công bố của nh...

Page 28: ... dùng 5 16 socket and ratchet Masking tape Putty knife thin blade screwdriver 1 Tắt nguồn tủ lạnh và lấy tất cả đồ đạc ra khỏi khay cửa 3 Tháo cửa tủ lạnh bản lề dưới và nắp chụp 2 hole caps upper hinge hole cover R bottom hinge 26 Tháo bản lề phía trên và nắp chụp của cửa tủ lạnh ...

Page 29: ... 4 Tháo hai bộ ray trượt và xoay chúng 180 và lắp đặt ở phía bên kia của tủ lạnh F upper hinge 6 Tháo cửa tủ ngăn đông bản lề dưới và nắp chụp F bottom hinge hole caps 27 R bottom hinge hole caps fixed block R upper hinge 180 Step 1 install left bottom hinge Step2 put refrigerator door on left bottom hinge vertically Step 3 install left upper hinge ...

Page 30: ...i và lắp đặt nắp chụp trên và dưới 8 Tháo hai bộ ray trượt và xoay chúng 180 và lắp đặt theo chiều ngược lại của cửa tủ lạnh ngăn đông Hình ảnh trên chỉ mang tính chất tham khảo cấu hình thực tế sẽ phụ thuộc vào cấu tạo vật lý hoặc công bố của nhà sản xuất 28 hole caps Step 1 install left bottom hinge Step2 put refrigerator door on left bottom hinge vertically Step 3 install left upper hinge ...

Page 31: ...bằng giấy nhôm giấy sáp hoặc khăn giấy Các lớp lót này sẽ làm cản nhiệt ảnh hưởng đến quá trình làm lạnh của thiết bị Dán nhãn cho mỗi loại thực phẩm để dễ dàng tìm kiếm Quá trình lấy thực phẩm ra khỏi tủ lạnh và đóng cửa càng nhanh càng tốt Trước khi bắt đầu sử dụng giữ tủ lạnh trong khoảng nửa giờ đồng hồ trước khi kết nối với nguồn điện Trước khi đặt bất kỳ thực phẩm tươi hoặc đông lạnh nào vào...

Page 32: ... chủ yếu được sử dụng để lưu trữ thực phẩm đông lạnh hoặc làm đá Khoang đông thích hợp để lưu trữ thịt cá cơm nắm và các thực phẩm khác không được tiêu thụ trong thời gian ngắn Thịt tốt nhất là nên chia thành các miếng nhỏ sẽ dễ dàng sử dụng hơn Hãy lưu ý tiêu thụ sản phẩm trong thời hạn sử dụng được Khoang lạnh Khoang lạnh thích hợp để lưu trữ nhiều loại trái cây rau củ quả và những thực phẩm tiê...

Page 33: ...hấn phím cài đặt A một lần nhiệt độ sẽ thay đổi một lần Sau khi cài đặt nhiệt độ hoàn tất tủ lạnh sẽ vận hành theo giá trị cài đặt sau 15s Quy định thay đổi là 5 Khóa Mở khóa Khi bảng điều khiển nhiệt độ trong trạng thái khóa nó cần được nhấn phím cài đặt nhiệt độ trong khoảng 3 giây để mở khóa bảng điều khiển tất cả đèn LED sẽ nhấp nháy trong 2 giây khi bảng điều khiển được mở khóa Khi bảng điều ...

Page 34: ...ại nguồn cấp điện detergent Thiết bị sẽ vận hành liên tục sau khi nó được khởi động Nói chung hoạt động của thiết bị sẽ không bị gián đoạn hoặc nếu không tuổi thọ của thiết bị có thể bị suy giảm 4 3 Không sử dụng Mất điện Trong trường hợp mất điện ngay cả khi đang trong mùa hè thực phẩm bên trong thiết bị có thể được giữ trong vài giờ trong thời gian mất điện nên hạn chế mở cửa tủ lạnh và không đư...

Page 35: ...ăng cửa làm cản trở sự tiếp xúc của gioăng cửa và sau đó làm mát để phục hồi sấy bằng máy sấy hoặc dùng khăn nóng để làm nóng Nhà ở nóng ѫL QyQJ WURQJ NKRDQJ kP WӓD UD WURQJ QKj ÿy Oj EuQK WKѭӡQJ KL QKj WUӣ QrQ QyQJ GR QKLӋW ÿӝ P L WUѭӡQJ FDR và lưu trữ quá nhiều thực phẩm nên cung cấp thêm không gian thông gió để tạo điều kiện tản nhiệt Sự ồn ào khác thường Thực phẩm có mùi sẽ được bọc lại Kiểm t...

Page 36: ...ẩn trong 24 giờ Độ ồn 34 Thời gian ổn định nhiệt độ Thể khối đông lạnh Điện áp định mức Dòng điện định mức Kích thước W x D x H Tổng dung tích L Tổng dung tích lưu trữ L Khối lượng tịnh kg Thiết bị gia dụng Phân loại năng lượng Nhãn sinh thái EU Chất làm lạnh Lớp khí hậu MF 241BCD 3 5 Kg 24h 220 240V 182 L 59 L 0 8 A 266 L 540 x 545 x 1770 241 L A 0 778 kW h 24h 11 7 h 41 dB R600a Cyclopentane Đạt...

Page 37: ...Lớp Bảng 1 Lớp khí hậu Biểu tượng Nhiệt độ môi trường SN 10 to 32 N 16 to 32 ST 16 to 38 Nhiệt đới mở rộng Nhiệt đới Cận nhiệt đới Ôn đới T 16 to 43 35 ...

Page 38: ...Trung tâm chính 279 Đường Nguyễn Văn Trỗi Phường 10 Quận Phú Nhuận TP HCM SĐT 028 39975 893 94 028 39975 294 95 Khu vực Bà Rịa Vũng Tàu 258 260A Lê Hồng Phong Phường 4 TP Vũng Tàu SĐT 0254 385 94 99 Khu vực Tây Nguyên 331 Phan Đình Phùng Phường 2 TP Đà Lạt SĐT 0263 3521 107 0918226362 Khu vực Nam Trung Bộ 08 Lê Hồng Phong Phường Phước Hải TP Nha Trang SĐT 0258 3875 488 Khu vực Miền Tây 180 Trần Hư...

Reviews: