8
stand-by-mode. The control can only be switched ON if it identifies the ON/OFF (1) key alone being
operated. Should it recognize ON/OFF (1) key activation other than that, the control remains in the
standby- mode.
If the child safety feature is active when switching on, the Safety lock indicator (11) lights up. When the
Touch Control is ON it can be switched- OFF at any time by operating the ON/ OFF (1) key. This is also
valid if the control has been locked (activated child safety feature).
The ON/OFF (1) key has always priority in the switch-OFF function.
Automatic Switch Off
When the control is ON it automatically switches-OFF after 10 seconds if no cooking zone or select
key has been operated within this period of time. If no pan is placed on a cooking zone after selecting a
power level for that area on the hob, it will automatically turn off after 1 minute.
Switching a cooking zone ON and OFF
First place the pan in the chosen cooking zone. If the pan is not present the system cannot be
switched on the correspondent zone.
1.
When the touch control is on, a cooking zone may be selected by pressing the UP + (3) or DOWN
- (2) buttons on the corresponding area.
2.
The display (5) for the chosen cooking zone will show the selected power level.
3.
If the cooking zone is “hot”, “H” and “0” are alternately displayed.
4.
Press the PLUS (3) or MINUS (2) button to select a setting and the zone will begin to heat up.
5.
Once the cooking zone has been selected, the setting can be selected by keeping the PLUS (3)
button pressed down. The setting begins at level 1 and increases by 1 level every 0.4 seconds.
When setting “9” is reached, the setting will not be changed further.
6.
If the setting level has been selected using the MINUS (2) button, the start level is “9“ (maximum
level). Keep the button pressed down to lower the active level by 1 every 0.4 seconds. When
setting “0” is reached, there will be no further setting changed. The setting can only be changed by
pressing the MINUS (2) or PLUS (3) button again.
Switching a cooking zone off
Pressing the UP (3) and DOWN (2) buttons at the same time will reset the power level to 0.
Alternatively, the MINUS button (2) can be used to reduce the setting level to 0. If a cooking zone is
“hot”, “H” and “0” will be alternately displayed.
Switching-OFF all cooking zones
Pressing the ON/OFF (1) button at any time will cause all cooking zones to switch off immediately.
In the standby- mode an “H“ appears on all cooking zones which are “hot“. All other cooking zone
displays are not illuminated.
Wattage settings
The output of the cooking zones can be set in 9 steps which are indicated by the figures “1” thru “9”
by means of LED displays.
Boost function
The booster function can be activated for the required cooking zone by selecting power level 9 and
then pressing the UP (3) button. By means of this function certain cooking zones are enabled to receive
power over the nominal (the number of boost able cooking zone depends on the power available on a
partial modules which is to be less than total hob power). If the desired cooking zone has the capacity to
activate the booster, the display shows a “P” symbol. If there is insufficient available power, the power
Summary of Contents for MI 593W
Page 2: ...2...
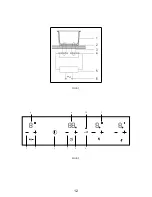
Page 3: ...3 Fig 1 4 6 10 5 2 3 1 7 8 9 Fig 2...
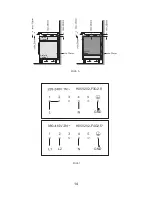
Page 4: ...4 Fig 3 Fig 4 Fig 5...
Page 12: ...12 H nh 1 4 6 10 5 2 3 1 7 8 9 H nh 2...
Page 13: ...13 H nh 3 H nh 4 H nh 5...


