MPG525G
800-295-0042 ext 206
technical@maloneautoracks.com
4
FRAME ASSEMBLY (Group 1)
Group 6:
Load Bar
Components
Bag 11433
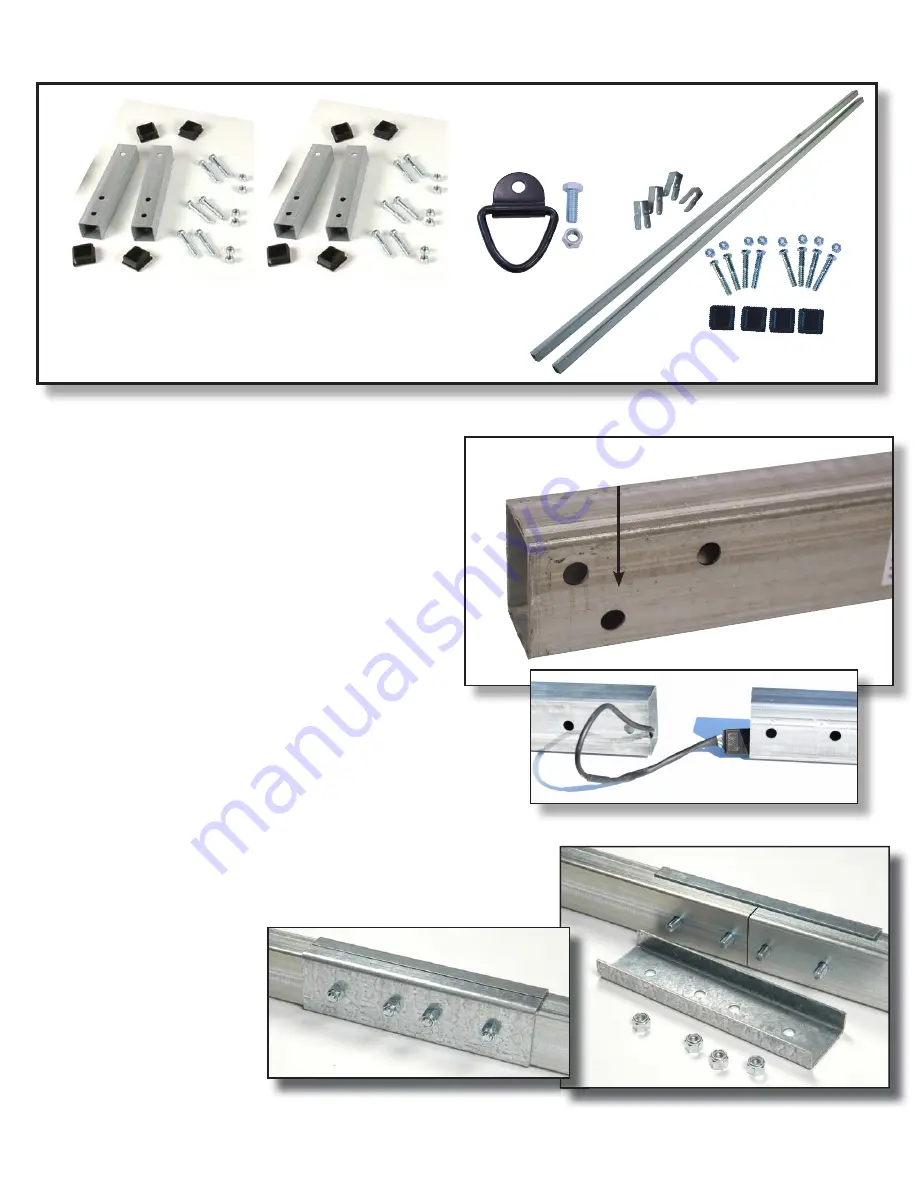
2. Get the wiring harness out of the
light kit. Un-kink the last 6 feet of
the 20 foot harness. Un-kink the
entire 4 foot harness. Wrap the 2
ends of the long harness together
with electrical tape.
4. Pass the entire harness through the grommet and out the top of
the tongue as shown.
3. Stand the front tongue section
on end with the coupler holes up.
Push a wire protection grommet
into the wiring harness hole as
shown.
1. First we will build the 2 piece tongue. The middle of the
tongue has symmetrical holes for the joining plates. The
forward end of the tongue has holes for the coupler.
D-Rings (4)
Load Bars (2) and Brackets (4)
Load Bars Support Tubes (4)
TONGUE & FRAME ASSEMBLY (Group 1)
1. First we will build the 2 piece tongue. The middle
of the tongue has symmetrical holes for the joining
plates, and You can identify the hitch end of the
tongue by the 3 holes on the left (drivers) side for
the coupler.
2. Align the tongue half’s together and insert the
wiring harness through both sections of the tongue,
making sure the plug end matches the
vehicles connection. The colored pigtails should
be towards the rear of the tongue.
MPG525G
800-295-0042 ext 206
technical@maloneautoracks.com
6
14. Being careful not to pinch the wiring harness, square
the tongue half ends together and install the joining plates
on each side. (Note
the rear tongue section
is symmetrical so it
works
fi
ne either way.
It has no top and
bottom.) Fully tighten
the 1/2” bolts with two
3/4” wrenches.
NOTE: We begin assembling the frame upside down, later we will
fl
ip it over to complete the assembly.
15. Layout the frame components as shown, “upside down”.
(
a
) The spring bracket mounting holes in the side rails must face up.
(
b
) The tongue mounting holes in the middle of the front two cross members must face up.
(
c
) The MALONE decal is on the rear cross member and must be upside down.
(
d
) The mid-cross member must face the same way as the rear cross member.
(
e
) Spring hangers with shackle bolt holes to the front, slippers to the back.
(
f
) Carriage bolts to mount cross members to rails.
(
g
) Regular bolts to mount spring hanger brackets.
a
a
a
a
b
b
c
d
d
e
e
g
f
16. Install all 12 carriage bolts,
fi
nger tighten only. Install all 8 spring hanger bolts with the nuts
inside the frame. Fully tighten the rear spring hangers. Finger tighten the front spring hangers.
technical@maloneautoracks.com
4
800-295-0042 ext. 215
3. Being careful not to pinch the wiring harness,
square the tongue half ends together and install the
joining plates on each side. (Note the rear tongue
section is symmetrical so it works fine either way. It
has no top and bottom.) Fully tighten the 1/2” bolts
with two 3/4” wrenches.
Group 6: Load Bar Components
Coupler / Hitch End
Visit www.maloneautoracks.com/Replacement-Parts
for all of your spare part needs


