background image

Coral Cloth for Mop Head

Attach the triangle shaped Coral Cloth to the Mop Head following the same instructions as
provided for the Microfiber Cloth with Hook and Loop tape in the “HOW TO ASSEMBLE
THE STEAM MOP” section in this manual.

The Coral Cloth is soft and durable with hundreds of super absorbing fringes, ideal for your
sealed hardwood, ceramic and other types of flooring.

AFTER USE

1) 

Unplug Power Cord from outlet.

2)  

Allow Mop  Pad/Cloths to cool down and  carefully remove  cleaning cloth  from  Mop

Head, as cleaning cloth could still be hot.

3) 

Any water remaining in the Water Tank should be emptied prior to appliance storage.

Always empty the Water Tank at the end of each use.

4)  

Let any water (that may remain as a product of condensation) drain from the  steam

opening prior to storing the appliance.

5) 

Wrap Power Cord around Upper and Lower Cord Wrap.

6) 

Wipe all surfaces of the STEAM MOP with a soft cloth. Store in a protected, dry area.

7) 

Please store the unit in a cool and dry place when not in use. Do not leave it exposed to

sunlight or rain.

8)  

Upright   storage   of   the   STEAM   MOP   with   a   wet   Mop   Pad/Cloth   may   result   in   the

formation   of   white   marks   on   your   floor.   To   remove   the   white   marks,   clean   area   with
vinegar. Make sure to remove the Mop Pad/Cloth before storage.

CLEANING AND MAINTENANCE

BE SURE THAT THE UNIT IS DISCONNECTED FROM THE POWER OUTLET  WHEN
PERFORMING CLEANING.

Drain the remaining water in the tank and clean the tank after every use.
Please use detergent to clean the accessories (Jet Nozzle and Round Brush) when they
are dirty, then wash with clean water and air dry.

How to decalcify the Water Tank interior:

To clean calcium deposits that build up inside the Water Tank, add one or two tablespoons
of white vinegar to a full Water Tank, close the Water Tank cap and shake the contents.
DO NOT TURN THE STEAMER ON.
Let the unit sit for a few hours. Then, empty the Water Tank and refill with clean  water and
empty until it rinses clear.


WARNING

DO NOT IMMERSE THE STEAM MOP IN WATER.
• Cleaning procedure to remove lime scale

If your STEAM MOP begins to produce steam more slowly than usual or stops producing
steam you may need to remove lime scale. Lime scale can develop over time on the metal
parts and greatly affect mop performance.
It is necessary to remove lime scale on a regular basis, every 25 - 50 times you use  a full
tank of water or at least once a month, especially in areas with hard water.
The frequency of lime scale removal depends upon the hardness of your tap water   and
how often you use the steam mop.

The STEAM MOP uses tap water. However, in areas with hard water, distilled water
should be used for better performance.

To remove lime scale from the STEAM MOP, please follow these procedures:

33/53


WARNING

Summary of Contents for SteamExpert HDS4500W

Page 1: ...Mop Parowy Czy cik SteamExpert HDS4500W Instrukcja Obs ugi...

Page 2: ...MOPA PAROWEGO w wodzie lub innych p ynach 10 Nie u ywa z uszkodzonym przewodem lub wtyczk Je li MOP PAROWY nie dzia a tak jak powinien zosta upuszczony uszkodzony pozostawiony na zewn trz lub zanurzo...

Page 3: ...ycznymi oparami takimi jak rozcie czalniki do farb lub farby na bazie oleju 30 Nie stosowa do sk ry polerowanych woskiem mebli lub pod g niezabezpieczonych pod g drewnianych lub parkiet w tkanin synte...

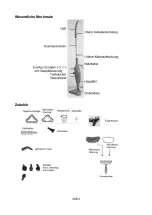
Page 4: ...Kluczowe cechy Akcesoria 4 53...

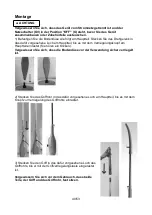
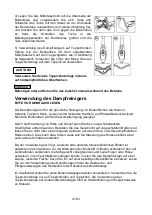
Page 5: ...g wnym a zablokuje si przyciskiem blokady na korpusie g wnym us yszysz klikni cie Przed u yciem upewnij si e g owica mopa jest bezpiecznie zablokowana 2 W rurk uchwytu do wyznaczonego otworu w korpusi...

Page 6: ...rzchni pokrytych woskiem Nie u ywa na niezabezpieczonych pod ogach ani nie pozostawia urz dzenia na jakiejkolwiek drewnianej lub wra liwej na ciep o pod odze przez d u szy czas Mo e to spowodowa podni...

Page 7: ...okr cony Mop parowy wykorzystuje wod z kranu Jednak na obszarach z tward wod dla lepszej wydajno ci nale y u ywa wody destylowanej Upewnij si e miedziany sto ek wewn trz zbiornika na wod jest zawsze z...

Page 8: ...z nast puj cych pozycji regulatora pary 1 Niski 2 redni 3 Wysoki i 4 Gor cy natrysk 1 Niski i 2 redni Idealne do czyszczenia wszystkich twardych pod g takich jak linoleum ceramika marmur drewno itp 3...

Page 9: ...ormalne Si a i ciep o pary mog niekorzystnie wp ywa na niekt re materia y Zawsze sprawdzaj przydatno mopa parowego na powierzchni przeprowadzaj c wst pny test na niewidocznym miejscu Czy cik Parowy R...

Page 10: ...zotka doskonale nadaje si do czyszczenia szorstkich lub metalowych powierzchni takich jak ceglane pod ogi ko a samochodowe metalowe drzwi i metalowe ramy itp Obie szczotki mog r wnie skutecznie czy ci...

Page 11: ...za pomoc przycisku blokady w korpusie g wnym us yszysz klikni cie Czyszczenie odzie y par 4 Aby u ywa narz dzia do czyszczenia okien jako parownicy do odzie y zainstaluj ciereczk z mikrofibry lub cier...

Page 12: ...y czy cika mo na zmieni pozycj regulatora pary i strumie pary Aby przesta emitowa par wy cz urz dzenie przekr caj c prze cznik zasilania O I do pozycji OFF O Je li prze cznik zasilania O I zostanie ob...

Page 13: ...ost puj zgodnie z krokami 2 i 3 opisanymi w rozdziale Korzystanie z czy cika parowego w tej instrukcji 4 Trzymaj czy cik parowy w jednej r ce jak pokazano na ilustracji 5 Powoli przesuwaj po szkle lub...

Page 14: ...zi czy ubranie mo e by czyszczone parowo Niekt re tkaniny takie jak sk ra zamsz i aksamit mog si do tego nie nadawa Je li nie masz pewno ci wyparuj niewielk cz wn trza ubrania aby sprawdzi czy nie usz...

Page 15: ...miejsce octem Przed przechowywaniem nale y wyj nak adk ciereczk do mopa CZYSZCZENIE I KONSERWACJA UPEWNIJ SI E URZ DZENIE JEST OD CZONE OD GNIAZDA ZASILANIA PODCZAS CZYSZCZENIA Spu pozosta wod w zbior...

Page 16: ...i wyp ucz 5 Nape nij zbiornik wie wod pod cz do urz dzenia i wypuszczaj par przez system a zbiornik wody b dzie pusty Nie pozostawiaj mopa bez nadzoru podczas procesu usuwania kamienia i lub podczas...

Page 17: ...PARA ZREDUKOWANA LUB BRAK PARY Pusty zbiornik na wod Nape nij zbiornik na wod Zablokowana dysza parowa Zdejmij g owic mopa i wyczy dysz Osad wapienny Aby usun kamie post puj zgodnie z procedur czyszc...

Page 18: ...wy LVD 2014 35 EU EC 2014 30 EU oraz spe nia nast puj ce standardy 62321 4 2013 AMD1 2017 62321 5 2013 62321 6 2015 62321 7 1 2015 62321 7 2 2017 62321 8 2017 EN 55014 1 2017 EN 55014 2 2015 EN 61000...

Page 19: ...Steam Mop Cleaner SteamExpert HDS4500W Instruction Manual 19 53...

Page 20: ...owards people animals or plants 9 Do not immerse the STEAM MOP in water or other liquids 10 Do not use with damaged cord or plug If the STEAM MOP is not working as it should has been dropped damaged l...

Page 21: ...hat are filled with flammable explosive or toxic vapor such as paint thinner or oil based paint 30 Do not use on leather wax polished furniture or floors unsealed hardwood or parquet floors synthetic...

Page 22: ...KEY FEATURES ACCESSORIES Glider Microfiber Cloth Measuring Cup Cleaning Pin Jet Nozzle 22 53...

Page 23: ...til it locks in place with the Lock Button on the Main Body you will hear a clicking sound Make sure that the Mop Head is securely locked into place before usage 2 Insert the Handle tube into the desi...

Page 24: ...r steam cleaning The heat and steam action my remove the wax on surfaces treated with wax Do not use on unsealed flooring or let unit stand on any wood or heat sensitive floor for an extended period o...

Page 25: ...tap water However in areas with hard water distilled water should be used for better performance Make sure the Copper Cone inside the Water Tank is always submerged in water As illustrated in Fig 1i w...

Page 26: ...Hot Spray Setting Ideal for cleaning bathrooms kitchens window sills car wheels etc You can change the Steam Regulator position and change the steam output while operating the STEAM MOP 4 Slowly pass...

Page 27: ...unter tops sinks windows mirrors tiles and spot cleaning on floors carpets and rugs Use it with the Jet Nozzle Brass brush or Nylon brush attachments to spray away dirt grease mold and more HOW TO ASS...

Page 28: ...vely clean the grease on pans stoves and ovens in the kitchen They can be used with soap or detergent to clean dirty areas Never use the round brass brush on surfaces that are prone to scratching Remo...

Page 29: ...STEAMING TOOL 4 To use the Window Cleaning tool as a Garment Steamer install the Microfiber Cloth or the Lint Cloth over the Window Cleaning Garment Steamer Tool as illustrated in Fig 4a 4b 4c Insert...

Page 30: ...can change the Steam Regulator position and the steam output while operating the STEAM MOP To stop emitting steam turn OFF the unit by turning the Power Switch O I to the OFF O position If the Power...

Page 31: ...ection in this manual 3 Follow Steps 2 and 3 described in the How To Use the Hand Hand Steamer section in this manual 4 Hold the Hand Held Steamer in one hand as illustrated 5 Slowly pass over glass o...

Page 32: ...n item of clothing to check if garment can be steamed Some fabrics like leather suede and velvet may not be suitable for steaming If you are not sure then steam a small part of the inside of the garme...

Page 33: ...age CLEANING AND MAINTENANCE BE SURE THAT THE UNIT IS DISCONNECTED FROM THE POWER OUTLET WHEN PERFORMING CLEANING Drain the remaining water in the tank and clean the tank after every use Please use de...

Page 34: ...the system until the Water Tank is empty Do not leave the steamer unattended during the lime scale removal process and or while in use Perform a test cleaning on a suitable isolated area after each li...

Page 35: ...ies and reattach them properly Debris or obstructions at the wring out and reattach Remove the accessory and check and clean connection points THE CLEANING CLOTH BECOMES WET The cloth gets saturated w...

Page 36: ...Dampfreiniger SteamExpert HDS4500W Bedienungsanleitung 36 53...

Page 37: ...sen hat 8 Richten Sie die D mpfe niemals auf Menschen Tiere oder Pflanzen 9 Tauchen Sie den Dampfreiniger nicht in Wasser oder andere Fl ssigkeiten 10 Verwenden Sie das Ger t nicht mit einem besch dig...

Page 38: ...ein wenn Sie ein Wasserleck bemerken und wenden Sie sich an einen qualifizierten Techniker 29 Verwenden Sie den Dampfreiniger nicht in geschlossenen R umen die mit brennbaren explosiven oder giftigen...

Page 39: ...Wesentliche Merkmale Zubeh r 39 53...

Page 40: ...it dem Verriegelungsknopf am Hauptteil einrastet Sie h ren ein Klicken Vergewissern Sie sich dass die Bodend se vor der Verwendung sicher verriegelt ist 2 Stecken Sie das Griffrohr in das daf r vorges...

Page 41: ...ind f r die Dampfreinigung geeignet Durch die Einwirkung von Hitze und Dampf kann Wachs von wachsbedeckten Oberfl chen entfernt werden Benutzen Sie das Ger t nicht auf ungesch tzten B den und lassen S...

Page 42: ...em Messbecher Wasser bis zum MAX F llstand in den Tank Nicht berf llen Das maximale Fassungsverm gen des Tanks betr gt 400 ML 13 5 OZ Setzen Sie den Wassertankdeckel wieder auf und drehen Sie ihn im U...

Page 43: ...ltet wurde Denken Sie daran das Ger t nach jedem Gebrauch auszuschalten und dann den Stecker aus der Steckdose zu ziehen damit das Ger t bei der n chsten Benutzung in der Position OFF O steht 3 W hlen...

Page 44: ...Mopp Dampf erzeugt Dieses Ger usch ist normal Es kann ein leichtes Spucken von Wasser gemischt mit Dampf auftreten Auch das ist normal Die Kraft und Hitze des Dampfes kann sich auf manche Materialien...

Page 45: ...sie das Ende der D se erreicht wie in Abb 5a 5b gezeigt Um die B rste zu entfernen ziehen Sie sie aus der D se heraus Die runde Nylonb rste ist ideal f r die Reinigung glatter harter Oberfl chen wie...

Page 46: ...Befestigen Sie die Fensterreinigungsd se wie folgt am Hauptteil F hren Sie die Fensterreinigungsd se in das daf r vorgesehene Loch im Hauptteil ein bis es mit dem Verriegelungsknopf am Hauptteil einra...

Page 47: ...n leuchtet etwa 20 30 Sekunden Das gr ne Licht leuchtet auf wenn der Dampfmopp einsatzbereit ist Wenn die Bereitschaftsanzeige gr n leuchtet schalten Sie den Netzschalter O I in die Position ON I Der...

Page 48: ...gefrorene Scheiben zu reinigen Seien Sie vorsichtig wenn Sie den Reiniger auf Glas verwenden da er zerbrechen kann Verwenden Sie den Reiniger nicht auf Leder gewachsten M beln oder gewachsten B den s...

Page 49: ...iger Dampfreiniger an und befestigen Sie den Fensterreiniger Dampfreiniger am Hauptger t wie im Abschnitt Dampfreinigung von Kleidungsst cken in diesem Handbuch beschrieben 3 W hlen Sie eine der folge...

Page 50: ...Tuch abk hlen und nehmen Sie es vorsichtig aus dem Fensterreinigungsger t da das Tch noch hei sein kann Mikrofaser berzug f r die Bodend se Befestigen Sie den Mikrofaser berzug an der Bodend se indem...

Page 51: ...nn der Dampfreiniger langsamer als gew hnlich Dampf erzeugt oder keinen Dampf mehr produziert muss m glicherweise Kalk entfernt werden Mit der Zeit k nnen sich Kalkablagerungen auf Metallteilen bilden...

Page 52: ...durch um sicherzustellen dass keine Verunreinigungen im System verbleiben VERBRENNUNGSGEFAHR Reinigung von verstopften Zubeh rteilen Aufgrund des hohen Mineraliengehalts des Wassers in einigen Gebiete...

Page 53: ...iehen Sie das Zubeh r ab und schlie en Sie es korrekt an Verschmutzungen oder Hindernisse an den Anschlussstellen Entfernen Sie das Zubeh r und berpr fen und reinigen Sie die Anschlussstellen DAS REIN...

Reviews: