background image


Right: to forward


Figure 2 


2.


Inspect the power cord and plug for damage. 

If the plug has been modified, is missing the 

grounding  prong  or  if  the  cord  is  damaged, 

do not use the Drain Cleaning Machine until 

the cord has been replaced. 

3.


Inspect the Drain Cleaning Machine for any 

broken, missing, misaligned or binding parts 

as  well  as  any  other  conditions  which  may 

affect  the  safe  and  normal  operation  of  the 

machine.  If  any  of  these  conditions  are 

present,  do  not  use  the  Drain  Cleaning 

Machine  until  any  problem  has  been 

repaired. 

4.  Lubricate  the  Drain  Cleaning  Machine,  if 

necessary,  according  to  the  Maintenance 

Instructions. 

5.  Use tools and accessories that are designed 

for your drain cleaner and meet the needs of 

your application. 

The correct tools and accessories allow you 

to  do  the  job  successfully  and  safely. 

Accessories  suitable  for  use  with  other 

equipment  may  be  hazardous  when  used 

with this drain cleaner. 

6.  Clean  any  oil,  grease  or  dirt  from  all 

equipment  handles  and  controls.  This 

reduces  the  risk  of  injury  due  to  a  tool  or 

control slipping from your grip. 

7.  Inspect  the  cutting  edges  of  your  tools.  If 

necessary, 

have 

them 

sharpened  or 

replaced  prior  to  using  the  Drain  Cleaning 

Machine. Dull or damaged cutting tools can 

lead to binding and cable breakage. 

8.  Inspect  cables  and  couplings  for  wear  and 

damage.  Cables  should  be  replaced  when 

they  become  severely  worn  or  corroded.  A 

worn  cable  can  be  identified  when  the 

outside coils become flat. Worn or damaged 

cables can break causing serious injury. 


Machine Set-Up 

WARNING 

Do  not  place  machine  in  water.  Water  entering 

the motor can result in electrical shock. 

To  prevent  serious  injury,  proper  set-up  of  the 

machine  and  work  area  is  required.  The 

following  procedures  should  be  followed  to 

set-up the machine:


Plug  the  Drain  Cleaning  Machine  into  the 

electrical  outlet,  making  sure  to  position  the 

power cord along the clear path selected earlier. 

If the power cord does not reach the outlet, use 

an extension cord in good condition. 


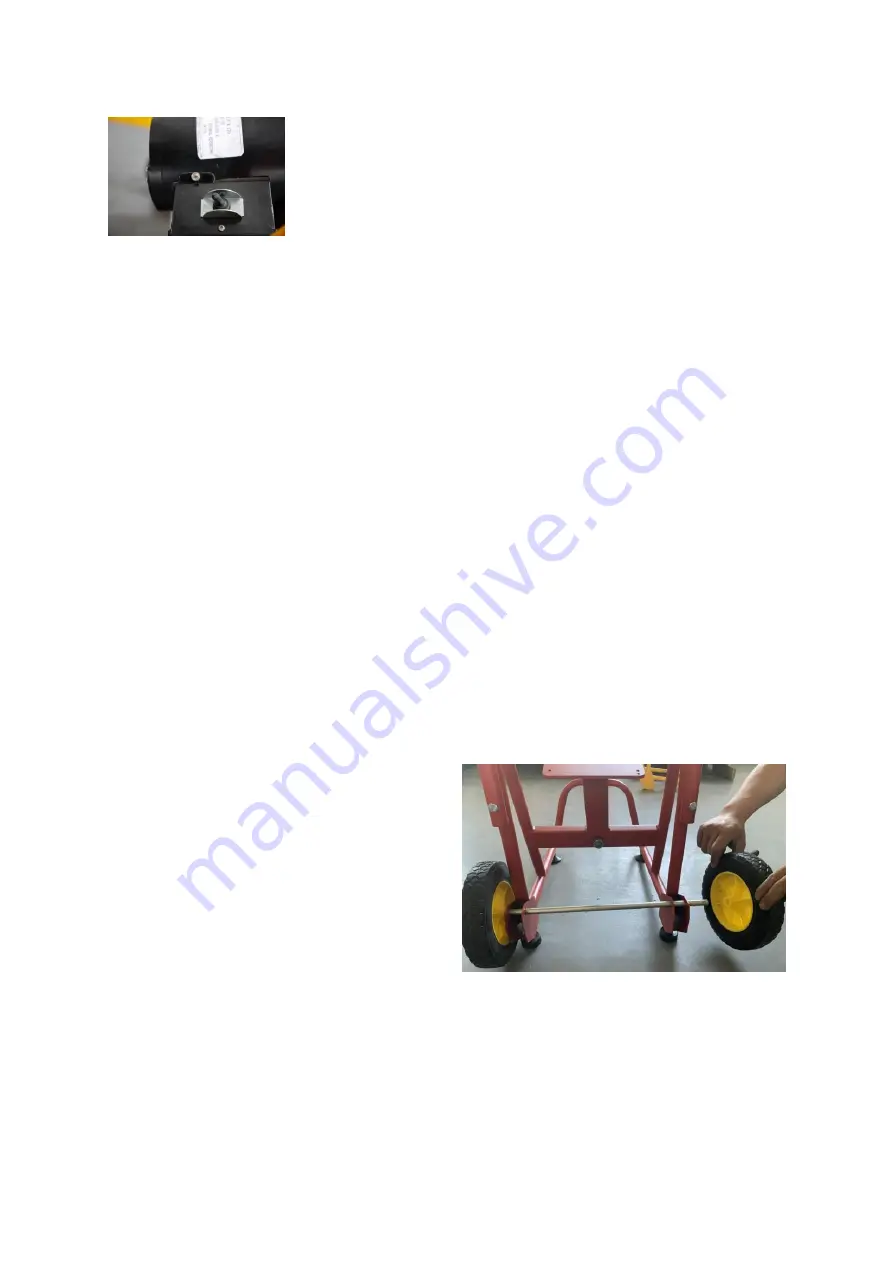
Installing Wheels 

1. Install retaining clip into groove on one end of 

axle. 

2. Slide one wheel onto axle with the boss away 

from the clip. (See Figure 3.) 

3. Fully insert axle through hole in bracket. 

4. Slide second wheel onto axle, boss first. 

5. Install retaining clip into groove. 


Figure 3 

– Assembling Wheel 


Warning 

To avoid electric shock and electrical fires, never 

use an extension cord that is damaged or does 

not meet the following requirements: 

If  the  wire  thickness  is  too  small,  the  cord  may 

Summary of Contents for AG100

Page 1: ...ing Machine Operation Manual WARNING Read this Operator s Manual carefully before using this tool Failure to understand and follow the contents of this manual may result in electrical shock fire and or serious personal injury ...

Page 2: ...rease the risk of electrical shock When operating a tool outside use an outdoor extension cord marked W A or W These cords are rated for outdoor use and reduce the risk of electrical shock Use only three wire extension cords which have three prong grounding plugs and three pole receptacles which accept the tool s plug Use of other extension cords will not ground the tool and increase the risk of e...

Page 3: ...idents are caused by poorly maintained tools Use only accessories that are recommended by the manufacturer for your model Accessories that may be suitable for one tool may become hazardous when used on another tool Keep handles dry and clean free from oil and grease Allows for better control of the tool Service Tool service must be performed only by qualified repair personnel Service or maintenanc...

Page 4: ...rical system An integral Ground Fault Circuit Interrupter GFCI is built into the line cord A FOR OFF REV or 1 OFF 2 switch controls drum and cable rotation and a pneumatic foot switch provides ON OFF control of the motor protect other cables The Solid Core Integral Wound cable is durable and kink resistant The cable has a quick change coupling system for connecting or disconnecting tools The optio...

Page 5: ...rpened or replaced prior to using the Drain Cleaning Machine Dull or damaged cutting tools can lead to binding and cable breakage 8 Inspect cables and couplings for wear and damage Cables should be replaced when they become severely worn or corroded A worn cable can be identified when the outside coils become flat Worn or damaged cables can break causing serious injury Machine Set Up WARNING Do no...

Page 6: ...out the foot switch Check the belt guard to insure that it is securely fastened to the drain cleaner Do not operate without guard in place Operating Instructions Always wear eye protection to protect your eyes against dirt and other foreign objects Wear HONGLI drain cleaning gloves Never grasp the rotating cable with anything else including a glove or a rag They can become wrapped around the cable...

Page 7: ...cable and machine See Figure 6 Figure 6 In Operating Position Manually Feeding Cable 4 Move the FOR OFF REV switch to the FOR FORWARD position Do not de press the foot switch yet FOR OFF REV refers to the drum cable rotation and not to the direction of cable movement Do not rotate the cable in reverse except as specifically described in these instructions Running the drain cleaner in REV REVERSE c...

Page 8: ...h if used less Place a drop of oil on each of the bearing points thrust bearing clutch jaws etc at least once a year Cables Cables should be thoroughly flushed with water to prevent damaging effects of sediment and drain cleaning compounds Periodically lubricate cables and couplings When not in use store cables indoors to prevent deterioration by the elements Cables should be replaced when they be...

Reviews: