background image

Chapter 1 - Basic info

41

basic camera operations

Turning on the camera....................................................................................................
Using the shutter............................................................................................................
About the drive dial........................................................................................................
Using the front and rear dial............................................................................................
Holding the system.........................................................................................................
Backlight button.............................................................................................................

4

42
43
44
45
46
47

Summary of Contents for DM System

Page 1: ...Mamiya DM System User s Manual ...

Page 2: ...e Attaching the neckstrap Using the eyepiece shutter 3 Preparing the battery and compact flash card Inserting the camera batteries Battery power icons Camera sleep mode and battery care Inserting and removing the digital back battery Charging the digital back battery Digital Back battery power status Formatting the compact flash card in MAC Formatting the compact flash card in windows Inserting an...

Page 3: ...o focus function AF Assist infrared light 6 Exposure Modes Program AE Aperture Priority AE Av Shutter Priority AE Tv Manual Mode M Sync Mode Custom Function Mode Auto Mode mechanism Exposure Metering Modes Exposure warnings Exposure compensation AE Lock Mode Auto Bracketing Mode Taking photos with the mirror up Mirror up delay Self Timer Mode Interval photography Long Exposure Mode Contents 41 42 ...

Page 4: ...exposure alarms Checking focus Setting the white balance Checking composition using the grid Changing the color of the grid lines Browsing through images Flagging or creating comments in shoot view 9 Editing images Editing view Browsing through images Viewing information and EXIF data Selecting multiple images Flagging creating comments or deleting images Sorting images 10 Image file management an...

Page 5: ...he software Activation The interface Toolbars Browser Tool palate Library Capture Color Exposure Compose Details Adjustment Process Recipe Batch Organising the workflow Importing images Exporting files Organising Images Moving to folders Working with albums Tethered capture Using the white balance tool Color balance Adjusting colors Optimising exposure Managing exposure using curves and high dynam...

Page 6: ...ash photography Rear curtain sync Flash compensation settings 13 Custom functions Setting custom functions Initializing user functions Camera custom functions quick guide Types of custom functions 14 System specifications Camera specifications Digital back specifications Trouble shooting Contents 169 170 171 172 173 174 177 178 179 180 181 182 183 184 185 189 190 192 193 ...

Page 7: ......

Page 8: ......

Page 9: ... know your camera system Thanks for your purchase Copyrights Trademarks Compliances Warranty Importance of the protective IR filter glass Important care notes for the digital back Important care notes for the camera body 2 3 4 6 7 9 1 ...

Page 10: ...miya DM System has been manufactured for heavy professional use and will give you a long service life if properly maintained In order to ensure long usage of the Mamiya DM System we recommend sending it in for annual servicing and keeping it up to date with firmware upgrades or tips and techniques for better handling as provided on our webpage See www mamiya com for more information ...

Page 11: ...emarks of Apple Computer Inc Macintosh is a trademark of Apple Computer Inc registered in the U S A and other countries Any Mamiya Digital Imaging Co Ltd equipment referred to in this document complies with the requirements in part 15 of the FCC Rules for a Class A digital device Operation of the Mamiya Digital Imaging Co Ltd equipment in a residential area may cause unacceptable interference to r...

Page 12: ...cts of nature by failure to follow supplied instructions or by modification or repair by unauthorized personnel Mamiya shall not be liable for any indirect damages including without limitation lost profits damage to other property caused by any defect in the Mamiya DM System damages based upon inconvenience loss of use of the Mamiya DM System loss of time commercial use incidental and or consequen...

Page 13: ...from i the use or the inability to use the product or software ii the cost of procurement of substitute goods and services resulting from any products goods data software information or services purchased iii unauthorized access to or alteration of your products software or data iv statements or conduct of any third party v any other matter relating to the product software or services The text and...

Page 14: ...m The protective IR filter glass is located on the underside of the Mamiya DM System s digital back WARNING The sensor is extremely sensitive to ESD Electro Static Discharge and can be damaged by it During some stages of the installation process the protective IR filter glass is exposed to the environment Do not touch the IR filter glass Any contamination of the IR filter glass such as dust or fin...

Page 15: ...purchased separately from your Mamiya dealer Spray away from the IR filter glass first to remove any condensation that may be inside the sprayer nozzle then spray the protective IR filter glass with ionized nitrogen to remove large dust particles Prepare the cleaning wipe to fit the width of the protective IR filter glass as shown in the above illustrations Do not touch any part of the wiping clot...

Page 16: ...dues from these products may permanently cloud the glass plate Never spray compressed air directly on the digital back Do not reuse cleaning wipes Put the protective cover over the sensor plate whenever the digital back is not attached to the system To prevent contamination of the sensor do not remove the protective IR filter glass The protective IR filter can be replaced only by Mamiya trained se...

Page 17: ...e battery when camera is not used for a long period of time Always keep covers on lenses and camera body Do not store the camera at temperatures exceeding 40 C 105 F and 10 C 15 F Avoid humid or sea air environments Prolonged disuse shortens camera life Periodically exercise the shutter at different speeds lens diaphragms at different apertures and focusing mechanism Protect camera against rain an...

Page 18: ...Chapter 1 Basic info 10 ...

Page 19: ...s and functions LCD Displays Viewfinder LCD Liquid Crystal Display Basic description of home screen on digital back Battery charger parts and functions Note on batteries for camera rechargeable vs disposable Attaching the neckstrap Using the eyepiece shutter 2 12 13 14 15 16 17 18 19 20 21 ...

Page 20: ...otographic results Images are shot in 16 bit RAW files with high resolution exceptional color accuracy and exquisite detail of which not a single megapixel is squandered due to the premium quality 33 28 and 22 megapixel sensors A comprehensive range of 16 precision lenses are available for the Mamiya DM System user all constructed drawing on over 60 years of experience and innovation For demanding...

Page 21: ...stment dial Strap lug Synchro terminal Electronic shutter release contact AF lock button Focus mode selector lever Lens release button C S M UP L Eyepiece shutter lever Hot shoe Main LCD Exposure mode dial Rear dial Mirror Do not touch the mirror Strap lug Electronic contacts Front dial Lens mount alignment mark Shutter release button Drive dial Depth of field preview button ...

Page 22: ...ation button Auto bracketing button Digital back Auto exposure lock button AEL Exposure metering button Auto bracketing icon Lens shutter icon Synchro mode icon AE lock icon Program AE mode icon Auto focus lock icon Custom function icon Aperture User function icon Repeat mode icon Focal plane shutter icon Mirror up mode icon Focus area icon Exposure compensation Spot metering icon Self timer icon ...

Page 23: ... Chapter 2 Getting to know your camera system Viewfinder LCD Auto focus area frame During actual use only the relevant icons and indicators are displayed During actual use only the relevant icons and indicators are displayed ...

Page 24: ...to know your camera system Liquid Crystal Display Liquid Crystal Display Due to the limitations of the space and letters words and letters on the LCD are abbreviated Display examples of the main LCD Display examples in the custom function mode ...

Page 25: ...ing to know your camera system Basic description of home screen on digital back Camera settings Shoot view Edit view Set up menu Remaining battery power Number of remaining shots Number of images in the current folder or on the disk Stylus ...

Page 26: ...ng to know your camera system DIGITAL BACK CHARGER AND BATTERY The Mamiya DM System is sold with a Haenel MCL 103 battery charger with 12 volt DC power supply and a set of 5 international socket plugs The lithium ion battery is 2350Ah power ...

Page 27: ...isposible alkaline or lithium batteries rechargeable nickel metal hydride Ni MH or nickel cadium batteries can be used In this case custom setting 04 battery type on the camera body must be changed to 1 Ni CD Ni MH Do not mix different types of batteries or old ones with new ones and ensure the batteries are placed with the correct polarity ...

Page 28: ...the neck strap through the mounts and secure it using the buckle as illustrated After attaching the strap pull it to make sure it does not loosen at the buckle Caution To ensure safety pull the ends of the strap taut and check that they are fastened securely to the metal mounts on the camera C M UP ...

Page 29: ... Close the eyepiece shutter when there is a strong light source behind the camera or when pressing the shutter release button without looking through the viewfinder This prevents exposure error due to light entering from the viewfinder Turn the eyepiece shutter lever in the direction of the arrow ...

Page 30: ...Chapter 1 Basic info 22 ...

Page 31: ...battery Charging the digital back battery Digital back battery power icons Formatting the compact flash card in MAC Formatting the compact flash card in windows Inserting and removing the compact flash card Attaching and removing a lens Detaching the digital back Adjusting the camera diopter Replacing the diopter correction lens Attaching to a tripod 3 24 25 26 27 28 29 30 31 32 34 36 37 38 39 ...

Page 32: ...e and pull out the battery holder 2 Insert the batteries while ensuring their polarities are properly aligned with the and markings on the battery case 3 Return the battery holder to its case and lock it by turning the lever clockwise Make sure it is fixed firmly in place Set the drive dial to L to turn off the power Use six AA alkaline or lithium batteries C S M UP L ...

Page 33: ...ve new batteries on hand Camera will still operate There is very little power remaining Camera will stop operating soon Set the shutter release mode selector lever to L to turn the power off and replace the batteries with new ones When the batteries are spent batt flashes on the main LCD and the viewfinder s LCD when the shutter release button is pressed When replacing the batteries be sure to use...

Page 34: ...arrying spare batteries in remote or foreign locations 4 Battery performance decreases in low temperatures Keep them warm when in cold climates or locations External battery case PE401 is available as an optional accessory 5 Store the batteries in a cool and dry place away from direct sunlight 6 Remove the batteries from the camera body when not in use for a long time 7 Replace the batteries with ...

Page 35: ...y slot cover Removing the battery slot cover 2 Press the battery into the recess on the bottom of the Mamiya DM System digital back and then slide it across until it snaps into place Inserting the battery Chapter 3 Preparing the battery and compact flash card Inserting and removing the digital back battery 2 1 ...

Page 36: ...t use any power supply cables other than the cable provided Many factors contribute to the amount of shots that can be taken with a single battery The following will help increase the battery life 1 Set the Mamiya DM System to enter sleep mode or turn it off when not in use 2 Set the backlight on the digital back to turn off after the camera has been idle for a certain amount of time 3 Avoid leavi...

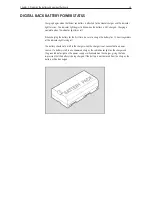
Page 37: ...ns off When charging the battery for the first time be sure to charge the battery for 12 hours regardless of the indicator light turning off The battery should not be left in the charger when the charger is not connected to a power source If a battery is left in an unpowered charger the red indicator light on the charger and the green indicator light on the power supply are illuminated on the char...

Page 38: ...able disk to be formatted 5 Click the Erase tab 6 In the Volume Format box select MS DOS FAT32 7 In the Name box type MamiyaCF 8 Click Erase 9 In the confirmation message that appears click Erase Formatting is complete when the progress bar disappears from view the Volume Format box shows Mac OS Extended journaled and the Name box shows Untitled 10 On the desktop select the MamiyaCF volume 11 Sele...

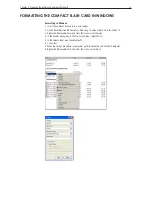
Page 39: ...2 On the desktop click My Computer Preparing a Compact Flash Card for Shoot 13 3 Right click Removable Disk and from the menu select Format 4 In the Format dialog box in the File System box select FAT32 5 In the Volume label box type MamiyaCF 6 Click Start 7 When the format procedure is complete go to the desktop and click My Computer 8 Right click Removable Disk and from the menu select Eject ...

Page 40: ...ter 1 Basic info 32 Chapter 3 Preparing the battery and compact flash card Inserting and removing the compact flash card 1 Open the compact flash door 2 Insert the compact flash Open the door Compact flash ...

Page 41: ...Chapter 1 Basic info 33 Chapter 3 Preparing the battery and compact flash card Inserting and removing the compact flash card Open the compact flash door and then press the release button Release button ...

Page 42: ...ody cap just like removing a lens by pushing the lens release button backward and then turning the front body cap counter clockwise and lift out To remove the front lens cap squeeze the shiny sections together and lift out To remove rear lens cap turn it counter clockwise A 22 22 11 11 4 4 ft m M F 8 0 m m 1 2 8 A F 22 2 2 11 11 4 4 f t m ...

Page 43: ...ens counter clockwise until it stops and lift it off Do not touch the distance ring or other rotating parts when attaching the lens When installing a lens do not press the lens release button After removing the lens from the camera body protect both ends by attaching the caps Oil dust fingerprints or water on the electronic contacts could result in malfunction or corrosion Wipe such impurities off...

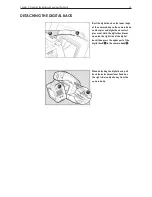
Page 44: ...ge of the camera body so the camera body contact pins and digital back contact pins meet Hold the digital back lever open on the right side of the digital back then press the upper part of the digital back to the camera body When detaching the digital back pull back the detachment lever found on the right side and pull away from the camera body B A ...

Page 45: ...hing Look through the viewfinder and make sure that the focus frame rectangle with circle is in sharp focus If it is not turn the diopter adjustment dial in the direction if you are nearsighted and in the direction if you are farsighted If this is not sufficient consider using an optional diopter correction lens See below Diopter correction lens Range of adjustment DE401 standard 2 5 to 0 5 DE402 ...

Page 46: ...detach 3 Insert a new diopter by aligning it to the base of the diopter holder and sliding it upwards into place then reattaching the rubber eye piece If there is dirt or dust on the lens surface remove it with a blower or sweep it off gently with a lens brush If there are fingerprints or dirt on the lens surface wipe away with a piece of clean soft gauze Using solvents could discolor the diopter ...

Page 47: ... compact flash card Attaching to a tripod When using a tripod with 3 8 screw instead of 1 4 screw remove the small screw from the tripod screw hole on the bottom of the body using a plus screwdriver then use a coin to remove the tripod screw adapter bushing A B ...

Page 48: ...Chapter 1 Basic info 40 ...

Page 49: ...Chapter 1 Basic info 41 Basic camera operations Turning on the camera Using the shutter About the drive dial Using the front and rear dial Holding the system Backlight button 4 42 43 44 45 46 47 ...

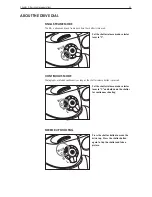
Page 50: ...on the camera C S M UP L 1 Set the drive dial to S single frame advance mode The drive dial has an S single frame advance mode setting and a C continuous advance mode setting When set to L the power is turned off When set to M UP the mirror moves into the set postion ...

Page 51: ...r release button has a two step action The first step is the half press when the button is pressed lightly When half pressed the camera functions are activated When the shutter button is pressed further down the shutter is tripped This position is called the release position Normal Half press Release position ...

Page 52: ...hs are taken continuously as long as the shutter release button is pressed Mirror up Shooting Set the shutter release mode selector lever to S Set the shutter release mode selector lever to C and hold down the shutter for continuous shooting Press the shutter button to move the mirror up Press the shutter button again to trip the shutter and take a picture C S M UP L C S M UP L C S M UP L ...

Page 53: ...tings such as focus area changing shutter speed and aperture selecting exposure metering modes choosing exposure compensations choosing auto bracketing modes and designating times for mirror delay the self timer and interval photography For details on how to use the front and rear dial for the above mentioned sections refer to their specific sections in this user s manual ...

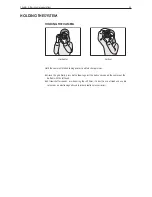
Page 54: ...ain sharp pictures Grasp the grip firmly press both elbows against the body and support the camera at the bottom with the left hand At slow shutter speeds or when using the self timer it is best to use a tripod and a cable release or an electromagnetic cable release optional accessories Holding the Camera Horizontal Vertical ...

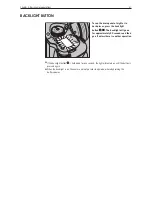
Page 55: ...in on until the button is pressed again When the backlight is on the camera will not go into sleep mode whereby draining the battery power P Av Tv M X C F C 1 C 2 C3 A To see the main panel at night or in dark places press the backlight button The backlight will go on for approximately 20 seconds and then go off unless there is another operation ...

Page 56: ...Chapter 1 Basic info 48 ...

Page 57: ...asic info 49 Focusing the camera Focusing the camera Focus area Manual focus Manual focusing using the focus mark When auto focus fails Using the auto focus function AF Assist infrared light 5 50 51 52 52 53 54 55 ...

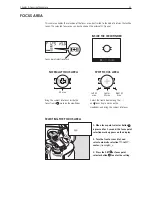
Page 58: ...ed focus area can be checked on the external LCD panel Selecting the focus area Select the frame from among the and focus frame marks on the viewfinder and bring the subject into focus Inside the View finder Normal focus area Spot focus area P Av Tv M X C F C 1 C 2 C3 A B 1 When focus point selector button is pressed for 1 second the focus point selection mark appears on the display 2 Turn the fro...

Page 59: ...s done the Auto Focus inscription on the lens barrel is covered and the lens can then be focused manually When the Focusing Ring is set in this position the external LCD display on the top of the camera will show It is not necessary to set the Focus Mode Selector on the body to M To switch back to auto focus simply slide the focusing ring back towards the camera and the Auto Focus inscription on t...

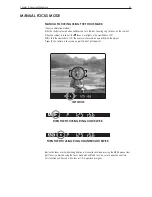
Page 60: ...iewfinder s LCD If is lit in the viewfinder s LCD the camera is focused on a point behind the object If is lit the camera is focused on a point in front of the object Use the focus mark when taking photos in manual focus mode or using the M645 manual lens If focus is adjusted using the focus mark with an M645 lens be sure to open the aperture This function can be used with a lens of f 5 6 aperture...

Page 61: ... into focus an object at the same distance as the object you want to photograph lock the focus using the focus lock mechanism then take the picture Low contrast subject blue skies white walls and other objects Subjects with continuous repeated patterns building exteriors blinds etc Extremely backlit reflective subjects car bodies water surfaces etc When the subject is far smaller than the focus fr...

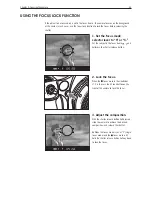
Page 62: ...r to S or C Put the subject in the focus frame and halfpress the shutter release button 2 Lock the focus When the focus mark in the viewfinder LCD is lit press the AF lock button on the front of the camera to lock the focus 3 Adjust the composition With the shutter release button half pressed slide the camera to achieve the desired composition and release the shutter When the focus mode is set at ...

Page 63: ...ssists the camera s auto focus function The AF assist infrared light is emitted only when the focus mode is set to S single focus mode Effective range of the AF assist infrared light is limited It does not reach distant subjects Range 9m 29 5 ft using 80 mm f 2 8 lens under test conditions When using a lens hood or a bellows lens hood sold as an optional accessory that may interfere with the assis...

Page 64: ...Chapter 1 Basic info 56 ...

Page 65: ... M Sync Mode Custom Function Mode Auto Mode mechanism Exposure Metering Modes Exposure warnings Exposure compensation AE Lock Mode Auto Bracketing Mode Taking photos with the mirror up Mirror up delay Self Timer Mode Interval photography Long Exposure Mode 6 58 59 60 61 62 63 64 65 66 67 68 69 70 72 74 75 76 ...

Page 66: ...ambient light This mode is best suited for general photography allowing the user freedom to concentrate on the subject If a correct exposure cannot be obtained the shutter speed and aperture value blink In such cases the pictures can be taken but they may turn out too bright or too dark P Av Tv M X C F C 1 C 2 C3 Turn the exposure mode setting dial to P program AE position ...

Page 67: ...ing portraits or landscapes The shutter speed value will blink when the subject is too dark or too bright for a correct exposure To obtain the correct aperture adjust the aperture value until the shutter speed value stops blinking and remains lit 1 Turn the exposure mode setting dial to Av aperture priority AE position 2 Turn the front or rear dial to set the desired aperture P A v Tv M X CF C 1 C...

Page 68: ...e used to blur motion on purpose The aperture value will blink when the subject is too dark or too bright for a correct exposure To obtain the correct aperture adjust the shutter speed value until the aperture value stops blinking and remains lit 1 Turn the exposure mode setting dial to Tv shutter priority AE position 2 Turn the front or rear dial to set the desired shutter speed P Av T v M X CF C...

Page 69: ...er speeds can be selected including bulb tIME and manually from 60 mins to 1 4000 sec Aperture values can be set from maximum to minimum aperture 1 Turn the exposure mode setting dial to M Manual position 2 Turn the rear dial to set the desired aperture 3 Turn the front dial to set the desired shutter speed P A v T v M X CF C 1 C 2 C 3 P A v T v M X CF C 1 C 2 C 3 ...

Page 70: ... fixed at 1 125 sec for synchronization To adjust synchro speed turn the rear dial When using a large flash unit for use in studios changing the synchronizing speed is recommended When 1 800 sec shutter speeds can not be achieved even though the leaf shutter lens is attached try another exposure mode P T v A v M X CF C 1 C 2 C3 ...

Page 71: ...Chapter 1 Basic info 63 Chapter 6 Exposure Modes CF Custom Function Mode Both the camera functions and methods can be changed by using custom functions P T v A v M X C F C 1 C2 C3 ...

Page 72: ... 6 Exposure Modes Auto mode mechanism When using the leaf shutter lens the leaf shutter s working range is from 1 800 sec to 1 sec For other speeds 1 4000 1 800 sec 1 60sec bulb use the focal plane shutter P Av Tv M X C F C 1 C 2 C3 ...

Page 73: ...he subject conditions centerweighted average spot exposure metering is selected automatically and the correct exposure is measured Spot exposure metering is automatically selected when the brightness of the spot exposure metering range becomes darker than the brightness of the entire screen If there is very little difference between the spot exposure metering value and center weighted average expo...

Page 74: ... cannot be obtained Warnings that the exposure is outside the metering range Important When a polarizing filter is used ensure that a circular polarizing filter circular filter C PL is used The correct exposure cannot be obtained with a normal polarizing filter PL Program AE P The shutter speed and f number blink Aperture priority AE Av The shutter speed blinks Shutter priority AE Tv The f number ...

Page 75: ...hen a Metz flash is not equipped 1 When exposure compensation button is pressed appears on the external LCD When the front or rear dial is turned counterclockwise the exposure is increased conversely when it is turned clockwise it is decreased The exposure compensation value can be checked on the external LCD or LCD inside the viewfinder 2 After taking the pictures press exposure compensation butt...

Page 76: ... lever is turned to the L power OFF position or after a lapse of one hour the AE lock mode will automatically be cancelled In the Manual M exposure mode the AE lock function cannot be used When the exposure metering value difference display appears press AEL button for about 1 second The one push shift function is now activated to shift to the shutter speed based on the metered result 1 Turn the e...

Page 77: ...viewfinder LCD blinks u for underexposure and o for overexposure By turning the front or rear dial in the AE lock mode the aperture and shutter speed value can be changed without changing the exposure value that is set when entered into AE lock mode In the P mode Program AE mode turning either the front or rear dial shifts the program to PH and PL When in Av Aperture priority AE or Tv Shutter prio...

Page 78: ...utter release mode selector lever to the S or C position When set at the S position one frame can be shot with each press of the shutter release button In the C mode the camera takes three or two frames successively with one press of the shutter release button 2 By pressing the auto bracketing button auto bracketing mode is selected In the main LCD the auto bracketing mark will flash on and off As...

Page 79: ...mark blink on the LCD inside the viewfinder Furthermore the auto bracketing mark blinks the bracket step width is displayed and the shooting sequence can be checked on the external LCD 5 Press the auto bracketing button then turn the front dial to OF to cancel Then press the auto bracketing set button or half press the shutter button to return to the normal display mode P Av Tv M X C F C 1 C 2 C3 ...

Page 80: ...es can be made when the auto bracketing mode is set before taking photos with mirror up After the set time mirror up photography will be cancelled The mirror will return to the original position if the lens is removed from the camera body P Av Tv M X C F C 1 C 2 C3 C S M UP L 1 Set the drive dial to M UP 2 Select S single focus mode by turning the focus mode selector lever 3 Turn the exposure mode...

Page 81: ...hy can be taken Another method is to select self timer then turn the drive dial to M UP When using auto focus the operational method is the same as 1 to 3 1 Press the self timer button and turn the front dial to On 2 Turn the rear dial to select the time needed 0 5 1 second to 10 seconds allows for increases by the second while 10 to 90 seconds increases by 10 seconds per turn For 2 to 10 minutes ...

Page 82: ...nder s eyepiece adversely affecting the exposure metering Turn the eyepiece shutter open close knob to close the eyepiece shutter then take the pictures Mirror up delay photography can be achieved after setting self timer mode by turning the drive dial to M UP Mirror up mode 1 Make sure the camera is firmly attached to the tripod 2 Press the self timer button to set the self timer mode to 3 Turn t...

Page 83: ...mode as On 4 Turn the rear dial to set the interval time Settings include 0 seconds no interval time 1 to 10 seconds increased by the second 10 to 90 seconds increased in units of 10 2 to 10 minutes increased by the minute or 10 to 60 minutes increased in units of 10 minutes per turn 5 Turn the front dial to the repeat mode rP 6 Turn the rear dial and choose your preferred duration by turning Sett...

Page 84: ...tripod As the camera is electronically controlled even during exposures it is recommended to replace batteries before bulb exposure 1 Turn the exposure mode dial and set it to M manual mode 2 Turn the front dial to select bulb then turn the rear dial to set the aperture 3 Determine the composition focus then take the picture The shutter remains open as long as the shutter release button is pressed...

Page 85: ...ack Turning off the digital back Changing the interface language Setting the date and time Defining a base name for your shots Adding notes or copyrights to your shots Choosing a new folder for your shots Creating a new folder Connecting the firewire cable for tethered mode 7 78 79 80 81 82 83 84 85 86 87 88 ...

Page 86: ...r 7 Basic Digital Back Operations Using the Stylus The digital back is supplied with a stylus Use the stylus to tap the touch screen To remove the stylus for use slide it out of the slot located at the top of the digital camera back ...

Page 87: ... Edit your images Turn the camera and digital back on and perform some basic steps before taking the first shot View the predefined camera settings choose another setting or make changes to specific camera settings Take a shot Check the exposure focus and composition of the shot and set the gray balance for future shots Organize the images using the Mamiya DM System s digital back editing tools ...

Page 88: ... first time using the compact flash card with the digital camera back format the card For detailed instructions on formatting the compact flash card see the Formatting a compact flash card in MAC Windows in chapter 3 3 Press and hold the On Off button on the camera back until the orange light turns on and then release the On Off button The light turns green and a beep sounds to indicate that the c...

Page 89: ... menu has been changed the camera saves the new setting and then shuts down When using a digital magazine Ø Press the On Off button When working in tethered mode Do one of the following When not using a compact flash card on the desktop right click the compact flash card and select Move to Trash Apple Mac OS X operating system or Eject Microsoft Windows operating system and then unplug the FireWir...

Page 90: ...Chapter 1 Basic info 82 Chapter 7 Basic Digital Back Operations Changing the Interface language 1 Scroll down and then tap Interface Language 2 Tap the desired language ...

Page 91: ...Chapter 1 Basic info 83 Chapter 7 Basic Digital Back Operations Setting the Date and Time 1 Scroll down and then tap Date and Time 2 Using the virtual keypad tap the date and time values and then tap ok ...

Page 92: ... Digital Back Operations DEFINING A BASE NAME FOR YOUR SHOTS Define a base name for your shots The Mamiya DM System digital back will apply a name to your shots adding a number sequence each time until a base name is defined 1 Tap File name ...

Page 93: ...er 7 Basic Digital Back Operations Adding notes or copyrights to your shots 1 Tap the info button 2 Click in either the Description or Copyright Notice area 3 Use the virtual keypad to enter the desired information and then tap ok ...

Page 94: ...Chapter 1 Basic info 86 Chapter 7 Basic Digital Back Operations CHOOSING A NEW FOLDER FOR YOUR SHOTS Select the folder to save the shots in tap a folder and then tap choose ...

Page 95: ...sic Digital Back Operations CREATING A NEW FOLDER Shots are automatically saved to the Mamiya DM System digital back or to a compact flash CF card Create folders for easy organization of your shots 1 Tap Shots Folder 2 Tap down 3 Tap new ...

Page 96: ...amiya DM System The cable carries both communication signals and electrical power The cable is a hotplug cable that can be connected or disconnected without turning the computer off or quitting the application 1 Connect one end of the FireWire cable to the port at the bottom of the Mamiya DM System Make sure that the FireWire cable connector is aligned to the left of the Mamiya DM System Connectin...

Page 97: ...g the exposure with the picker tool Checking the exposure with the over or under exposure alarms Checking focus Setting the white balance Checking composition using the grid Changing the color of the grid lines Browsing through images Flagging or creating comments in shoot view 8 90 91 92 93 94 95 96 97 98 ...

Page 98: ...arms to view the overexposed and underexposed areas of the image Press the user button to view the histogram the exposure alarms and additional shot information when in Shoot view To maximize the display size of the shot double tap the image Checking Exposure with the Histogram 1 Tap histog 2 Examine the histogram to check that most of the exposure data lies within the exposure limits Exposure dat...

Page 99: ...istogram 2 Tap and then tap a spot on the image The tapped spot is marked by a magenta circle A magenta line on the histogram indicates the exposure data related to the spot Tap to enlarge the histogram The exposure meter 0 4 shows the overall exposure in f stops To remove the spot from the image tap on the histogram and then tap outside the image area ...

Page 100: ...e overexposed and underexposed areas of the image It is possible to configure which exposure areas appear overexposed or underexposed Chapter 8 Using the digital back settings and evaluating shots Checking Exposure with the Overexposure and Underexposure Alarms ...

Page 101: ...ncrease or reduce the magnification tap either in or out and then tap the image Each tap on the image changes the magnification by a fixed percentage 4 To pan the image tap the arrows 5 To revert to a view of the entire image tap fit Chapter 8 Using the digital back settings and evaluating shots Checking Focus ...

Page 102: ... WHITE BALANCE To set the white balance for future shots do one of the following 1 Do one of the following Include a gray card in the shot Ensure that there is a neutral gray area in the shot 2 Tap gray 3 Tap the gray card or on a gray area in the image 4 Tap OK to use the new white balance setting ...

Page 103: ...ent of an image This task is performed in Shoot view 1 Tap more and then tap grid The grid appears over the image 2 Evaluate the composition Moving the Grid Lines Move the grid lines to help align the composition This task is performed in Shoot view 1 Tap more 2 Tap gridset 3 Tap the line to be moved The selected line is highlighted 4 Use the arrows to move the grid lines as desired ...

Page 104: ...performed in Shoot view 1 Tap more 2 Tap gridset 3 Tap color The color of the grid lines changes 4 To cycle through to view additional colors continue to tap color Setting Grid Attributes Select the number of grid lines and the line type This task is performed in Setup view 1 Tap Shoot View Options 2 Tap Grid Setting 3 Set the grid attributes To set the number of grid lines tap Horizontal Grid Lin...

Page 105: ...sic info 97 Chapter 8 Using the digital back settings and evaluating shots Browsing Through Your Images Do one of the following Tap more and then tap the prev and next buttons Roll the user button back or forwards ...

Page 106: ... Shoot View While shooting flag your image or add a note as desired Then view the flag or note on the image in Edit view and in the image information 1 Tap the image and hold until the flag note and delete buttons appear 2 Do one of the following Tap flag to flag the image Tap note to add a comment about the image ...

Page 107: ...Basic info 99 Editing images Editing view Browsing through images Viewing information and EXIF data Selecting multiple images Flagging creating comments or deleting images Sorting images 9 100 101 102 103 104 105 ...

Page 108: ...view modes Browse through images Flag annotate and delete single or multiple images Move images from one folder to another Accessing Edit View from Shoot View When in Shoot view access Edit view directly without returning to the main menu In Shoot view tap more then tap edit The above image is Edit view ...

Page 109: ...Editing images Browsing Through Images To browse through images do one of the following Tap prev and next Use the scroll bar Roll the user button back or forward When moving from one image to the next the image is automatically selected ...

Page 110: ...asic info 102 Chapter 9 Editing images Viewing Information and EXIF Data 1 Tap more and tap an image 2 Tap view and select a single view Information saved with the image and the EXIF data appears beside the image ...

Page 111: ...103 Chapter 9 Editing images Selecting Multiple Images 1 In Edit view tap an image and hold the stylus on it until the Multi button appears on the image 2 Tap the Multi button and then tap the images that you want to select ...

Page 112: ...ic info 104 Chapter 9 Editing images Flagging Annotating and Deleting in Edit View 1 Tap the image and then tap flag note or delete If multiple images are selected the action is performed on all the selected images ...

Page 113: ...Chapter 1 Basic info 105 Chapter 9 Editing images Sorting Your Images 1 Tap more 2 Tap sort and select the desired sort method by name time or flag ...

Page 114: ...Chapter 1 Basic info 106 ...

Page 115: ...o bar Setting the exposure alarm Resetting the file name counter Formatting the compact flash card in portable mode Configuring the user button Configuring the user button for edit view Configuring a long press of the user button Aligning the touch screen Turning on the backlight Turning off the backlight Setting the volume for digital back sounds Setting personal information Restoring factory set...

Page 116: ... 108 Chapter 10 Image file management and preferred settings Selecting a Folder 1 Tap more 2 Tap folder 3 Tap on the desired folder and tap choose The Shots folder always appears at the top of the folder list Shots folder ...

Page 117: ...fo 109 Chapter 10 Image file management and preferred settings Moving Images 1 Tap an image and hold the stylus on it until the Move button appears on the screen 2 Tap Move 3 Tap the desired destination folder 4 Tap Move ...

Page 118: ...ngs Opening Images in Shoot View To view images at full screen size individual images can be opened in Shoot view This is useful for checking focus or composition To open a specific image in Shoot view do one of the following Tap the image and then tap shoot Double tap the image ...

Page 119: ... settings HOW TO TURN ON OVERLAYS WHEN SHOOTING After each shot indicators and information about the shot appear as an overlay Clear the overlays if this information is not to appear while shooting 1 Tap Shoot View Options 2 Tap On Shoot 3 On the Clear overlays bar tap Yes ...

Page 120: ...ngs Working in Full Screen View If desired hide the menu buttons and view shots full screen while you work 1 Tap Shoot View Options 2 Tap On Shoot 3 On the Maximize image bar tap Yes To view the menu buttons when working in full screen view tap the image or press the user button ...

Page 121: ...mber of lines and line attributes for the grid 1 Tap Shoot View Options 2 Tap Grid Setting The grid options appear To set the number of horizontal or vertical grid lines tap Horizontal Grid Lines Vertical Grid Lines and tap the desired number of lines To set the line type tap Line Type and select the desired line type ...

Page 122: ...ge file management and preferred settings Using the Crop Mask To show or hide the crop mask while shooting 1 Tap Shoot View Options 2 In the Crop Masking bar do one of the following To view the crop mask tap On To hide the crop mask tap Off ...

Page 123: ...gement and preferred settings Adjusting the Transparency of the Crop Mask To show or hide the crop mask while shooting 1 Tap Shoot View Options 2 Tap Crop Mask Transparency 3 Tap the desired intensity where 0 is opaque and 100 is completely transparent ...

Page 124: ...mage file management and preferred settings Adjusting the Transparency of the Histogram and Info Bar 1 Tap Shoot View Options 2 Tap Histogram Info Transparency 3 Tap the desired intensity where 0 is opaque and 100 is completely transparent ...

Page 125: ...pter 10 Image file management and preferred settings Setting the Exposure Alarm To set the exposure alarm to show underexposed areas overexposed areas or both 1 Tap Shoot View Options 2 Tap Exposure Alarm 3 Tap the desired setting ...

Page 126: ...nt and preferred settings Resetting the File Name Counter The Mamiya Digital System s digital back adds a number in sequence to the base name that is defined each time a shot is taken The counter can be reset to zero at any time 1 Tap File name 2 Tap reset ...

Page 127: ...orming as expected for example pictures cannot be saved on the card saving on the card takes a long time or if error messages concerning the card appear If the compact flash card is new or if the compact falsh card has been used on a non digital camera back do not perform a quick format Perform the procedure detailed in Formatting the compact flash card in MAC Windows in chapter 3 Formatting the c...

Page 128: ...Chapter 1 Basic info 120 Chapter 10 Image file management and preferred settings 3 Tap ok ...

Page 129: ...button for viewing indicators or flagging images in Shoot view and for flagging or deleting images in Edit view Configuring the User Button for Shoot View 1 Tap User Button 2 Tap Shoot view 3 In the Action bar select Indicators or Flag 4 If Indicators were selected in step 3 tap Actions Settings and select the desired indicators ...

Page 130: ...fo 122 Chapter 10 Image file management and preferred settings Configuring the User Button for Edit View To configure the user button for flagging or deleting images 1 Tap User Button 2 Tap Edit view 3 Tap Flag or Delete ...

Page 131: ...ment and preferred settings Configuring a Long Press of the User Button The User Button can be set so that a long press can either lock or unlock the touch screen or turn the display on or off 1 Tap User Button 2 Tap Long Press 3 Select the desired option ...

Page 132: ...Chapter 1 Basic info 124 Chapter 10 Image file management and preferred settings Aligning the Touch Screen 1 Tap Display 2 Tap Align Touch Screen 3 Follow the instructions on the screen ...

Page 133: ...Chapter 1 Basic info 125 Chapter 10 Image file management and preferred settings TURNING OFF THE BACKLIGHT 1 Tap Display 2 Tap Backlight Off After 3 Tap a power source 4 Tap the desired time ...

Page 134: ...Chapter 1 Basic info 126 Chapter 10 Image file management and preferred settings Turning On the Backlight AFTER 1 Tap Display 2 Tap Backlight Off After 3 Select the desired option ...

Page 135: ...Chapter 1 Basic info 127 Chapter 10 Image file management and preferred settings Setting the Volume for the Camera Back Sounds 1 Tap Display 2 Tap the desired option and set the volume as desired ...

Page 136: ...Chapter 1 Basic info 128 Chapter 10 Image file management and preferred settings Setting Personal Information 1 Tap Owner Information 2 Tap the desired option and set the volume as desired ...

Page 137: ... 1 Basic info 129 Chapter 10 Image file management and preferred settings Restoring Factory Settings 1 Tap Restore Factory Settings 2 Tap ok 3 Use the virtual keypad to enter the desired information and tap ok ...

Page 138: ...ge file management and preferred settings VIEWING INFORMATION ABOUT THE DIGITAL BACK Tap About The Mamiya DM System s digital back information is displayed on the About screen Copyright 2010 Mamiya Digital Imaging Co Ltd All Rights Reserved ...

Page 139: ...ance Adjusting colors Optimising exposure Managing exposure using curves and high dynamic range Managing highlight and shadows Variants Cropping an image Straightening and rotating an image Sharpening an image Noise reduction Removing post capture dust and spots Megadata Adding and resetting megadata to image files Creating a process recipe Processing completed images About batch Creating a web co...

Page 140: ...icense key Enter license code in the license activation dialogue box Type in your details in the required fields to activate the software Once entered press the Activate License button and activation will be validated by Phase One s activation server The software is now activated and ready for use Troubleshooting If experiencing problems activating the software follow the instructions provided in ...

Page 141: ... the most vital and useful collections there within The Cursor tools give you immediate access to the most used tools with just the click of the mouse The Cursor tools gives access to a number of closely related sub features e g zoom in and zoom out The Cursor tools can be activated by simple keyboard shortcuts Holding down the Shift button when using a given Cursor tools keyboard shortcut allows ...

Page 142: ...stments Grid Guides Rotate left right Select previous next Move variant to move to folder Tool Tab The Browser The Viewer Trash Undo Redo Edit selected Copy adjustments Capture Process Preferences Exposure warnings Cursor Tools Move to Focus mask Apply adjustments Composition mode Customize MAC ...

Page 143: ...ooming and panning image comparisons can easily be done To create more space for the Viewer hide the Tools and Brower which provides close to full screen viewing of the images and more room for other interface elements The top left Icon of the Viewer allows choice between one or multiple image viewer The Image exposure parameters The parameters are right on top of the image indicating the values o...

Page 144: ...ctions can be performed in the Browser such as rating images and some cursor tools can be used directly on the thumbnails By hiding the Browser there is more space for the Viewer Place the Browser next to or below the Viewer if desired Play with the configurations to find out which is most suitable Browser toolbar The Browser toolbar controls how the thumbnails in the Browser are displayed Here yo...

Page 145: ...eatures that will allow amongst other things the adjusting and processing of images Each Tool Tab contains a number of tools Each tool has it s own set of controls to adjust the image file The color space of the histograms Placed at the top of several of the Tool Tabs is a guidance histogram This histogram provides an up to date visualization of the exposure in the image The histogram reflects the...

Page 146: ...ormation on these folders will be discussed later on in this guide Quick The Quick tool tab includes a selection of key tools which gives easy access to tools for fast image enhancement In Base characteristics you can choose between different ICC camera profiles and film curves An ICC profile is automatically applied according to the make and model of the selected RAW file We have created several ...

Page 147: ...age and there are also advanced controls e g Curves which allow for fine tune adjustments Levels and Curves can adjust overall lightness values but also in the individual Red Green and Blue color channels Composition The Composition tool tab provides the crop feature and it s related settings Here aspect ratios can be applied to images to meet output format needs Rotate and Straighten tools are al...

Page 148: ...t any zoom level Use the Focus window to keep track of the sharpness in 100 view and the Spot Removal tool to get rid of dust and spots Adjustments The Adjustments tool tab provides a clipboard with image adjustments which can be copied from one image and applied to other images The default copy contains only the parameters where actual adjustments are made to the settings of the source image Here...

Page 149: ...n be configured You can decide what metadata will be included in the processed image file and it is also possible to systematically rename the output files as desired Batch Enable the user to see which images are in queue for processing and which images have been processed previously within the Batch tool tab The order of processing can be changed by drag and drop images can be deleted from the ba...

Page 150: ...File Import images or select the import images button to begin the import process Immediately a large dialogue box appears showing a preview of files to be imported This dialogue box also provides a range of options from which to choose Inserting a memory card into a card reader will also bring up the import dialogue window The Import window offers a range of options to make importing a quick and ...

Page 151: ...orting files the image file is processed meaning a new file is created based on the image file containing the editing added After process and export to another folder the original raw file can be found in the original folder Processed files can be exported in a range of formats that can be opened by industry standard imaging applications Read more on fileformats in the output chapter All files can...

Page 152: ...hould be edited Move the best examples or those with the highest rating to a separate folder using the Move To function Once rated and moved the best images can be quickly optimized before proofing to clients as JPEGs or creating web gallery The web gallery function built into Capture One is extremely quick File Make Web Contact Sheet The web contact sheet will in addition to the images show capti...

Page 153: ...rred to the Move To folder go to Library Application Folders Move To Folder An alternative way of working is to create a single folder that will always serve as the Move To for all images Follow the same procedure or simply navigate to a chosen folder highlight and Right Click Set as Move To Output Folder In the same way that Move To folders can be specific to a group of images or a nominated fold...

Page 154: ...the image to be removed and hit the backspace delete key or right click on the image and select delete Only the variant in the album is deleted the original image file in its folder remains How to move images between Capture One and the OS file browser Images can be dragged and dropped from the Capture One Browser into the OS file browser and vice versa Using the Option key during the drag drop op...

Page 155: ...ages directly onto the computer without any interim storage To shoot tethered connect the Mamiya DM System to the computer using a FireWire cable The digital back will automatically be recognized USB can be used if necessary The Capture Tab is the control center for shooting tethered To connect the firewire cable see Connecting the firewire cable for tethered mode section in chapter 7 When shootin...

Page 156: ...nd shot which is the white balance used by the camera when the image was shot Advanced users may prefer to create their own or to choose alternative options Kelvin Changes the color temperature of the image within the range 800 to 14000 degrees Kelvin By moving the slider to the right the image will become warmer yellowish and to the left cooler blueish To fine tune the green magenta balance it is...

Page 157: ...enu bar Quick or Cursor Tool bar The button will go orange to confirm that it is active Select an area of the image that looks neutral a grey or dark white area if possible The color picker takes this value as neutral grey and uses that information to map all other colors Auto White Balancing images Capture One has a built in auto white balance Select the image to be neutralized and then click the...

Page 158: ...lance and color balance settings you like Copy them with Adjustments Copy Adjustments in the menu bar Select the images you want to modify and use the Apply settings button on the menu bar to paste the settings to the image Images that are too dark can be lightened by up to 2 5 stops made 6 times brighter Bright images can theoretically be made darker by the same amount ...

Page 159: ...lied to additional images The advantage to setting the white balance first is because saved color adjustment presets are relative to the colorvalues created in whitebalance or at import A group of images can be white balanced to a neutral value and then a preset can be applied An example would be to use a preset to warm up the colors in a selected group of images Using the different controls in th...

Page 160: ...he mixture will be applied this ensuring a natural look to the selective changed colors Images like the feathers showing many colors in the relation with each other keep smoothness on a lower level It is also possible to just select one color slice from the menu below the sliders or choose global if you want to affect all colors at once This is however a more creative tool that shouldn t be used i...

Page 161: ...ogram and define an initial exposure ensuring that no highlight or shadow clipping occurs When this stage has been completed use the levels controls to fine tune the lightness and darkness of the mid tones of the image How to use the image adjustment slider Sliders provide the best way to adjust exposure and contrast Use one tool at a time before moving onto the next tool Exposure Adjusts the expo...

Page 162: ...g shadow areas and reducing contrast Saturation Increases or decreases saturation of the image When saturation is decreased the image is black and white Then the histogram changes from RGB to monochrome though the image is still in a RGB color space chosen as out output color space The saturation slider is not just saturation but intelligent saturation The negative values represent regular saturat...

Page 163: ...k point and white point adjustments have been brought in very slightly This has the effect of lightening the lighter tones and darkening the shadow tones in the image at the same time increasing contrast slightly The process has to be done very carefully in order to preserve the feeling that the image evokes The highlight warning function can be configured to provide visual feedback when adjusting...

Page 164: ...r tones and increasing the values of the tones at the three quarter tone mark as shown in the image The brightness values at the quarter tones before applying the curve are around 65 with image tonal values from black 0 to white at 255 The curve darkens these tones to around 50 whilst the three quarter tones at 190 are raised to 200 lightening them in the final image The inverse S curve has the op...

Page 165: ... images that have been accidentally over or underexposed to an extent that render them unusable with conventional exposure tools How to optimize the dynamic range of an image The dynamic range of an image is optimized at the shooting stage by adjusting exposure to capture the maximum amount of data This may result in an image that does not look optimal on the LCD display Bear in mind that around 1...

Page 166: ...f the image to be adjusted A point will be put on the curve and this allows very precise adjustment of the exact tonal area of the image that you prefer To fine tune this use the arrow keys on the keyboard This practice is much more accurate compared to relying on the sliders in levels to achieve an overall result How to prevent loss of detail in highlighted and shadowed images Correct exposure in...

Page 167: ...ut risk and without copying the image files New Variant creates a duplicate of the image using default settings The image is created as it came out of the camera or DNG file except rotation Clone Variant creates an exact duplicate of the image you are working on complete with any changes made The white frame of one image in the Viewer shows you which image you are working on In this case you work ...

Page 168: ...s from the original image metadata and Lens Cast corrections where appropriate with Digital Back files Clone Variants inherit all settings from the original image including white balance color exposure and other changes that have been made in Capture One With the exception of Lens Cast correction Digital Backs only and metadata any changes made to an original image can also be applied to a variant...

Page 169: ...preview inwards the cursor will turn into a two way arrow until the desired crop has been achieved To reposition the cropped area click in the middle and the button will turn into a cross Move the cropped area When the desired result has been achieved select any other button from the cursor tool selector The crop will be applied and the updated preview will fill the viewer How to reuse a crop sett...

Page 170: ...age that requires straightening It is easier to rotate the image first as the software automatically crops the rotated image to the maximum usable dimensions Following this the crop can be fine tuned by the user perhaps to fit to a specific aspect ratio such as 6x4 inches 10x15cm Applying straighten or crop settings to a group of images Straighten the image as required optimize the crop and then c...

Page 171: ...se rotate left right Rotate Left Right Allows rotation of 90 degree to the left or right By pressing shift while rotating Left Right you will rotate all selected image files Fine tune the rotation or rotating by mouse scroll over the slider this way you will change the degree of rotation by 0 1 at the time if carefully scrolled Rotate more than one image at the time by first selecting the images t...

Page 172: ...or post production or retouching in other software we recommend processing the image without sharpening applied How to sharpen an image Capture One has a range of presets formulated to provide good starting points for sharpening images for most purposes If the concept of sharpening is unfamiliar take a little time to look at how the settings change the appearance of images on screen at 100 and com...

Page 173: ...detail tools How to determine the right amount of sharpening A rule of thumb for sharpening used to be that the image should look over sharp on screen to look correct in print These ideas have been superseded The current thinking is that a 2 stage workflow is better First sharpen the fine detail in the image Use the capture or raw pre sharpening setting Secondly a more aggressive sharpening affect...

Page 174: ...er provides a clear view of the effect of filters on image noise How to remove noise from images Noise should be removed from the images using a combination of the above tools Capture One automatically applies some noise reduction to images based on the ISO and exposure data from the camera that is contained in the image metadata The default settings provide a good starting point for further adjus...

Page 175: ...e dust removal tool is a part of the spot removal tool After selecting Dust removal tool in the Type drop down menu mark up the dust spots on the image using the Spot cursor tool The size of the spot cursor tool can be adjusted by pulling the sides of the cursor tool circle or by using the Radius slider the dust removal circle is moved by placing the cursor inside the circle and moving it Switch b...

Page 176: ...he underlying colors and structure After selecting Spot removal tool in the Type drop down menu you can now mark up the spots on the image using the spot cursor tool The size of the Spot cursor tool can be adjusted by pulling the sides of the cursor tool circle or by using the Radius slider the spot removal circle is moved by placing the cursor inside the circle and moving it Switch between the in...

Page 177: ...refers to data that describes your image and how it was taken Raw files holds metadata in up to 4 different places Embedded EXIF Embedded IPTC IIM Embedded XMP XMP Sidecar file these 4 types of metadata will be automatically updated and read by Capture One Many users merely use metadata to keep keywords or simply copyright information ...

Page 178: ...e file except metadata is to prevent from removing information such as copyright from the image file by mistake If you have added metadata to an image file and wish to delete all added metadata use the local reset button How to add the same metadata to image files in the same session After adding the metadata the Local Copy allows you to select which of the metadata you wish to copy and then selec...

Page 179: ...bit output increases the color graduations from black to white in each of the three color channels from 256 in 8 bit output to 65 536 per channel in 16 bit This makes a huge difference in the way that an image can be adjusted without visible damage It also prevents banding on gradients such as skies How to create a process recipe Process Settings consist of a selection of options to create and out...

Page 180: ... is where you choose the output destination for processed files Click on the button and navigate to a suitable folder This can be on a local or networked drive This can also be set on the output location on the Library tool tab Process Summary The Process Summary window provides an overview of all the settings chosen for an image before processing This includes the actual and final processed size ...

Page 181: ...ng happens in the background without noticeable effect on the performance of the application There is the option to stop the batch queue enabling it to process images when other work has finished or overnight To set the application to work in this way go to the Batch Tool tab At the bottom of the tab press the Stop button Processing will not commence until this has been reset to Start When there a...

Page 182: ...e the quality of the images You can see the pixel size of thumbnails or preview size when adjusting the slider the number indicates how many pixels the images are wide Once all options have been selected choosing Export outputs a complete folder to add to your web site It is important that the name is in lower case and without spaces you can use hyphens or underscores When generating a Web Contact...

Page 183: ...pening can be applied to the images themselves not to the web contact sheet as a whole Workflow for adjusting exposure for images meant for the web The most effective way to adjust images quickly for output is to fine tune exposure and contrast then copy the settings and then to select all similar images and paste the settings to them ...

Page 184: ...Chapter 1 Basic info 176 ...

Page 185: ...Chapter 1 Basic info 177 Flash photography Flash photography Rear curtain sync Flash compensation settings 12 178 179 180 ...

Page 186: ... or extension tubes With TTL flash photography the reflection of the flash is metered and the intensity of the flash is adjusted automatically so TTL flash photography may not be suitable to all conditions In the cases described below we recommend using a flash meter to check the intensity of the flash or to use a manual flash setting Adapter SCA3952S CA3000C Type of Flash Metz Flash Unit ModuleC ...

Page 187: ...hen the background behind the subject is extremely bright or when there is a strongly reflective object in the background 3 When the background behind the subject is extremely dark outdoors at night etc 4 When light from the flash is incorrectly directed and falls too widely from the subject When a moving subject has been shot under this function the flash of light appears after the moving subject...

Page 188: ... adapter on the Metz flash and put it on the camera then lock the flash in place using the locking knob on the flash shoe Turn the shutter release mode selector lever to the S or C position and turn ON the flash power switch P Av Tv M X C F C 1 C 2 C3 A 2 When the flash charge confirmation lamp lights press the set button in The display appears on the main LCD panel 3 Turn the front or rear dial t...

Page 189: ...Chapter 1 Basic info 181 Custom functions Setting custom functions Initializing user functions Camera custom functions quick guide Types of custom functions 13 182 183 184 185 ...

Page 190: ...tions When at C 00 chose 1 A 2 B or 3 C to store a specific set of user function selections for the group of custom settings from C 01 to C 19 However if you set C 00 to 0 the settings used will be the default set 1 Turn on the power Turn the shutter release mode lever to the S or C position 2 Turn the exposure mode dial to select CF Custom Function mode 3 Turn the rear dial to select the settings...

Page 191: ...de dial CF custom function mode can be selected 2 By turning the rear dial user A b or C can be selected 3 Press and hold down set button for longer than 1 second and settings for A B C can be initialized or the settings can be returned to default The default user setting is User 0 P T v A v M X C F C 1 C2 C3 ...

Page 192: ...ge Front AFL Rear AEL Front AEL Rear AFL C 10 Shutter half press func tion AF operation AF operation AE Lock OFF no function C 11 AEL function lock unlock mode Continuous One shot While the shutter button is pressed C 12 AFL lock mode setting Set with AF lock only AF operation Continuous C 13 One push function M Mode Shutter speed shift Aperture value shift Off C 14 AF assist beam Fires Does not f...

Page 193: ...no sleep mode has been set C 04 Battery Type batt This function is used to set the batteries used in the camera so that the remaining battery charge will be displayed correctly on the external LCD panel 0 Alkaline 1 Ni CD Ni MH 2 Li ION ONLY FOR USE WITH VERTICAL GRIP C 05 Bracketing Stno Setting bracket s width for auto bracketing setting 0 3 Exposures 1 5 Exposures 2 7 Exposures C 06 Front Rear ...

Page 194: ...on 0 Shutter speed shift tv 1 Aperture value shift Av 2 No no C 14 AF assist setting AF_L The AF auxiliary light fires automatically when the subject is too dark to perform AF but this function can be used to prevent the AF auxiliary light from firing 0 On On 1 Off OF C 15 Flash sync FLSY When shooting moving subjects with flash you can set the synchronization timing This allows you to have the fl...

Page 195: ...era body C 98 Lens firmware version The current firmware version can be checked C 99 Body firmware version The current firmware version of the body can be checked Chapter 13 Custom functions Types of custom functions Liquid Crystal Display Due to the limitations of the space and letters words and letters on the LCD are abbreviated Display examples of the main LCD Display examples in the custom fun...

Page 196: ...Chapter 1 Basic info 188 ...

Page 197: ...Chapter 1 Basic info 189 System specifications Camera specifications Digital Back specifications Trouble shooting 14 190 191 193 ...

Page 198: ...pe operating range EV0 to EV18 ISO 100 Focus area Displays the focus area in the viewfinder screen AF assist beam Activates automatically under low light low contrast Range 9m when using AF80mm f 2 8 D lens AF lock By pressing the shutter release button halfway down in the AF S mode or by pressing the AFL button Exposure modes Aperture Priority AE Shutter Priority AE programmed AE PH PL setting po...

Page 199: ...ttery power icon spot metering icon dial lock icon flash compensation icon exposure compensation icon exposure compensation delay time Sync terminal X contact sync speed 1 125 sec Cable release socket On shutter button Remote control terminal On side of body electromagnetic cable release RE401 and RS402 can be purchased separately Self timer Self timer intervals can be set from 0 5 to 90 sec 0 5 1...

Page 200: ... 136MB 106MB 84MB ISO sensitivity 50 800 50 800 25 400 LCD screen touchscreen with stylos LCD size 6x7cm Image viewing Up to 20 images on LCD screen with 1 1 zoom Viewing tools Histogram spot meter f stop average exposure meter exposure alarms Languages English German French Spanish Italian Japanese Chinese Properties Operation conditions Temperature 0 40 C Humidity 15 80 RH non condensing Portabl...

Page 201: ... your benefit there are user s forums on our web page www mamiya com In the event that you think something is wrong or faulty with your Mamiya DM System please consult these pages first to see if the problem can be rectified before handing the System to your dealer for servicing ...

Page 202: ...Chapter 1 Basic info 194 www mamiya com ...

Reviews: