Mando Footloose user manual
08
English
A new way of moving
09
Adjustment of brake
How to use the
product properly
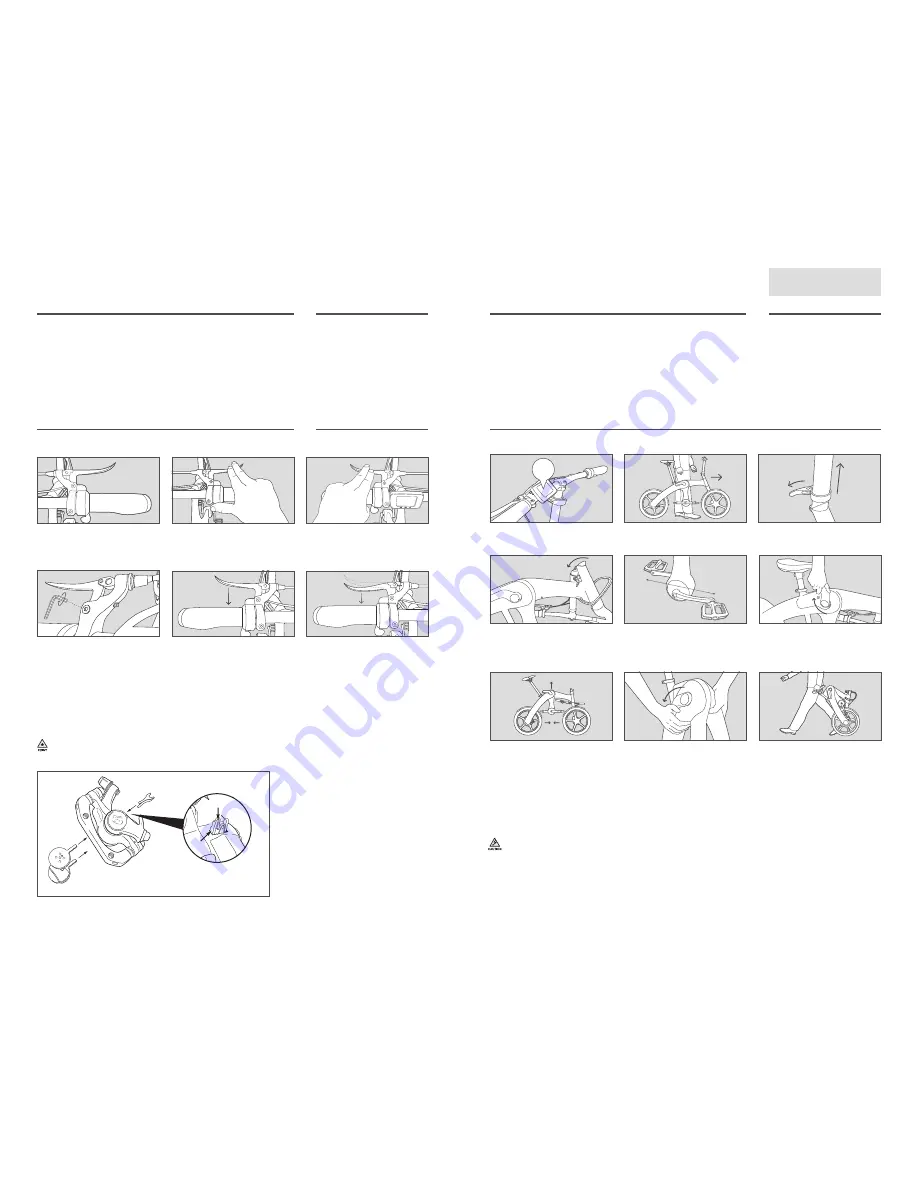
1. How to use the brake
3. How to replace the pad
A pad should be replaced when its total thickness is less than 3 mm.
①
How to remove the old pad
Back the inner adjustment knob all the way out (counterclockwise). Pull the pad spreader clip from
between the pads, then pull the pads out of the caliper one at a time.
②
Install a new pad and spring
Insert the new pads one at a time into the caliper.
C-3
1) Right lever = rear brake
2)
For stable use, it is recommended to use the
throttle with your thumb, grab the brake lever
with your forefinger and middle finger, and use
the rest of the fingers to grab the grip.
3) Left lever = front brake, use the same
method
2. How to adjust the brake reach
1) Use a 2mm hex wrench to adjust the
brake reach.
2) Initial position
3) The brake reach has been adjusted
(adjust the brake reach according to the
length of your fingers)
How to fold/ tips for folding
Mando Footloose is designed to be foldable so the volume of the product can
be reduced to allow easier storage and transport. Folding can be done by
operating the folding lever located in the center.
1. How to fold Mando Footloose
1) Ensure that the power is off.
2) It is recommended to stand on the left
side of Mando Footloose with the front
wheel heading forward.
Folding instructions
D
3) To fold the handlepost, loosen the
handlepost clamp folding lever and lift
the whole clamp upward.
4) When the handlepost clamp is lifted,
the whole handlepost can be folded
backward to its left side.
5) Check that the right pedal is forward the
cranks horizontal (incorrectly aligned
pedals may damage the frame).
7) Hold the position of rear wheel with
your right foot against the tire so Mando
Footloose does not move during folding,
and fold Mando Footloose by lifting the
seat or centre frame up.
8) Hold the seat or frame with your left
hand and push down the folding lever to
the ‘fixed position’ with your right hand.
9) Roll Mando Footloose by holding the seat.
OFF
6) Unlock the folding lever located in the
center frame by pulling it up (hold the
upper part of the front frame with your
left hand and lift the folding lever with
your right hand).
2. Unfolding Mando Footloose:
Reverse the steps above.
Make sure to place the black pad on the inner side (towards the wheel), and blue pad on the
outer side (away from the wheel).
Once the pad is installed on the caliper, slide the pad spreader clip back to its initial position
(between the pads).
BB7 and BB5 Installation & Set-Up Guide
English
13
SRAM
5
0
0
2
yl
u
J
n
o
it
a
r
o
p
r
o
C
PAD REPLACEMENT (BB5 ONLY)
A pad should be replaced when its total thickness (backing plate and friction material) is less than 3mm.
1. REMOVE THE OLD PADS
Back the inner adjustment knob all the way out (counterclockwise). Pull the pad spreader clip from between the pads, then pull
the pads out of the caliper one at a time.
2. INSTALL THE NEW PADS AND SPREADER
Insert the new pads one at a time into the caliper.
V
ERY IMPORTANT
: M
AKE SURE YOU PLACE THE BLACK PAD ON THE INNER SIDE
(
TOWARDS THE WHEEL
)
AND THE BLUE PAD ON THE OUTSIDE
(
AWAY FROM THE WHEEL
.) O
NCE THE PADS ARE IN THE CALIPER YOU CAN SLIDE THE SPREADER CLIP BACK INTO POSITION
–
BETWEEN THE PADS
.
Pad spreader
Pad
A detailed picture about the pad
spreader clip
Blue pad “Right”
Black pad “Left”
Tips for folding / unfolding
①
Ensure that the power is off before folding / unfolding.
②
Do not turn the power on during folding.
③
After unfolding, lock the folding lever so it is closed properly. If the folding lever is not fixed completely, it may
cause a problem during a ride.


