R
R
W
EPLACING THE MOTOR PROTECTION FUSE
EPLACING THE MAINS FUSE
ORKING WITH THE REMOTE
REMOTE CONTROLLER
Switch the control box off. Unscrew fuse cover and exchange the old fuse for a new one with the same current rating
(indicated on the control box cover next to the fuse). Voltage rating should be at least 50 V. Standard values 110V or
230V are appropriate.
Switch the control box off and remove power supply cable from the socket. Using a screwdriver, open the fuse cover.
Inside you will find one spare fuse. Exchange the old fuse with the new one with the same current and voltage rating,
as indicated on the box ID label.
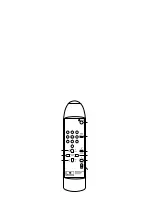
Point the remote controller at the control box Infra Red (IR) sensor and press a button on the remote controller.
Infra red signal reception is indicated by two LEDs at the lower right corner of each display digit.
To ensure optimal IR reception make sure to position the control box so that the IR sensor is not covered by any other
studio equipment and avoid light sources shining directly on the IR sensor - it may significantly reduce reception
sensitivity. The commands are sent for as long as the button is pressed. Some buttons have double functions if pressed
at the same time as the FN button (see fig. Remote controller).
Standby
Background selection keys /
(FN) + ‘5’ change motor direction
All backgrounds
auto up
Auto background up /
(FN) Set high stop position
Auto background down /
(FN) Set low stop position
Manual background down /
(FN) Slow manual background down
Manual background up /
(FN) Slow manual background up
Background number “-”
Background number “+”
Second function (FN)
Fig. 5 Remote controller
8


