background image

ASSEMBLY

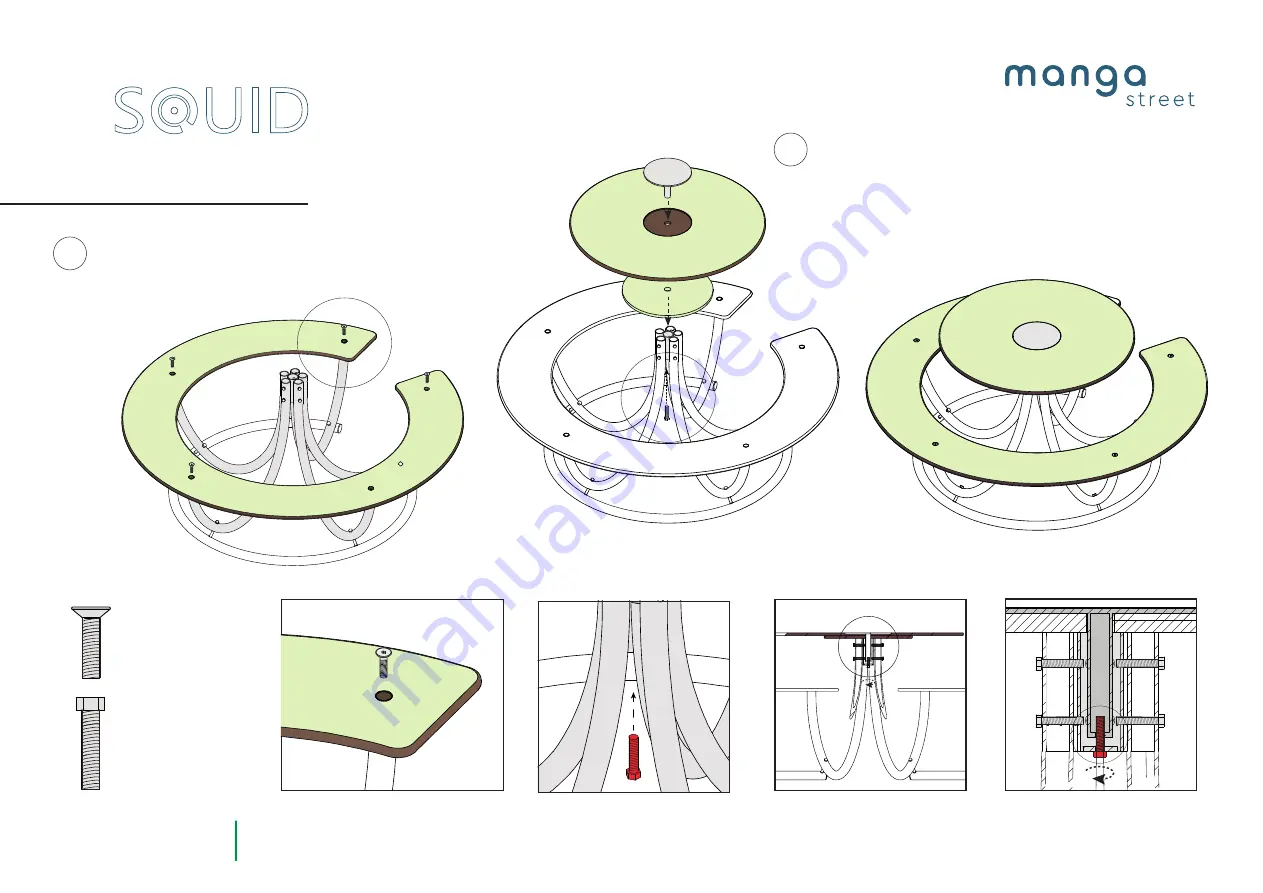
Remove  film  on  the  underside  of  the  bench.  Place  the 

bench on top of the legs and over the holes in the legs. 

Fasten the countersunk screws in each hole with an Allen 

key as shown in 

detail 4

 until the bench is securely fas-

tened

3

4-5

MANGA STREET APS
Web

www.mangastreet.eu

Mail

:

 manga

@

mangastreet.eu

S   UID

SMALL

4

Remove  the  film  on  the  support  and  the  underside  of  the 

table top. Position the support for the table top, the table 

top and the top bracket on top of the legs, so that the pin on 

the top bracket goes down through both and into the centre 

of the centre tube as shown in 

detail 5

. Tighten the supplied 

bolt on to the thread of the top bracket as shown in 

detail 

5 and 6

, so the table top does not wobble and is secure. Re-

move the film from the top of the bench and table top. Squid 

is then ready to use.

DETAIL 5

DETAIL 6

SECTIONAL VIEW OF THE ASSEMBLY

DETAIL 6

SECTIONAL VIEW OF THE  ASSEMBLY

DETAIL 4

1 BOLT

5 countersunk

SCREWS M 10 mm
1 BENCH

1 support

1 TABLE TOP

1 TOP BRACKET

DETAIL 5

DETAIL 4

Summary of Contents for SQUID SMALL

Page 1: ...Table of contents Squid Small dimensions Preparation for assembling Squid Small Assembling the Squid table Squid Small care 1 2 3 4 5 S UID SMALL ...

Page 2: ...ngastreet eu Mail manga mangastreet eu DIMENSIONS SQUID SMALL FROM ABOVE ASSEMBLED WEIGHT 45 kg 99 lbs 143 cm 56 3 in 143 cm 56 3 in 26 cm 10 2 in 34 5 cm 13 6 in 23 4 cm 9 2 in 82 cm 32 3 in 64 cm 25 2 in 143 cm 56 3 in 38 5 cm 15 2 in 25 5 cm 10 in PERSPECTIVE 1 5 ...

Page 3: ... legs See the next page for at taching the legs If the centre tube cannot be attached it or the legs are not positioned correctly S UID SMALL MANGA STREET APS Web www mangastreet eu Mail manga mangastreet eu PREPARATION CENTRE TUBE Where the holes are closest on the centre tube the holes must be turned towards the right and left leg THE 3 LEGS Two holes in the centre LEFT LEG Two holes to the righ...

Page 4: ...t M 10 mm x 45 mm 1 GUIDE RING 5 LEGS DETAIL 3 Washer Middle piece DETAIL 3 5 LEGS 5 TIMES DETAIL 1 5 LEGS 5 TIMES DETAIL 1 DETAIL 2 RIGHT LEG LEFT LEG DETAIL 2 DETAIL 1 GUIDE RING Place a washer on a long bolt The right leg is attached to the guide ring with a long bolt washer and spacer middle piece as shown in detail 1 and according to the instructions above Tighten the bolt Attach the left leg...

Page 5: ...ort for the table top the table top and the top bracket on top of the legs so that the pin on the top bracket goes down through both and into the centre of the centre tube as shown in detail 5 Tighten the supplied bolt on to the thread of the top bracket as shown in detail 5 and 6 so the table top does not wobble and is secure Re move the film from the top of the bench and table top Squid is then ...

Page 6: ...e it with water first if it is covered in earth or sand Liquid soap can be added to the water Tips When it has rained and the table is clean of earth and sand you can use a squeegee to remove the water so you can sit on it immediately after it has rained 5 5 SQUID table CARE MANGA STREET APS Web www mangastreet eu Mail manga mangastreet eu S UID SMALL ...

Reviews: