background image

6

Intended Use

The Airflo


24


by Mangar Health is a low pressure 

air  compressor,  which  has  been  designed  to 

inflate the Mangar ‘Camel’ and ‘ELK’ pneumatic 

lifting  equipment  through  a  4-Way  pneumatic 

hand  control.  The  4-Way  hand  control  is 

supplied with the Camel and ELK.

Applied Parts

 (Accessories) for the Airflo


24:

Mangar ELK (Emergency lifting cushion)

Mangar Camel (Emergency lifting cushion)

Contents

Intended Use  

Pg 6

Warnings 

Pg 6

Battery Status Indicator 

Pg 7

Battery Charging 

Pg 8

Mains Power Adaptor 

(optional)


Pg 9

Operation 


Pg 9

Cleaning & Storage   

Pg 10

Maintenance  

Pg 10

Trouble shooting guide 

Pg 11

Specifications  

Pg 11

Symbols used on Airflo

 24

 and Charger  Pg 12

Symbols used on packaging  

Pg 1

2

Warranty 

Pg 13

Declaration of Conformity   

Pg 5

1

WARNINGS

Be sure  that you have read and understood

these instructions and those provided with


any

other Mangar Health product, before

operating the equipment.

To avoid the risk of electric shock, NEVER

recharge the battery in the bathroom,

outdoors or in a damp environment.

Always  disconnect from the battery charger

before cleaning.

Use only the supplied battery charger.

Do not operate the Airflo


24 

compressor

in the presence of flammable anaesthetic

mixtures with air, oxygen or nitrous oxide,


as

these mixtures can create a combustible

environment leading to the potential for fire


or

even an explosion in the presence of a


spark.

Ensure that when in use, the Airflo


24

 and 

its

connected hoses are laid out in such a way as

to avoid any risk of tripping or strangulation.

Ensure that children and pets do not interfere

with the safe operation of the Airflo 24 and

inflatable product.

Keep the Airflo


24

 and inflatable product away

from sources of heat.

Disconnect the Airflo


24 

compressor from 

the

inflatable product before transporting so as to

avoid accidental inflation.

• The 

Airflo


24

 should only be used for its stated

purpose and should not be modified in any way.

The optional mains power adaptor is


specific

to  the


Airflo


24 and is the only approved


unit

to be


used


for this purpose.

Do not operate the compressor outside of the

specified  duty  cycle  of  20%  ‘Operating  Time’

and  80%  ‘Non-Operating  Time’.  Maximum

continuous operating time = 5 minutes.

To calibrate the battery and battery indicator, it

is essential before the first use to charge for 12

hours and then disconnect from the charger

and leave for 90 minutes to allow the battery

management software to correctly calibrate.

Failure to do this could lead to incorrect

battery charging and battery ladder indication.

This product and associated packaging does not 

contain latex.

The ELK requires assistance  to help lift a patient 

from  the  floor  to  an  elevated  sitting  position. 

Once  in  a  sitting  position,  the  patient  can  be 

transferred  to  a  chair  or  helped  to  a  standing 

position.
The  Camel  can  be  operated  with  or  without 

assistance  and  when  inflated,  lifts  the  patient 

into a raised seated position ready to stand.
No special skills or training are required to 

operate the Airflo 24 and its accessories.
Further guidance on operation can be found in 

the individual accessory User Instructions.

The Airflo compressor and applied parts are 

intended for continual re-use as required and 

no special actions or operations are needed to 

achieve this.

English

Airflo 

24

Summary of Contents for Airflo 24

Page 1: ...ealthcare solutions designed for life User Instructions Airflo 24 English Quick Start Guide Pg 2 Deutsch Kurzanleitung Seite 14 Fran ais Guide de d marrage rapide page 26 Nederlands Snelgids pagina 38...

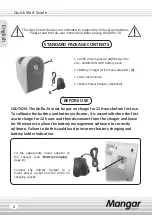
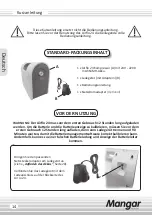
Page 2: ...t be put on charge for 12 Hours before first use To calibrate the battery and battery indicator it is essential before the first use to charge for 12 hours and then disconnect from the charger and lea...

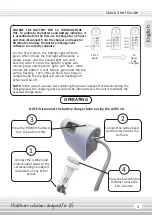
Page 3: ...and leave for 90 minutes to allow the battery management software to correctly calibrate For the first 3 hours the bottom light will flash green After 3 hours the first light will become a steady gre...

Page 4: ...mains in the battery Battery Status Indicator Button UNDERSTANDING THE BATTERY STATUS INDICATOR LIGHTS TO DETERMINE THE BATTERY CHARGE STATE YOU MUST DISCONNECT THE CHARGING LEAD OR REMOVE THE AIRFLO...

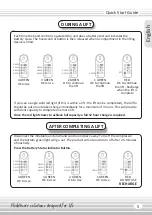
Page 5: ...l is operated the unit does a battery test and indicates the battery state The hand control button is then released when a compartment in the lifting device is filled 4 GREEN OK to Use GREEN GREEN GRE...

Page 6: ...t children and pets do not interfere with the safe operation of the Airflo 24 and inflatable product Keep the Airflo 24 and inflatable product away from sources of heat Disconnect the Airflo 24 compre...

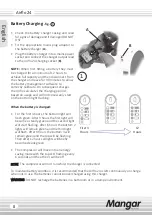
Page 7: ...ery fully recharge the battery after use Fully charge the battery for a minimum of 12 hours before using the Airflo 24 for the first time and when a new battery has been fitted Then disconnect from th...

Page 8: ...t on the bottom light flashing When the battery is charged For the first 3 hours the bottom light will flash green After 3 hours the first light will become a steady green and the second light will st...

Page 9: ...flo 24 Fig 2 NOTE This adaptor has a non standard output connector and powers the Airflo 24 directly it will not charge the battery The only way to charge the battery is to use the charger which was s...

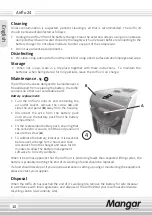
Page 10: ...flo 24 at your local household waste recycling centre civic amenity site Cleaning Unless contamination is suspected periodic cleaning is all that is recommended The Airflo 24 should be cleaned disinfe...

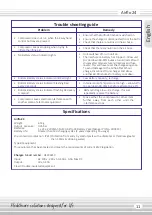
Page 11: ...ng to inflate the lifting aid Check that there are no kinks in the air hose Bottom Battery status indicator Flashing Red every 2 seconds Compressor causes electrical interference with another piece of...

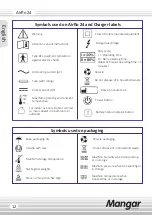
Page 12: ...waste Type BF equipment protection against electric shock Max Min operating environment temperature Attention consult instructions Warning Power Button Date of manufacture Battery Status Indicator But...

Page 13: ...the understanding that in the event of any defect of manufacture or material appearing within the warranty period the defect will be rectified free of charge providing that a Reasonable evidence is p...

Page 14: ...WARNUNG Der Airflo 24 muss vor dem ersten Gebrauch 12 Stunden lang aufgeladen werden Um die Batterie und die Batterieanzeige zu kalibrieren m ssen Sie vor dem ersten Gebrauch 12 Stunden lang aufladen...

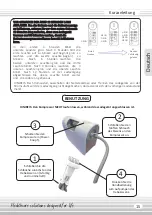
Page 15: ...nuten warten damit die Batteriemanagementsoftware korrekt kalibrieren kann In den ersten 3 Stunden blinkt die unterste Leuchte gr n Nach 3 Stunden h rt die erste Leuchte auf zu blinken und beginnt gr...

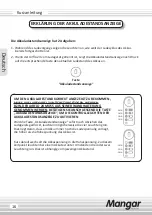
Page 16: ...US SEINER WANDHALTERUNG GENOMMEN WERDEN BET TIGEN SIE ANSCHLIESSEND DIE TASTE AKKULADESTANDSANZEIGE UM DIE KONTROLLLEUCHTEN DER AKKULADESTANDSANZEIGE ZU AKTIVIEREN Wird die Taste Akkuladestandsanzeige...

Page 17: ...wird losgelassen sobald ein Kissensegment der Hebevorrichtung gef llt ist 4 GR N Kann verwendet werden GR N GR N GR N GR N 3 GR N Kann verwendet werden GR N GR N GR N 2 GR N Anhebevorgang kann fortges...

Page 18: ...d verstanden haben bevor Sie die Hebehilfen in Betrieb nehmen Um die Gefahr eines elektrischen Schlags zu vermeiden laden Sie den Akku NIE im Badezimmer im Freien oder in einer feuchten Umgebung auf T...

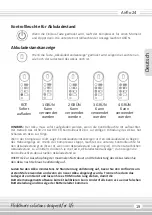
Page 19: ...zu ermitteln dr cken S ie d ie Taste Akkuladestandsanzeige d ann zeigen die Kontrollleuchten den aktuellen Akkuladestand an WICHTIG Zur Aussch pfung der maximalen Nutzdauer und Hebeleistung des Akkus...

Page 20: ...te gr n Nach 3 Stunden h rt die erste Leuchte auf zu blinken und beginnt gr n zu leuchten und die zweite Leuchte beginnt zu blinken Nach 6 Stunden leuchten die beiden untersten Leuchten gr n und die d...

Page 21: ...flo 24 direkt ber eine Netzsteckdose mit Strom versorgt werden kann Der Adapter wurde speziell f r den Airflo 24 entwickelt und ist der einzige zugelassene Adapter f r diese Anwendung Schlie en Sie da...

Page 22: ...Reinigen Sie die Au enfl chen mit einem nicht scheuerndenfeuchtenTuchundwarmemWasser TrocknenSiedasGer tvorWiederanschlie en des Ladeger ts mit einem trockenen Tuch gr ndlich ab Lassen Sie keine Feuch...

Page 23: ...eitstechnisch gepr ft und entspricht den derzeitigen EMV Bestimmungen Ladeger t Modellnummer HX2902SR Eingang AC 100v 240v 50 60Hz 0 5A Max Ausgang DC 30v 0 45A Doppelt isoliertes Ger t der Schutzklas...

Page 24: ...Nicht im Hausm ll entsorgen Ger t vom Typ BF Schutz gegen elektrischen Schlag Max min Umgebungstemperatur Achtung Bedienungsanleitung beachten Warnung Ein Aus Taste Herstellungsdatum Taste Akkuladesta...

Page 25: ...n Rechte des Kunden Dieses Produkt wird unter der Pr misse verkauft dass ein Materialfehler oder Herstellungsmangel der innerhalb des Garantiezeitraums auftritt unter folgenden Voraussetzungen kostenf...

Page 26: ...dant 12 heures puis de se d connecter du chargeur et de laisser reposer pendant 90 minutes pour permettre au logiciel de gestion de batterie de se calibrer correctement Le non respect de cette consign...

Page 27: ...s 12 heures le chargement est complet la lumi re du haut continuera mettre une lumi re intermittente et les 3 autres lumi res seront teintes VERT VERT VERT VERT VERT VERT VERT VERT 3 premi res heures...

Page 28: ...IN DE D TERMINER CORRECTEMENT L TAT DE CHARGE DE LA BATTERIE LE CABLE DE CHARGEMENT DOIT D ABORD TRE D CONNECT OU BIEN L AIRFLO 24 DOIT TRE RETIR DU SOCLE DE CHARGEMENT PUIS APPUYER SUR LE BOUTON INDI...

Page 29: ...lumi re rouge pendant une op ration de levage celle ci peut tout de m me tre termin e Cependant l Airflo devra alors tre mis charger sans interruption imm diatement pendant un minimum de 3 heures Ceci...

Page 30: ...S recharger la batterie dans une salle de bain l ext rieur ou dans un milieu humide Avant chaque nettoyage d brancher syst matiquement l quipement du chargeur de batterie Utiliser uniquement le charge...

Page 31: ...rie mettra tout en bas une lumi re verte qui sera rouge si la charge de la batterie est basse Afin de d terminer l tat r el de la batterie suite une op ration de levage appuyer sur le bouton Indicateu...

Page 32: ...premi res heures le voyant du bas mettra une lumi re intermittente verte Apr s 3 heures le premier voyant mettra une lumi re verte en continu et le deuxi me voyant commencera mettre une lumi re inter...

Page 33: ...appuyersurlebouton Marche arr t Le voyant de l indicateur du bas s teindra La pompe de l Airflo s teindra aussi automatiquement si elle reste inactive pendant au moins 2 5 minutes Adaptateur alimentat...

Page 34: ...pas laisser d humidit entrer dans aucune des pi ces du compresseur Ne pas utiliser de produits base de solvant D sinfection Effectuer un nettoyage au pr alable en utilisant un chiffon humide puis d si...

Page 35: ...la norme en vigueur CEM Chargeur Num ro du mod le HX2902SR Entr e AC 100v 240v 50 60Hz 0 5A Max Sortie DC 30v 0 45A Equipement de Classe II double isolation Airflo 24 Absence de voyant indicateur de...

Page 36: ...s m nagers Equipement de type BF protection contre chocs lectriques Temp rature ambiante de fonctionnement Max Min Attention consulter les instructions Avertissement Bouton Power Date de fabrication B...

Page 37: ...oits l gaux des consommateurs Ce produit est vendu sachant qu en cas de d faut de fabrication ou de mat riau apparaissant pendant la dur e de garantie le d faut sera rectifi sans frais condition que a...

Page 38: ...en vervolgens de stekker uit het stopcontact te halen en 90 minuten te laten staan om de batterijbeheersoftware correct te laten kalibreren Als u dit niet doet kan dit leiden tot onjuist opladen van d...

Page 39: ...de batterij indicator te kalibreren is het essentieel dat deze voor het eerste gebruik 12 uur oplaadt en 90 minuten afkoelt De eerste 3 uur knippert het onderste lampje groen Na 3 uur brandt het eers...

Page 40: ...N DE STATUSLAMPJES VAN DE BATTERIJ DE OPLAADKABEL MOET EERST WORDEN LOSGEKOPPELD OF DE AIRFLO 24 MOET VAN DE BERGPLANK WORDEN VERWIJDERD OM DE JUISTE LADING VAN DE BATTERIJ TE KUNNEN ZIEN DRUK VERVOLG...

Page 41: ...handbedieningsknop wordt uitgeschakeld als een onderdeel van het tilapparaat is opgeblazen 4 GROEN Batterij kan worden gebruikt GROEN GROEN GROEN GROEN 3 GROEN Batterij kan worden gebruikt GROEN GROE...

Page 42: ...geleverd heeft gelezen en begrepen voordat u de uitrusting gaat gebruiken Laad de batterij NOOIT op in de badkamer buitenshuis of in een vochtige omgeving om het risico van een elektrische schok te vo...

Page 43: ...bekijken drukt u op de knop Batterijstatus De lampjes geven dan de huidige status van de lading weer BELANGRIJK Om zowel de levensduur als de tilprestaties van de batterij te optimaliseren dient u de...

Page 44: ...flo 24 De eerste 3 uur knippert het onderste lampje groen Na 3 uur brandt het eerste lampje constant groen en begint het tweede lampje te knipperen Na 6 uur branden de onderste twee lampjes constant g...

Page 45: ...onderste lampje gaat uit De Airflo pomp wordt ook automatisch uitgeschakeld als het apparaat langer dan 2 5 minuut inactief blijft Netvoedingsadapter optioneel De Airflo 24 kan rechtstreeks op netvoe...

Page 46: ...droog voordat het apparaat weer op de batterijlader wordt aangesloten Zorg dat er geen vocht in de compressor binnendringt Gebruik geen oplosmiddelen Desinfecteren Reinig eerst alle oppervlakken met...

Page 47: ...nummer HX2902SR Ingang AC 100v 240v 50 60Hz 0 5A Max Uitgang DC 30v 0 45A Dubbel ge soleerde klasse II uitrusting Airflo 24 De compressor stopt steeds wanneer ik het hefmiddel opblaas Controleer of de...

Page 48: ...weggooien bij het huishoudelijk afval Type BF uitrusting bescherming tegen elektrische schok Max min omgevingstemperatuur voor gebruik Let op raadpleeg de instructies Waarschuwing Aan uit knop Datum...

Page 49: ...als consument Dit product is verkocht met dien verstande dat indien er binnen de garantieperiode een defect in materiaal of fabricage optreedt dit defect dan gratis zal worden hersteld mits a Redelijk...

Page 50: ...Healthcare solutions designed for life 50 Airflo 24...

Page 51: ...Equipment General requirements for basic safety and essential performance IEC 60601 1 11 Medical Electrical Equipment Requirements for use in the home care environment IEC 60601 1 2 Medical Electrical...

Page 52: ...olutions designed for life MI0439 Issue 8 08 20 Mangar International Ltd Presteigne Powys Wales LD8 2UF United Kingdom Tel 44 0 1544 267674 Fax 44 0 1544 260287 E mail sales mangarhealth com www manga...

Reviews: