4
ENGLISH
Initial Setup
Connecting
You can connect the headset two ways to enjoy audio:
•
Create a wireless connection to a mobile device or computer that features
Bluetooth
wireless
technology (see
Bluetooth Pairing
below);
or
•
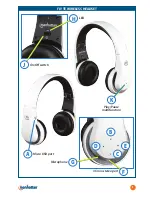
Use the included 3.5mm stereo cable to connect (
F
) to an audio source (which doesn’t require
charging the battery first). Note: The function buttons — Play/Pause (
K
), Volume Up/Down (
B
,
C
)
and Previous/Next (
D
,
E
) — work only during Bluetooth wireless operation.
Built-in Battery Charging
Prior to initial use as a wireless headset, the built-in battery needs to be charged. A full charge can take
up to 3 hours, but you can listen to music or make phone calls while charging (the audio device is
displayed in the computer).
1
Use the included USB-to-micro USB cable to
connect the headset (
A
) to a powered
computer.
2
The LED (
H
) lights red while charging and turns
off when the charge is complete. Note: The LED
flashes red to indicate low voltage (with a vocal prompt every 60 seconds). Re-charge the battery
as soon as you can. For details, see
About the Battery
below.
Bluetooth Pairing & Wireless Operation
This product utilizes the latest in Bluetooth wireless technology; wireless performance may vary from
device to device. If using this product with a Mac or PC, ensure that your Bluetooth driver is up to
date. If it isn’t, visit your computer manufacturer’s website for details and updates.
1
Set the headset’s On/Off switch (
J
) to On (Standby mode).
2
Press the
u
II
(
K
) and
–
(
C
) buttons simultaneously for about 3 seconds, until the LED (
H
) alternately
flashes red and blue.
3
Referring as needed to the manual of your phone, tablet, computer, etc., activate your device’s
Bluetooth function and search for Bluetooth devices. Note: Be sure that you are familiar with the
Bluetooth operation of your source device.
4
Once the device finds “Flyte Wireless Headset,” an on-screen prompt will ask if you’re ready for
pairing. Click or press OK or Confirm to continue. Note: If the device prompts you to enter a PIN,
enter 0000 and click or press Yes or Confirm to continue.
•
After a successful connection is made, the LED (
H
) will flash blue 3 times, then flash once every 5
seconds. If the pairing has failed and the LED is still alternately flashing red and blue, the pairing
procedure needs to be re-initiated on your source device.
Making Voice-Activated Calls
In Standby mode, double-press the
u
II
button (
K
) and listen for the beep that indicates you can start
to voice dial for hands-free operation. Note: Not all phones feature this option. If this option is available,
speak the name of the person you wish to call into the microphone (
G
) and the call should be placed.
Mode
Description
Standby
Flashes blue once
every 5 seconds
Low battery Flashes red every 5
seconds with a vocal
prompt every 60
seconds
Mode
Description
Incoming call Flashes blue rapidly
Charging
Lights red
Powering on Flashes blue
Powering off Flashes red
Pairing
Alternately flashes
red and blue
LED Indications


