3-30
D - EVERY 500 HOURS SERVICE
Carry out the operations described previously as well as the following operations.
D1 - I.C. ENGINE OIL
DRAIN
D2 - I.C. ENGINE OIL FILTER
CHANGE
Place the lift truck on level ground, let the I.C. engine run at idle for a few minutes, then
stop the I.C. engine.
DRAINING THE OIL
- Open the I.C. engine bonnet.
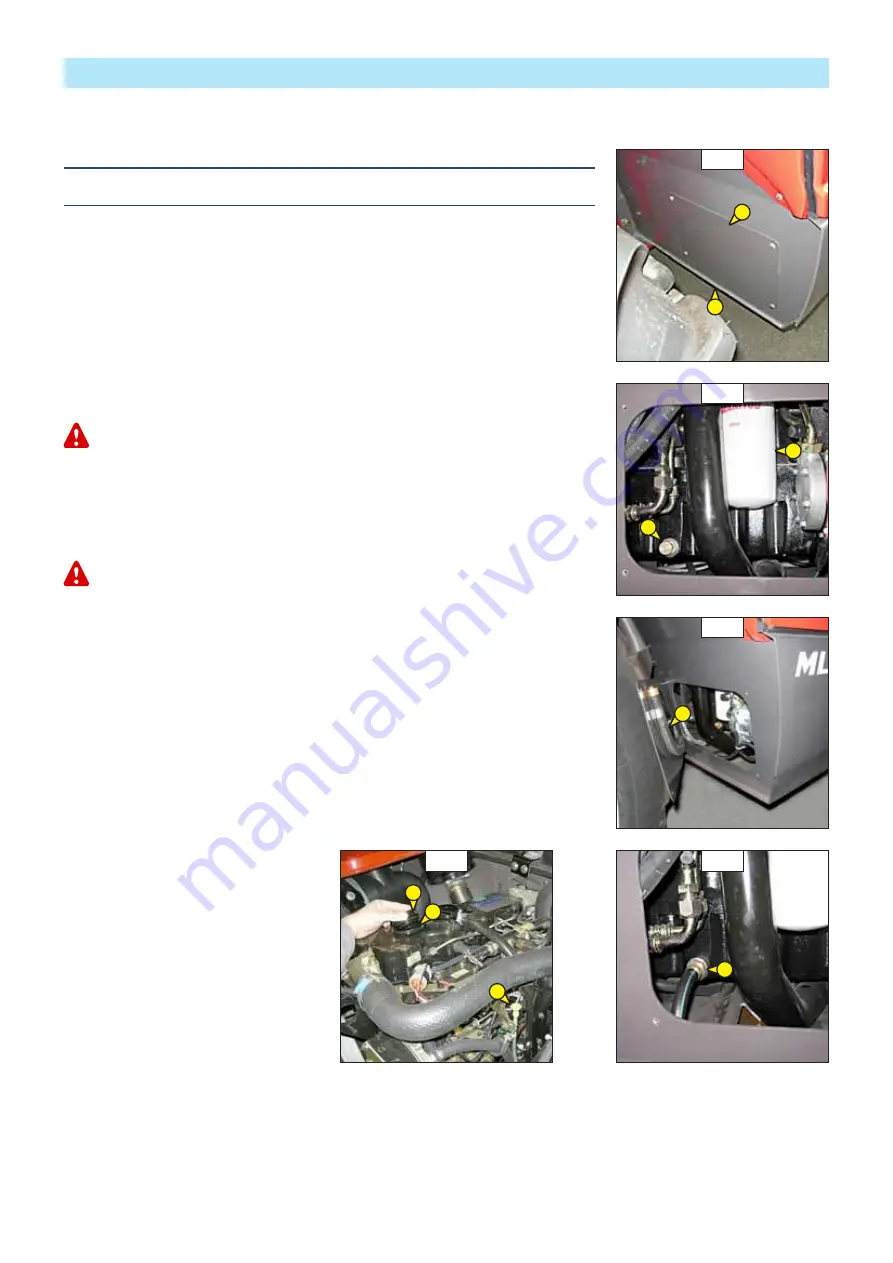
- Remove access panel 1 (fig. D1/1).
- Place a container under drain plug 2 (fig. D1/1) and unscrew the plug 3 (fig. D1/2).
- Take drain hose 4 (fig. D1/3).
- Place the end of the drain hose in the container 2 (fig. D1/1) and screw fully the union on
draining port 5 (fig. D1/4).
- Remove filler cap 6 (fig. D1/5) in order to ensure that the oil is drained properly.
Dispose of the drain oil in an ecological manner.
REPLACEMENT OF THE FILTER
- Remove I.C. engine oil filter 7 (fig. D1/2); discard the filter and the filter seal.
- Clean the filter bracket with a clean, lint-free cloth.
- Lightly grease the new oil filter seal and refit the oil filter (see: 3 - MAINTENANCE: FILTERS
CARTRIDGES AND BELTS) on the filter bracket.
Tighten the oil filter by hand pressure only and lock the filter in place by a quarter turn.
FILLING UP THE OIL
- Loosen, clean and put back in place the drain hose 4 (fig. D1/3).
- Refit and tighten drain plug 3 (fig. D1/2).
- Refit access panel 1 (fig. D1/1).
- Fill up with oil (see: 3 - MAINTENANCE: LUBRICANTS AND FUEL) through filler por t 8 (fig.
D1/5).
- Wait a few minutes to allow the oil to flow into the sump.
- Star t the I.C. engine and let it run for a few minutes.
- Check for possible leaks at the drain plug and the oil filter.
- Stop the I.C. engine, wait a few minutes and check the level between the two notches on
dipstick 9 (fig. D1/5).
- Top up the level if necessar y.
D1/2
7
3
D1/4
5
D1/1
1
2
D1/3
4
D1/5
6
9
8
Summary of Contents for 6-E3 Series
Page 2: ......
Page 4: ......
Page 5: ...1 1 1 OPERATING AND SAFETY INSTRUCTIONS...
Page 6: ...1 2...
Page 32: ...1 28...
Page 33: ...2 1 2 DESCRIPTION...
Page 34: ...2 2...
Page 111: ...2 79...
Page 124: ...2 92...
Page 125: ...3 1 3 MAINTENANCE...
Page 126: ...3 2...
Page 133: ...3 9...
Page 143: ...3 19...
Page 149: ...3 25...
Page 172: ...3 48...
Page 173: ...4 1 4 OPTIONAL ATTACHMENTS FOR USE WITH THE RANGE...
Page 174: ...4 2...
Page 176: ...4 4...
Page 191: ...5 1 5 SPECIFIC AUSTRALIA See also the operator s manual supplement 647065 AU...
Page 192: ...5 2...


