3-37
E3 - GEAR BOX OIL
DRAIN
E4 - GEAR BOX SUMP STRAINER
CLEAN
MLT 634 Turbo LSU Série F-E3
MLT 634 -120 LSU Série F-E3
MLT 731 Turbo Série F-E3
MLT 735 Turbo LSU Série 6-E3
MLT 735 -120 LSU Série 6-E3
MLT 741 Turbo LSU Série 6-E3
MLT 741 -120 LSU Série 6-E3
MLT 1035 L Turbo LSU Série 6-E3
Place the lift truck on level ground with the I.C. engine stopped, the gear box oil still
warm.
DRAINING THE OIL
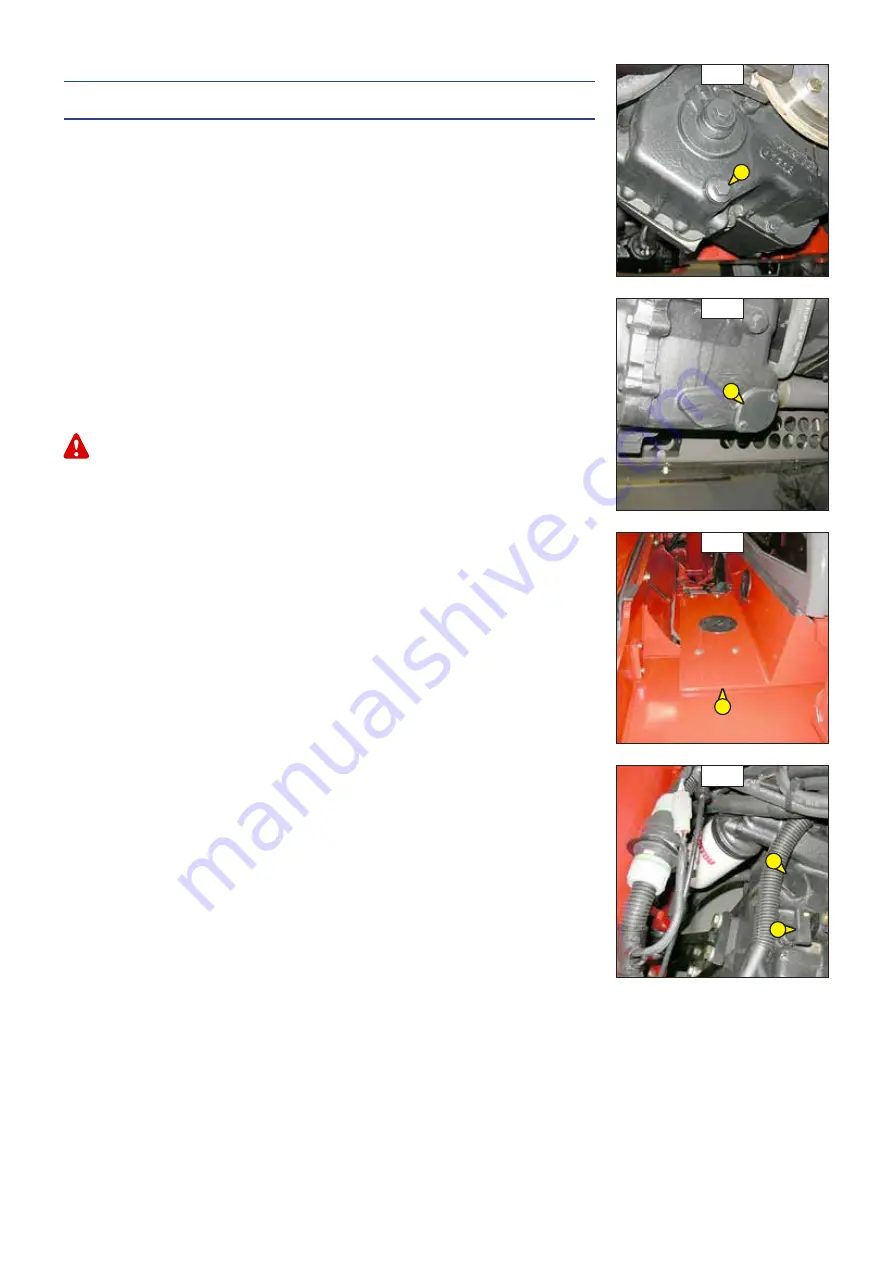
- Place a container under drain plug 1 (fig. E3/1) and under cover 2 (fig. E3/2) and unscrew
the drain plug.
- Remove cover plate 3 (fig. E3/3).
- Remove dipstick 4 (fig. E3/4) and unscrew filling plug 5 (fig. E3/4) in order to ensure that
the oil is drained properly.
Dispose of the drain oil in an ecological manner.
CLEANING THE STRAINER
- Remove cover 2 (fig. E3/2) and set aside the O-ring joint and sealing washer.
- Allow the rest of the oil to drain away.
- Remove and clean the strainer using a compressed air jet.
- Clean the magnetic section on the plate.
- Refit the assembly and tighten up plate 2 (fig. E3/2) (tightening torque 18 to 31 N.m).
FILLING UP THE OIL
- Refit and tighten drain plug 1 (fig. E3/1) (tightening torque 34 to 54 N.m).
- Fill up with oil (see: 3 - MAINTENANCE: LUBRICANTS AND FUEL) by filler por t 5 (fig. E3/4)
and refit the filler cap.
- Star t the I.C. engine and let it run for a few minutes.
- Check any possible leaks from the drain plug or cover.
- Stop the I.C. engine, and within 5 minutes of the I.C. engine being stopped, check on the
dipstick 4 (fig. E3/4) the correct level between the two MIN and MAX. marks.
- Top up the level if necessar y.
- Put back the cover plate 3 (fig. E3/3).
E3/1
1
E3/3
3
E3/4
5
4
E3/2
2
Summary of Contents for 6-E3 Series
Page 2: ......
Page 4: ......
Page 5: ...1 1 1 OPERATING AND SAFETY INSTRUCTIONS...
Page 6: ...1 2...
Page 32: ...1 28...
Page 33: ...2 1 2 DESCRIPTION...
Page 34: ...2 2...
Page 111: ...2 79...
Page 124: ...2 92...
Page 125: ...3 1 3 MAINTENANCE...
Page 126: ...3 2...
Page 133: ...3 9...
Page 143: ...3 19...
Page 149: ...3 25...
Page 172: ...3 48...
Page 173: ...4 1 4 OPTIONAL ATTACHMENTS FOR USE WITH THE RANGE...
Page 174: ...4 2...
Page 176: ...4 4...
Page 191: ...5 1 5 SPECIFIC AUSTRALIA See also the operator s manual supplement 647065 AU...
Page 192: ...5 2...


