3-58
IT
EN
DE
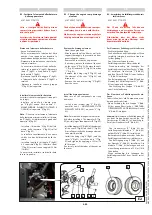
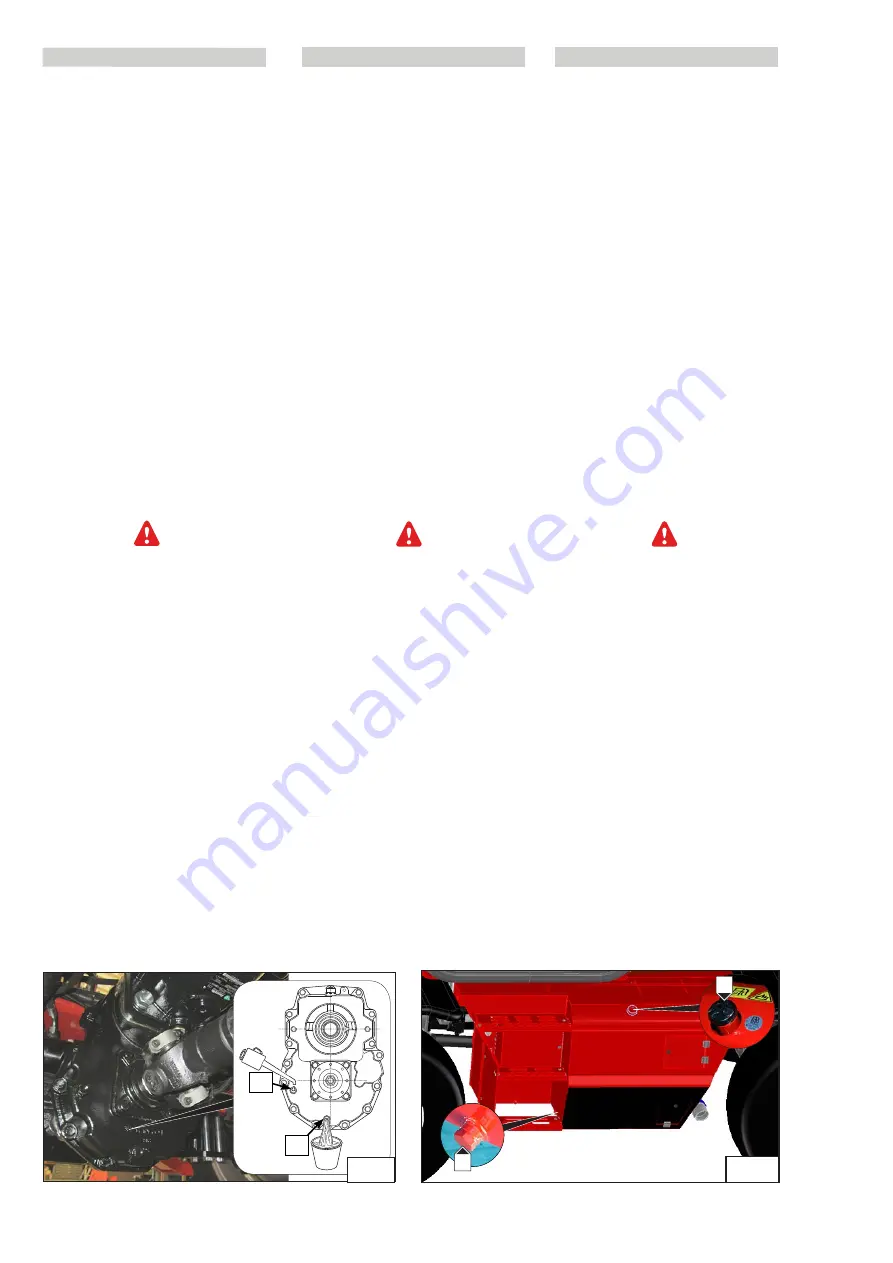
E6 - Change the front axle gearbox oil
Park the lift truck on a horizontal surface
with the I.C. engine switched off and the
reduction gear oil still hot.
Place a container under the drainage cap
“1” (Fig. E6).
Remove the cap 1 (Fig. E6) and drain out
the oil.
Remove the oil level and filler cap “2” (Fig. E6
to ensure complete drainage.
Refit and tighten the cap 1 (Fig. E6).
Fill oil (see ”LUBRICANTS”) through the level
and filler hole 2 (Fig. E6).
The oil level is correct when it flows out
through the opening.
Refit and tighten the level and filler cap “2”
(Fig. E6).
Check for leaks from the drainage cap.
E7 - Clean the fuel tank
It is forbidden to smoke or use free flames
during this intervention.
Never attempt to weld or carry out other
operations, taking into account risks of
explosion or fire.
Position the truck on a level surface, with
the engine switched off.
Unscrew the tank filler cap 2 (Fig. E7) then
place a suitable container under the draina-
ge cap 1 (Fig. E7) and unscrew the cap.
Drain out the fuel and pour 10 litres of clean
fuel through the filler hole 2 (Fig. E7) to
remove impurities, if any.
Refit and tighten the drainage cap 1 (Fig.
E7). Fill the tank with clean fuel and refit the
cap 2 (Fig. E7).
1
2
E7
E7
2
1
E6
1
2
E6 - Sostituire olio scatola cambio assale
anteriore
Posizionare il carrello su di una superficie
orizzontale con il motore fermo e l’olio del
riduttore ancora caldo.
Porre un recipiente sotto al tappo di svuota-
mento 1(fig.E6).
Togliere il tappo 1(fig.E6) e lasciare defluire
l’olio.
Togliere il tappo di livello e riempimento
2 (fig.E6) per assicurare uno svuotamento
completo.
Rimettere e serrare il tappo 1 (fig.E6).
Mettere l’olio (vedere “LUBRIFICANTI”) att-
raverso il foro di livello e riempimento 2
(fig.E6).
Il livello é corretto quando l’olio affiora dal
foro.
Rimettere e stringere il tappo di livello e
riempimento 2 (fig.E6).
Controllare eventuali perdite dal tappo di
svuotamento.
E7 - Pulire serbatoio combustibile
È vietato fumare o avvicinarsi con una
fiamma libera durante questo intervento.
Non cercare mai di effettuare da soli una
saldatura o qualsiasi altra operazione,
tenuto conto dei rischi di esplosione o di
incendio.
Posizionare il carrello su di una superficie
orizzontale e con il motore fermo.
Svitare il tappo 2 (fig. E7) di riempimento
serbatoio poi collocare un recipiente ade-
guato sotto il tappo di svuotamento 1 (fig.
E7) e svitare il tappo.
Lasciare defluire il carburante ed introdurre
10 litri di carburante pulito attraverso il foro
di riempimento 2 (fig. E7) per eliminare
eventuali impurità.
Rimontare e serrare il tappo di svuotamen-
to1 (fig. E7).
Riempire il serbatoio con carburante pulito
e rimettere il tappo 2 (fig. E7).
E6 - Getriebegehäuseöl der Vorderachse
wechseln
Das Fahrzeug auf einer waagerechten Stelle
mit stehendem Motor und noch warmem
Öl des Endantriebs abstellen.
Einen Auffangbehälter unter die
Ablassschraube 1 (Abb. E6) stellen.
Die Ablassschraube 1 (Abb. E6) entfernen
und das Öl ablaufen lassen.
Den Ölstand- und Öleinfüllstopfen 2 (Abb.
E6) entfernen, um die komplette Entleerung
sicherzustellen.
Den Stopfen 1 (Abb. E6) einsetzen und fest-
ziehen. Öl (siehe “SCHMIERMITTEL”) durch
die Einfüllöffnung 2 (Abb. E6) einfüllen.
Der Ölstand ist korrekt, wenn das Öl bis zur
Öffnung reicht.
Die Ölstandschraube und den Einfüllstopfen
2 (Abb. E6) wieder einsetzen und festziehen.
Die Ablassschraube auf Dichtheit prüfen.
E7 - Kraftstofftank reinigen
Rauchen oder offenes Feuer ist bei dieser
Wartungsarbeit verboten.
Versuchen Sie niemals, Schweiß- oder
sonstige Arbeiten am Kraftstoffbehälter
selbst durchzuführen. Explosions- und
Brandgefahr.
Das Fahrzeug auf einer waagerechten
Fläche mit stillstehendem Motor abstellen.
Den Einfüllstopfen 2 (Abb. E7) des Behälters
abschrauben und dann einen geeigneten
Auffangbehälter unter die Ablassschraube
1 (Abb. E7) stellen und diese dann lösen.
Den Kraftstoff abfließen lassen und dann
10 Liter sauberen Kraftstoff durch die
Einfüllöffnung 2 (Abb. E7) einfüllen, um
eventuelle Unreinheiten zu eliminieren.
Die Ablassschraube 1 (Abb. E7) wieder ein-
setzen und festziehen.
Den Tank mit sauberem Kraftstoff füllen und
den Stopfen 2 (Abb. E7) wieder aufsetzen.
649050
IT-EN-DE
(01/06/2017)
MRT
EASY
55P
400
ST4
S2,
MRT
EASY
55P
360
ST4
S2,
MRT
EASY
75P
400
ST3B
S2,
MRT
EASY
75P
360
ST3B
S2,
MRT-X
EASY
75P
400
ST3A
S2,
MRT-X
EASY
75P
360
ST3A
S2


