background image


8

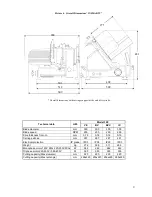
Picture 2 – Overall Dimensions “VX BV SMARTY” 


Picture 3 – Overall Dimensions “VK BVC SMARTY” 


* Overall dimensions with carriage support at the end of its stroke.


* Overall dimensions with carriage support at the end of its stroke.


670 

572 

501 

729* 

572 

389

300 

492 

620 

522 

501 

678* 

389 

572 

557 

300 


Summary of Contents for Smarty 300 IX

Page 1: ...Instructions for use and maintenance Models Smarty 300 VX VE Smarty 300 VX BV Smarty 300 VX BVC Smarty 300 IX Translation of original instructions Edition October 2011 Slicers ...

Page 2: ...odic maintenance of the machine 3 The design of our machines is subject to possible revision and for this reason some models may include parts that differ from those illustrated in this manual This will in no way invalidate the explanations given in the manual 4 The technicians of the Technical Assistance Service TAS authorised by MANCONI represent a wealth of experience gained during years of wor...

Page 3: ...ate with unstable voltage ie with variations that exceed the normal limits of electricity supplier 2 the machine is subjected to cleaning with high pressure water jets steam or water spray 3 the machine is tampered by unauthorized personnel 4 on the machine are used not genuine parts by MANCONI EXTENDED WARRANTY a Warranty will be valid till 12 twelve months from the first installation and testing...

Page 4: ...2 Page intentionally left blank ...

Page 5: ...lity directive 2004 108 CE RoHS directive 2002 95 CE Food Material directive 1935 2004 CE The following harmonised standards or parts thereof were applied EN 1974 1998 Slicing machines Safety and hygiene requirements EN 60204 1 Safety of machinery Electrical equipment of machines Part 1 General requirements EN 55014 Electromagnetic compatibility Requirements for household appliances electric tools...

Page 6: ...ction 4 INSTALLATION 4 1 POSITIONING OF THE MACHINE 14 4 2 ELECTRICAL CONNECTION 14 4 3 FUNCTIONAL CHECKS 17 Section 5 HOW TO USE THE SLICER 5 1 LOADING THE FOODSTUFF AND CUTTING 17 5 1 1 GRAVITY SLICER IX SMARTY 17 5 1 2 STRAIGHT SLICER VX VE SMARTY 18 5 1 3 STRAIGHT SLICER VX BV SMARTY 18 5 1 4 STRAIGHT SLICER VX BVC SMARTY 18 5 2 SHARPENING THE BLADE WITH INTEGRATED SHARPENER 19 Section 6 CLEAN...

Page 7: ...s which can cause skin damage We recommend the use of metal mesh safety gloves Avoid to wear clothes and accessories that can be caught by moving parts of the slicer necklaces bracelets ties scarves ear wire scarves Do not let affection grippers or other accessories work Do not use the slicer for frozen products meat or fish containing bones or for anything except foodstuffs Do not use the machine...

Page 8: ...ty guard does not completely eliminate the risk of cuts in the sharpening area although it drastically reduces the possibility and the extent of injury 1 3 ELECTRICAL SAFETY The protection against electrical risks conforms to Norm EN 60204 and so it complies with the requirements of Directive 2006 95 EC The control circuit has been fitted with a relay that necessitates deliberate relighting of the...

Page 9: ...afety use The group is removable for an easy cleaning operation Safety devices comply with current regulations some of these are made of resistant plastic materials suitable for contact with foodstuffs and are transparent for easier control of the cutting operations Sealed electrical parts and suitable materials make it possible to wash the outside of the slicer with a rain jet of water 2 3 DIMENS...

Page 10: ...RTY Picture 3 Overall Dimensions VK BVC SMARTY Overall dimensions with carriage support at the end of its stroke Overall dimensions with carriage support at the end of its stroke 670 572 501 729 572 389 300 492 620 522 501 678 389 572 557 300 ...

Page 11: ...97 297 297 297 Electrical protection IP grade IPX3 IPX3 IPX3 IPX3 Weight Kg 27 2 30 9 31 1 26 5 Monophase motor 120V 60hz 220 230V 50hz W 242 242 242 242 Triphase motor 220 230V 380 400V W 350 350 350 350 Cutting capacity Max diameter mm 220 220 220 220 Cutting capacity Max rectangle mm 255x220 255x220 255x220 255x220 Overall dimensions with carriage support at the end of its stroke 609 512 501 65...

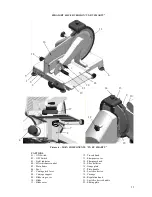
Page 12: ...03 Light indicator 14 Sharpener knob 04 Slice thickness control 15 Slice deflector 05 Main frame 16 Gauge plate 06 Foot 17 Last slice device handle 07 Carriage lock lever 18 Last slice device 08 Carriage support 19 Carriage 09 Blade ring cover 20 Carriage arm 10 Blade 21 Thumb guard 11 Blade cover 1 2 3 4 5 6 7 8 9 10 11 12 13 14 15 16 17 18 19 20 21 ...

Page 13: ...icator 14 Sharpener knob 04 Slice thickness control 15 Slice deflector 05 Main frame 16 Gauge plate 06 Foot 17 Plate handle 07 Carriage lock lever 18 Last slice device 08 Carriage support 19 Carriage 09 Blade ring cover 20 Regulation knob 10 Blade 21 Last slice device handle 11 Blade cover 22 Sliding plate 1 2 3 4 5 6 7 8 9 10 11 12 13 14 15 16 17 18 22 20 21 19 ...

Page 14: ...ener cover 03 Light indicator 14 Sharpener knob 04 Slice thickness control 15 Slice deflector 05 Main frame 16 Gauge plate 06 Foot 17 Plate handle 07 Carriage lock lever 18 Last slice device 08 Carriage support 19 Carriage 09 Blade ring cover 20 Sliding plate 10 Blade 21 Column arm 1 2 3 5 4 6 7 8 17 9 10 12 13 14 15 11 16 18 19 20 21 22 23 ...

Page 15: ...pener cover knob 03 Light indicator 15 Slice deflector 04 Slice thickness control 16 Blade 05 Main Frame 17 Blade ring cover 06 Foot 18 Gauge plate 07 Carriage handle 19 Last slice device handle 09 Carriage knob 20 Last slice device arm 10 Carriage support 21 Last slice device 11 Blade Cover 22 Carriage 12 Tie rod Knob 23 Thumb guard 1 2 3 5 4 6 7 9 10 17 16 11 12 13 14 15 18 19 20 21 22 23 ...

Page 16: ...TALLATION 4 1 POSITIONING THE MACHINE The surface on which the slicer is to stand should allow for the measurements indicated in the overall dimensions and should therefore be sufficiently spacious perfect flat dry smooth stable and at a height of about 80 cm Reevaluate the height considering the height of the operator in charge to use the slicer If it is intended to clean the slicer with a jet of...

Page 17: ...ect call Manconi authorised TAS The three phase motors installed in the machine can operate either with a 380 400V or 220 230V three phase power supply If not otherwise specified slicers are delivered for 308 400V For adaptation to a 220 230V three phase network the Manconi authorised TAS shall be called in Pictures 10 11 12 13 shown the slicers electrical boxes L1 Marrone N Blu 1 Spina 2 Motore P...

Page 18: ...16 Picture 12 Three phase electrical box 230Volt 50 Hz 3P T Picture 13 Three phase electrical box 400Volt 50 Hz 3P N T Motor Plug Brown Grey Black Motor Plug Black Brown Grey Blue ...

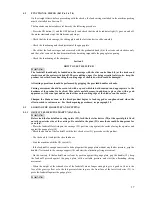
Page 19: ...lice with a good appearance it does not put undue strain either on the cutting edge of the blade or on the motor Sharpen the blade as soon as the sliced product begins to look ragged or roughened and when the effort needed to cut increases For the sharpening procedures see paragraph 5 2 5 1 LOADING THE FOODSTUFF AND CUTTING 5 1 1 GRAVITY SLICER IX SMARTY Ref Pic 8 WARNING Before load the foodstuff...

Page 20: ...18 At the end of the cutting operation return the knob 4 at the stroke end clockwise and switch off the machine with the OFF button 2 ...

Page 21: ...rallel to the blade for the alternating movement of the carriage and perpendicular to the blade for the advance of the product When the reduced dimensions of the product does not allow a satisfactory cut use the front surface of the last slice device 18 to keep the foodstuff well in contact to the gauge plate At the end of the cutting operation return the knob 4 at the stroke end clockwise and swi...

Page 22: ...harpener is provided with a grinding wheel and a finishing grinding wheel To keep both the tools well working they must be cleaned with brush and solvent Too much worn wheels must be replaced by Manconi TAS In view of the extreme simplicity and speed of the operation and thanks to the built in sharpener we would suggest frequent sharpening at least once a day using the following procedure a Raise ...

Page 23: ...cted of rust proof materials and some parts are fitted with guards and seals do not wash the sharpener and the electromechanical parts beneath the main frame All parts of the machine that come in direct or indirect contact with the products to be sliced must be cleaned very thoroughly in conformity to the national laws Use only water and neutral detersive disinfectant PH 7 8 for degreasing clean w...

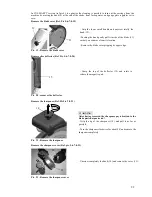
Page 24: ...pener cover Ref pic 5 6 7 8 23 Pic 23 Remove the sharpener cover Grip the lower small handle and unscrew totally the knob 12 Pushing the knob gently pull it inside of the blade 11 so that you can move from its location Remove the blade cover gripping its upper edge Grasp the top of the deflector 15 and rotate to release the magnetic pad 90 WARNING After having removed the sharpener pay attention t...

Page 25: ...Main body cleaning Remove coarse product scraps by hand or with a plastic scraper or knife Deep clean with cloth brush or spray wetted with a suitable cleaning compound Disinfect with cloth sponge or spray wetted with an approved compound Rinse with cloth sponge spray and using clean water WARNING This operation must be done with great attention and concentration cause there is danger of cutting D...

Page 26: ...24 During washing do not direct water jet on parts housed in the basement ...

Page 27: ... the finished grinding wheel when worn Check on the diameter of the blade after sharpening to program replacement with a new one once the blade diameter has been reduced by 10 mm max permissible gap between the blade guard and the cutting edge 6 mm Replacement of a worn blade must be carried out by the authorised TAS Substitute the blade by TAS authorised Manconi when the gap between the blade and...

Page 28: ...ong with their causes and the actions to remove them If a malfunction persists contact the TAS authorized by MANCONI DEFECT PROBABLE CAUSE REMEDY Motor does not start when the ON button is pressed No power is applied to the machine No power supply from the electrical mains Defective electrical circuit Check that the machine is plugged in correctly Check the electrical mains Contact the MANCONI aut...

Page 29: ...NCONI authorized TAS to replace the blade Irregular sliding of the carriages Sliding rails not enough lubricated Damaged self lubricating rollers bearings and bushings Lubricate Contact the MANCONI authorized TAS to replace the damaged parts It is difficult or impossible to remove the carriage when at its stroke end operator side and with the gauge plate closed Carriage can be removed in any other...

Reviews: