background image

USER’S MaNUal

20

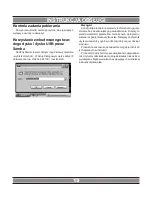
Step 1: Select the hard disk to be formatted and press OK, 

and the system access to the interface of format warning.

Step 2: In the interface of format warning, press Confirm 

to go to the next step. If you don’t want format the hard disk, 

Select Cancel or press Return on the remote control. 

Step 3: Use the up and down keys on the remote control 

to set time shifting and press Advance after the preset space 

is left. To return to the previous step, press Return. 

Step 4: Select Format to start the formatting process. 

Remember not to do any other operation during formatting. 

To return to the previous step, press Return. 

Step 5: After formatting, press Confirm in the popped 

up menu.

audio

This item is used to set the output sound, and options are 

night mode, HDMI output, SPDIF output, Surround.

Night mode

Three options are available for night mode. 

OFF:  Regular  output,  without  any  setting  for  the 

volume. 

ON: To turn down the sound in a overall manner to improve 

the sound quality. 

COMFORT: To turn down the incisive sound.

HDMI output

Three options are available for HDMI output. LPCM: 

Two-channel digital output.

LPCM Multi-CH: Multi-channel digital output (5.1 > 7.1) . 

RAW: Source code output.

SPDIF output

Two options are available for SPDIF output. LPCM: Two-

channel digital output. 

RAW: Source code output.

Dolby Surround Sound

This item is used to control the surround sound effects, 

with three options: degrade 5.1ch and HD audio. It is used 

when HD audio and DTS-HD need to be degraded.

Video

This item is used to set the output image. The details 

include screen ratio, TV system, video zoom-in/out, 1080P 

24Hz and deep color.

Aspect Ratio

Use this item to adjust the screen ratio, and 4 options are 

available: Pan Scan 4:3, Letter Box 4:3, wide-screen 16:9 

and wide-screen 16:10.

TV system

Use this item to set the image output standard, with range 

from 480i to 1080P 60HZ. Note: If an output standard you set 

is not supported by the TV, black screen will occur

Video zoom-in/out

Use this item to set whether the image on the screen 

should be zoomed in or out.

1080P 24Hz

Enable this item if the TV supports it.

Deep color

To set the deep colors, and 4 modes are available: Auto, 

12bit, 10bit and OFF.

Network

Use this item to set the network connection. Options are: 

cable network, wireless network and PPPOE.

Set the cable network

When the machine is connected to the network, you can 

use this item to set the network connection. Options are 

DHCP IP (auto) and FIX IP (manual).

DHCP IP (auto)

 If you select Yes, the system will be automatically con

-

nected to the network. Once the connection is successful, 

the obtained IP address and subnet mask will appear on 

the screen. 

FIX IP (manual)

For this item, you should manually set the IP address, 

subnet mask, default gateway, DNS server and IP address, 

and press OK on the remote control to confirm. The system 

will then prompt whether the network settings need to be 

saved. If you select Yes, the network setting will be com

-

pleted successfully.

Wireless network setting

After the machine is connected to the wireless network 

adapter, you can set the network connection through this 

item.

3) Common connection method: Select the network to be 

connected and press OK. If this network requires a pass

-

word, you should enter the password in the related field and 

press OK. At the time, the system will automatically test the 

network connection. Once the connection is successful, the 

information indicating the success will appear.

4) Ad Hoc: After you select a wireless network, press the 

red key on the remote control, and you will access the ad hoc 

mode. When you enter the SSID number for ad hoc connec

-

tion, you can obtain the same IP address as SSID.

Summary of Contents for DVBT05

Page 1: ...MULTIMEDIA HDD PLAYER DVBT05 Instrukcja obsługi User s Manual ...

Page 2: ... Cyber Eye HD to stylowe okulary z ukrytą kamerą pozwalają ce na dyskretne filmowanie i fotografowanie w doskonałej jakości HD Można je wykorzystać jako wygodny aparat do rejestrowania wyczynów sportowych do zastosowań prywatnych rozrywkowych oraz pracy detektywistycznej Łatwa obsługa urządzenia za pomo cą zaledwie dwóch przycisków wysokiej jakości lekkie oprawki spolaryzowane soczewki dla ochrony...

Page 3: ... ustawionego nagrania 8 Kasowanie ustawionego nagrania 9 Przesunięcie czasu 9 Zarządzanie plikami 9 Przeglądanie plików 9 Filmy 9 Odtwarzanie plików wideo 9 Przeglądanie plików wideo 10 Muzyka 10 Obrazy 10 Odtwarzanie obrazów 10 Ustawienia systemu 11 System 11 Dźwięk 11 Wideo 11 Sieć 12 Inne 12 Obsługa BT i Samba 12 Pobieranie BitTorrent 12 Kontrola zadania pobierania 13 Korzystanie z wbudowanego ...

Page 4: ...Create the preset videotape 17 Delete the preset videotape state 18 Time shift 18 File Management 18 Browse files 18 Film 18 Play the video files 18 Browse the video files 19 Music 19 Picture 19 Play the pictures 19 System setup 19 System 19 Audio 20 Video 20 Network 20 Others 21 Operation of BT and Samba 21 Download BitTorrent 21 Control the download task 21 Visit built in hard disk and U drive t...

Page 5: ... Reset 2 Włącznik wyłącznik 3 USB 1 4 USB 2 5 Kieszeń na dysk 6 Wejście RF 7 Wyjście RF 8 Wejście zasilania 9 Wyjście CVBS 10 Wyjście prawe 11 Wyjście lewe 12 Wyjście optyczne 13 HDMI 14 LAN 15 Mini USB 16 Zasilanie 17 Wyjście Y PB PR 18 Złącze koncentryczne ...

Page 6: ...ków w interfejsie zarządzania plikami 18 Przesunięcie czasu Wykonanie operacji przesunięcia czasu 19 Telegazeta Włączanie interfejsu graficzno teksto wego dla programu TV 20 Wyciszanie Wyłączanie i włączanie dźwięku 21 Informacja Ekran 22 Proporcje Ustawianie proporcji obrazu 23 Przycisk TV SYS przełącza między trybami PAL NTSC 480 575 720 180 24 Poprzedni następny Odtwarzanie poprzedniego następn...

Page 7: ...ób 1 W trybie bieżącego kanału wprowadź numer żądanego kanału i naciśnij OK 2 W trybie bieżącego kanału naciśnij OK i wybierz pro gram z listy 3 W trybie bieżącego kanału naciśnij Powrót na pilocie a system przełączy się na poprzednio oglądany kanał Po zmianie kanału system wyświetli informacje o tym kanale Ustawianie głośności Podczas oglądania programu TV naciśnij przyciski głośno ści na pilocie...

Page 8: ...agrywania dostępne są trzy opcje nagrywanie w czasie rzeczywistym nagrywanie ustawione i nagrywanie w trybie EPG Nagrywanie w czasie rzeczywistym Podczas oglądania programu TV w trybie pełnoekrano wym naciśnij przycisk Nagrywanie na pilocie lub naciśnij Opcje aby przejść do menu opcji wybierz Nagrywanie i naciśnij OK Bieżący program będzie nagrywany w czasie rzeczywistym Jeśli naciśniesz Nagrywani...

Page 9: ...ęcia czasu a obraz bieżącego programu zatrzyma się Aby kon tynuować oglądanie naciśnij przycisk Odtwarzanie na pilocie W trybie przesunięcia czasu możesz wykonywać operacje odtwarzania pauzy i przewijania w przód i w tył Zarządzanie plikami Jeśli do urządzenia podłączone są takie urządzenia pe ryferyjna jak dysk USB lub dysk twardy będą one wyświe tlane w pozycji Zarządzanie plikami System przeska...

Page 10: ... operacyjne gdzie mo żesz wybrać tryb przeglądania plików przy użyciu przycisków w górę i w dół Naciśnij OK w celu potwierdzenia Muzyka W pozycji Muzyka możesz wyszukać wszystkie pliki mu zyczne zapisane na urządzeniach peryferyjnych USB dysk twardy i odtwarzać je Naciśnij Muzyka w głównym interfejsie i OK aby przejść do interfejsu muzyki Następnie wybierz plik muzyczny i naciśnij Odtwarzanie lub ...

Page 11: ...niego etapu naciśnij Powrót Krok 4 Wybierz Format aby rozpocząć proces formato wania Pamiętaj aby podczas formatowania nie wykonywać żadnych innych operacji Aby wrócić do poprzedniego etapu naciśnij Powrót Krok 5 Po formatowaniu naciśnij Potwierdź w wyświe tlonym menu Dźwięk Ta pozycja jest używana do ustawiania dźwięku wyjścio wego dostępne są opcje trybu nocnego wyjścia HDMI wyjścia SPDIF Surrou...

Page 12: ...E Naciśnij OK lub Następny aby przejść do klawiatury programowej i wprowadzić konto PPPOE na ciśnij jeszcze raz aby wprowadzić hasło Po poprawnym wprowadzeniu hasła system automatycznie połączy się z siecią Gdy połączenie będzie uzyskane na ekranie pojawią się odpowiednie parametry Bezprzewodowy PPPOE Jedyną różnicą między try bem bezprzewodowym i przewodowym jest fakt iż przed połączeniem bezprze...

Page 13: ...onstrukcja produktu i parametry techniczne mogą ulec zmianie bez wcześniejszego powiadomienia Dotyczy to przede wszystkim parametrów technicznych oprogramo wania oraz podręcznika użytkownika Niniejszy podręcznik użytkownika służy ogólnej orientacji dotyczącej obsługi produktu Produkt oraz akcesoria do telewizora mogą się różnić od tych opisanych w instrukcji Producent i dystrybutor nie ponoszą żad...

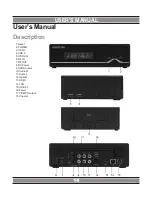
Page 14: ...al 14 User s Manual Description 1 Reset 2 POWER 3 USB 1 4 USB 2 5 HDD slot 6 RF IN 7 RF OUT 8 DC Power 9 CVBS output 10 Audio R 11 Audio L 12 Optical 13 HDMI 14 LAN 15 USB 3 0 16 Power 17 Y PB PR output 18 Coaxial ...

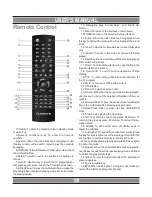
Page 15: ...he file in the file administration interface 18 Time Shift To carry out the operation of time shifting 19 TTX To call out the graphic and text interface for the TV program 20 Mute To turn on or off the audio output 21 Info Display 22 Ratio To adjust the screen ratio 23 Screen When the video or pictures are being played use this key to call out the detailed information of the cur rent file 24 Previ...

Page 16: ...can press INFO to call out the menu of channel information and view that of the current channel Option menu In watching the TV program you can press Option on the remote control to call out the Option Menu where you can carry out the operations said below EPG To call out EPG menu Edit To edit the channel Videotape To videotape the TV program being currently watched Time Shift To carry out time shi...

Page 17: ...l to call out the option menu where you can select EPG to call out the EPG menu With EPG menu you can use the remote control to select the program to be videotaped Then press Record on the remote control to videotape the program in a preset way Timed videotape With timed videotaping the user can set the videotaping time and repeat the videotape mode based on his needs For that purpose press Timer ...

Page 18: ...a To display all files video music and picture and folders Display films Only to display the video files and folders Display pictures Only to display the picture files and folders Display music Only to display the music files and folders You can use the up and down keys on the remote control to select the browse mode you desire and press OK to confirm it Film In this item all the video files saved...

Page 19: ...DD are displayed in the item Picture To access this item select Picture in the main interface and press OK Play the pictures Operation procedures Select the picture and press Play or OK to play it in full screen The keys on the remote control can be operated as follows in playing the pictures Previous Next To switch to the preview next picture Left Right To switch to the up down picture When the p...

Page 20: ... 3 wide screen 16 9 and wide screen 16 10 TV system Use this item to set the image output standard with range from 480i to 1080P 60HZ Note If an output standard you set is not supported by the TV black screen will occur Video zoom in out Use this item to set whether the image on the screen should be zoomed in or out 1080P 24Hz Enable this item if the TV supports it Deep color To set the deep color...

Page 21: ...rogram This item is used to set whether the BitTorrent program should be run If it is disabled BitTorrent downloading can t be realized Samba program This item is used to set whether the Samba program should be run If it is disabled Samba services can t be accessed BT Samba security Use this item to set whether the account and password should be entered when the BT or Samba program needs to be acc...

Page 22: ...22 NOTE ...

Page 23: ...23 NOTE ...

Page 24: ...a tel 48 22 332 34 63 lub e mail serwis manta com pl od poniedziałku do piątku w godz 9 00 17 00 Producent zastrzega sobie możliwość wprowadzenia zmian w specyfikację produktu bez uprzedzenia Made in P R C FOR MANTA EUROPE ...

Reviews: